Mesos Architecture
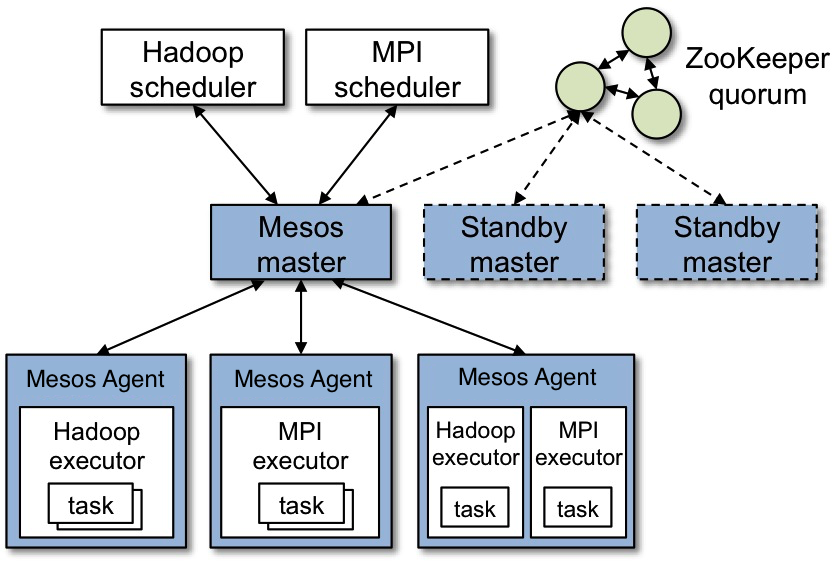
The above figure shows the main components of Mesos. Mesos consists of a master daemon that manages agent daemons running on each cluster node, and Mesos frameworks that run tasks on these agents.
The master enables fine-grained sharing of resources (CPU, RAM, ...) across
frameworks by making them resource offers. Each resource offer contains a list
of <agent ID, resource1: amount1, resource2: amount2, ...> (NOTE: as
keyword 'slave' is deprecated in favor of 'agent', driver-based frameworks will
still receive offers with slave ID, whereas frameworks using the v1 HTTP API receive offers with agent ID). The master decides how many resources to offer to each framework according to a given organizational policy, such as fair sharing or strict priority. To support a diverse set of policies, the master employs a modular architecture that makes it easy to add new allocation modules via a plugin mechanism.
A framework running on top of Mesos consists of two components: a scheduler that registers with the master to be offered resources, and an executor process that is launched on agent nodes to run the framework's tasks (see the App/Framework development guide for more details about framework schedulers and executors). While the master determines how many resources are offered to each framework, the frameworks' schedulers select which of the offered resources to use. When a framework accepts offered resources, it passes to Mesos a description of the tasks it wants to run on them. In turn, Mesos launches the tasks on the corresponding agents.
Example of resource offer
The figure below shows an example of how a framework gets scheduled to run a task.
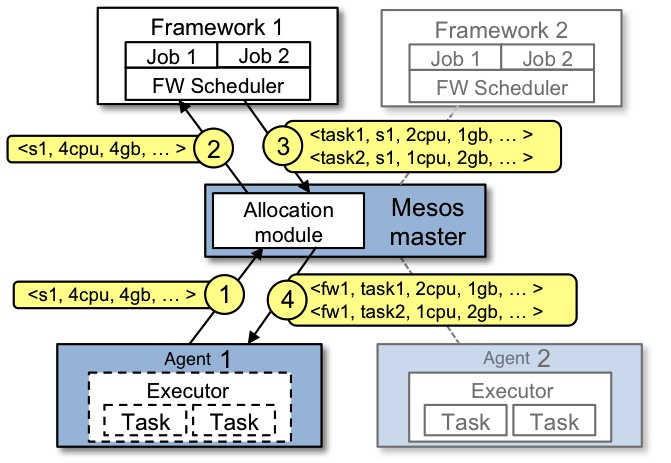
Let's walk through the events in the figure.
- Agent 1 reports to the master that it has 4 CPUs and 4 GB of memory free. The master then invokes the allocation policy module, which tells it that framework 1 should be offered all available resources.
- The master sends a resource offer describing what is available on agent 1 to framework 1.
- The framework's scheduler replies to the master with information about two tasks to run on the agent, using <2 CPUs, 1 GB RAM> for the first task, and <1 CPUs, 2 GB RAM> for the second task.
- Finally, the master sends the tasks to the agent, which allocates appropriate resources to the framework's executor, which in turn launches the two tasks (depicted with dotted-line borders in the figure). Because 1 CPU and 1 GB of RAM are still unallocated, the allocation module may now offer them to framework 2.
In addition, this resource offer process repeats when tasks finish and new resources become free.
While the thin interface provided by Mesos allows it to scale and allows the frameworks to evolve independently, one question remains: how can the constraints of a framework be satisfied without Mesos knowing about these constraints? For example, how can a framework achieve data locality without Mesos knowing which nodes store the data required by the framework? Mesos answers these questions by simply giving frameworks the ability to reject offers. A framework will reject the offers that do not satisfy its constraints and accept the ones that do. In particular, we have found that a simple policy called delay scheduling, in which frameworks wait for a limited time to acquire nodes storing the input data, yields nearly optimal data locality.
You can also read much more about the Mesos architecture in this technical paper.
Video and Slides of Mesos Presentations
(Listed in reverse chronological order)
MesosCon North America 2018
Jolt: Running Distributed, Fault-Tolerant Tests at Scale using Mesos
Video Sunil Shah, Kyle Kelly, and Timmy Zhu Presented November 1, 2017 at Bay Area Mesos User Group Meetup
MesosCon Europe 2017
MesosCon North America 2017
MesosCon Asia 2017
MesosCon Asia 2016
MesosCon Europe 2016
MesosCon North America 2016
MesosCon Europe 2015
MesosCon North America 2015
Building and Deploying Applications to Apache Mesos
Slides Joe Stein Presented February 26, 2015 at DigitalOcean Community Meetup
MesosCon 2014
Datacenter Computing with Apache Mesos
Slides Paco Nathan Presented April 15, 2014 at Big Data DC Meetup
Apache Spark at Viadeo (Running on Mesos)
Video + Slides Eugen Cepoi Presented April 9, 2014 at Paris Hadoop User Group
Mesos, HubSpot, and Singularity
Video Tom Petr Presented April 3rd, 2014 at @TwitterOSS #conf
Building Distributed Frameworks on Mesos
Video Benjamin Hindman Presented March 25th, 2014 at Aurora and Mesos Frameworks Meetup
Introduction to Apache Aurora
Video Bill Farner Presented March 25th, 2014 at Aurora and Mesos Frameworks Meetup
Improving Resource Efficiency with Apache Mesos
Video Christina Delimitrou Presented April 3rd, 2014 at @TwitterOSS #conf
Apache Mesos as an SDK for Building Distributed Frameworks
Slides Paco Nathan Presented February 13th, 2014 at Strata
Run your Data Center like Google's with Apache Mesos
Video and Demo Abhishek Parolkar Presented November 14th, 2013 at Cloud Expo Asia 2013
Datacenter Management with Mesos
Video Benjamin Hindman Presented August 29th, 2013 at AMP Camp
Building a Framework on Mesos: A Case Study with Jenkins
Video Vinod Kone Presented July 25, 2013 at SF Mesos Meetup
Hadoop on Mesos
Video Brenden Matthews Presented July 25, 2013 at SF Mesos Meetup
Introduction to Apache Mesos
Slides Benjamin Hindman Presented August 20, 2013 at NYC Mesos Meetup
Chronos: A Distributed, Fault-Tolerant and Highly Available Job Orchestration Framework for Mesos
Slides Florian Leibert Presented August 20, 2013 at NYC Mesos Meetup
Airbnb Tech Talk
Video Benjamin Hindman Presented September 6, 2012 at Airbnb
Managing Twitter Clusters with Mesos
Video Benjamin Hindman Presented August 22, 2012 at AMP Camp
Mesos: A Platform for Fine-Grained Resource Sharing in Datacenters
Video Matei Zaharia Presented March 2011 at UC Berkeley
Mesos: Efficiently Sharing the Datacenter
Video Benjamin Hindman Presented November 8, 2010 at LinkedIn
Mesos: A Resource Management Platform for Hadoop and Big Data Clusters
Video Matei Zaharia Presented Summer 2010 at Yahoo
Apache Mesos - Paid Training
Automated Machine Learning Pipeline with Mesos
Video Karl Whitford Packt (November 2017)
Docker, Apache Mesos & DCOS: Run and manage cloud datacenter (Video)
Manuj Aggarwal Packt (January 2018)
Mesos Release and Support policy
The Mesos versioning and release policy gives operators and developers clear guidelines on:
- Making modifications to the existing APIs without affecting backward compatibility.
- How long a Mesos API will be supported.
- Upgrading a Mesos installation across release versions.
This document describes the release strategy for Mesos post 1.0.0 release.
Release Schedule
Mesos releases are time-based, though we do make limited adjustments to the release schedule to accommodate feature development. This gives users and developers a predictable cadence to consume and produce features, while ensuring that each release can include the developments that users are waiting for.
If a feature is not ready by the time a release is cut, that feature should be disabled. This means that features should be developed in such a way that they are opt-in by default and can be easily disabled (e.g., flag).
A new Mesos release is cut approximately every 3 months. The versioning scheme is SemVer. Typically, the minor release version is incremented by 1 (e.g., 1.1, 1.2, 1.3 etc) for every release, unless it is a major release.
Every (minor) release is a stable release and recommended for production use. This means a release candidate will go through rigorous testing (unit tests, integration tests, benchmark tests, cluster tests, scalability, etc.) before being officially released. In the rare case that a regular release is not deemed stable, a patch release will be released that will stabilize it.
At any given time, 3 releases are supported: the latest release and the two prior. Support means fixing of critical issues that affect the release. Once an issue is deemed critical, it will be fixed in only those affected releases that are still supported. This is called a patch release and increments the patch version by 1 (e.g., 1.2.1). Once a release reaches End Of Life (i.e., support period has ended), no more patch releases will be made for that release. Note that this is not related to backwards compatibility guarantees and deprecation periods (discussed later).
Which issues are considered critical?
- Security fixes
- Compatibility regressions
- Functional regressions
- Performance regressions
- Fixes for 3rd party integration (e.g., Docker remote API)
Whether an issue is considered critical or not is sometimes subjective. In some cases it is obvious and sometimes it is fuzzy. Users should work with committers to figure out the criticality of an issue and get agreement and commitment for support.
Patch releases are normally done once per month.
If a particular issue is affecting a user and the user cannot wait until the next scheduled patch release, they can request an off-schedule patch release for a specific supported version. This should be done by sending an email to the dev list.
Upgrades
All stable releases will be loosely compatible. Loose compatibility means:
- Master or agent can be upgraded to a new release version as long as they or the ecosystem components (scheduler, executor, zookeeper, service discovery layer, monitoring etc) do not depend on deprecated features (e.g., deprecated flags, deprecated metrics).
- There should be no unexpected effect on externally visible behavior that is not deprecated. See API compatibility section for what should be expected for Mesos APIs.
NOTE: The compatibility guarantees do not apply to modules yet. See Modules section below for details.
This means users should be able to upgrade (as long as they are not depending on deprecated / removed features) Mesos master or agent from a stable release version N directly to another stable release version M without having to go through intermediate release versions. For the purposes of upgrades, a stable release means the release with the latest patch version. For example, among 1.2.0, 1.2.1, 1.3.0, 1.4.0, 1.4.1 releases 1.2.1, 1.3.0 and 1.4.1 are considered stable and so a user should be able to upgrade from 1.2.1 directly to 1.4.1. Look at the API compatability section below for how frameworks can do seamless upgrades.
The deprecation period for any given feature will be 6 months. Having a set period allows Mesos developers to not indefinitely accrue technical debt and allows users time to plan for upgrades.
The detailed information about upgrading to a particular Mesos version would be posted here.
API versioning
The Mesos APIs (constituting Scheduler, Executor, Internal, Operator/Admin APIs) will have a version in the URL. The versioned URL will have a prefix of /api/vN where "N" is the version of the API. The "/api" prefix is chosen to distinguish API resources from Web UI paths.
Examples:
- http://localhost:5050/api/v1/scheduler : Scheduler HTTP API hosted by the master.
- http://localhost:5051/api/v1/executor : Executor HTTP API hosted by the agent.
A given Mesos installation might host multiple versions of the same API i.e., Scheduler API v1 and/or v2 etc.
API version vs Release version
- To keep things simple, the stable version of the API will correspond to the major release version of Mesos.
- For example, v1 of the API will be supported by Mesos release versions 1.0.0, 1.4.0, 1.20.0 etc.
- vN version of the API might also be supported by release versions of N-1 series but the vN API is not considered stable until the last release version of N-1 series.
- For example, v2 of the API might be introduced in Mesos 1.12.0 release but it is only considered stable in Mesos 1.21.0 release if it is the last release of "1" series. Note that all Mesos 1.x.y versions will still support v1 of the API.
- The API version is only bumped if we need to make a backwards incompatible API change. We will strive to support a given API version for at least a year.
- The deprecation clock for vN-1 API will start as soon as we release "N.0.0" version of Mesos. We will strive to give enough time (e.g., 6 months) for frameworks/operators to upgrade to vN API before we stop supporting vN-1 API.
API Compatibility
The API compatibility is determined by the corresponding protobuf guarantees.
As an example, the following are considered "backwards compatible" changes for Scheduler API:
- Adding new types of Calls i.e., new types of HTTP requests to "/scheduler".
- Adding new optional fields to existing requests to "/scheduler".
- Adding new types of Events i.e., new types of chunks streamed on "/scheduler".
- Adding new header fields to chunked response streamed on "/scheduler".
- Adding new fields (or changing the order of fields) to chunks' body streamed on "/scheduler".
- Adding new API resources (e.g., "/foobar").
The following are considered backwards incompatible changes for Scheduler API:
- Adding new required fields to existing requests to "/scheduler".
- Renaming/removing fields from existing requests to "/scheduler".
- Renaming/removing fields from chunks streamed on "/scheduler".
- Renaming/removing existing Calls.
Implementation Details
Release branches
For regular releases, the work is done on the master branch. There are no feature branches but there will be release branches.
When it is time to cut a minor release, a new branch (e.g., 1.2.x) is created off the master branch. We chose 'x' instead of patch release number to disambiguate branch names from tag names. Then the first RC (-rc1) is tagged on the release branch. Subsequent RCs, in case the previous RCs fail testing, should be tagged on the release branch.
Patch releases are also based off the release branches. Typically the fix for an issue that is affecting supported releases lands on the master branch and is then backported to the release branch(es). In rare cases, the fix might directly go into a release branch without landing on master (e.g., fix / issue is not applicable to master).
Having a branch for each minor release reduces the amount of work a release manager needs to do when it is time to do a release. It is the responsibility of the committer of a fix to commit it to all the affecting release branches. This is important because the committer has more context about the issue / fix at the time of the commit than a release manager at the time of release. The release manager of a minor release will be responsible for all its patch releases as well. Just like the master branch, history rewrites are not allowed in the release branch (i.e., no git push --force).
API protobufs
Most APIs in Mesos accept protobuf messages with a corresponding JSON field mapping. To support multiple versions of the API, we decoupled the versioned protobufs backing the API from the "internal" protobufs used by the Mesos code.
For example, the protobufs for the v1 Scheduler API are located at:
include/mesos/v1/scheduler/scheduler.proto

package mesos.v1.scheduler;
option java_package = "org.apache.mesos.v1.scheduler";
option java_outer_classname = "Protos";
...
The corresponding internal protobufs for the Scheduler API are located at:
include/mesos/scheduler/scheduler.proto

package mesos.scheduler;
option java_package = "org.apache.mesos.scheduler";
option java_outer_classname = "Protos";
...
The users of the API send requests (and receive responses) based on the versioned protobufs. We implemented evolve/devolve converters that can convert protobufs from any supported version to the internal protobuf and vice versa.
Internally, message passing between various Mesos components would use the internal unversioned protobufs. When sending response (if any) back to the user of the API, the unversioned protobuf would be converted back to a versioned protobuf.
Building
Downloading Mesos
There are different ways you can get Mesos:
1. Download the latest stable release from Apache (Recommended)
$ wget https://downloads.apache.org/mesos/1.11.0/mesos-1.11.0.tar.gz
$ tar -zxf mesos-1.11.0.tar.gz
2. Clone the Mesos git repository (Advanced Users Only)
$ git clone https://gitbox.apache.org/repos/asf/mesos.git
NOTE: If you have problems running the above commands, you may need to first run through the System Requirements section below to install the wget, tar, and git utilities for your system.
System Requirements
Mesos runs on Linux (64 Bit) and Mac OS X (64 Bit). To build Mesos from source, GCC 4.8.1+ or Clang 3.5+ is required.
On Linux, a kernel version >= 2.6.28 is required at both build time and run time. For full support of process isolation under Linux a recent kernel >= 3.10 is required.
The Mesos agent also runs on Windows. To build Mesos from source, follow the instructions in the Windows section.
Make sure your hostname is resolvable via DNS or via /etc/hosts to allow full support of Docker's host-networking capabilities, needed for some of the Mesos tests. When in doubt, please validate that /etc/hosts contains your hostname.
Ubuntu 14.04
Following are the instructions for stock Ubuntu 14.04. If you are using a different OS, please install the packages accordingly.
# Update the packages.
$ sudo apt-get update

# Install a few utility tools.
$ sudo apt-get install -y tar wget git

# Install the latest OpenJDK.
$ sudo apt-get install -y openjdk-7-jdk

# Install autotools (Only necessary if building from git repository).
$ sudo apt-get install -y autoconf libtool

# Install other Mesos dependencies.
$ sudo apt-get -y install build-essential python-dev python-six python-virtualenv libcurl4-nss-dev libsasl2-dev libsasl2-modules maven libapr1-dev libsvn-dev
Ubuntu 16.04
Following are the instructions for stock Ubuntu 16.04. If you are using a different OS, please install the packages accordingly.
# Update the packages.
$ sudo apt-get update

# Install a few utility tools.
$ sudo apt-get install -y tar wget git

# Install the latest OpenJDK.
$ sudo apt-get install -y openjdk-8-jdk

# Install autotools (Only necessary if building from git repository).
$ sudo apt-get install -y autoconf libtool

# Install other Mesos dependencies.
$ sudo apt-get -y install build-essential python-dev python-six python-virtualenv libcurl4-nss-dev libsasl2-dev libsasl2-modules maven libapr1-dev libsvn-dev zlib1g-dev iputils-ping
Mac OS X 10.11 (El Capitan), macOS 10.12 (Sierra)
Following are the instructions for Mac OS X El Capitan. When building Mesos with the Apple-provided toolchain, the Command Line Tools from XCode >= 8.0 are required; XCode 8 requires Mac OS X 10.11.5 or newer.
# Install Python 3: https://www.python.org/downloads/

# Install Command Line Tools. The Command Line Tools from XCode >= 8.0 are required.
$ xcode-select --install

# Install Homebrew.
$ ruby -e "$(curl -fsSL https://raw.githubusercontent.com/Homebrew/install/master/install)"

# Install Java.
$ brew install Caskroom/cask/java

# Install libraries.
$ brew install wget git autoconf automake libtool subversion maven xz

# Install Python dependencies.
$ sudo easy_install pip
$ pip install virtualenv
When compiling on macOS 10.12, the following is needed:
# There is an incompatiblity with the system installed svn and apr headers.
# We need the svn and apr headers from a brew installation of subversion.
# You may need to unlink the existing version of subversion installed via
# brew in order to configure correctly.
$ brew unlink subversion # (If already installed)
$ brew install subversion

# When configuring, the svn and apr headers from brew will be automatically
# detected, so no need to explicitly point to them.
# If the build fails due to compiler warnings, `--disable-werror` can be passed
# to configure to not treat warnings as errors.
$ ../configure

# Lastly, you may encounter the following error when the libprocess tests run:
$ ./libprocess-tests
Failed to obtain the IP address for '<hostname>'; the DNS service may not be able to resolve it: nodename nor servname provided, or not known

# If so, turn on 'Remote Login' within System Preferences > Sharing to resolve the issue.
NOTE: When upgrading from Yosemite to El Capitan, make sure to rerun xcode-select --install after the upgrade.
CentOS 6.6
Following are the instructions for stock CentOS 6.6. If you are using a different OS, please install the packages accordingly.
# Install a recent kernel for full support of process isolation.
$ sudo rpm --import https://www.elrepo.org/RPM-GPG-KEY-elrepo.org
$ sudo rpm -Uvh http://www.elrepo.org/elrepo-release-6-6.el6.elrepo.noarch.rpm
$ sudo yum --enablerepo=elrepo-kernel install -y kernel-lt

# Make the just installed kernel the one booted by default, and reboot.
$ sudo sed -i 's/default=1/default=0/g' /boot/grub/grub.conf
$ sudo reboot

# Install a few utility tools. This also forces an update of `nss`,
# which is necessary for the Java bindings to build properly.
$ sudo yum install -y tar wget git which nss

# 'Mesos > 0.21.0' requires a C++ compiler with full C++11 support,
# (e.g. GCC > 4.8) which is available via 'devtoolset-2'.
# Fetch the Scientific Linux CERN devtoolset repo file.
$ sudo wget -O /etc/yum.repos.d/slc6-devtoolset.repo http://linuxsoft.cern.ch/cern/devtoolset/slc6-devtoolset.repo

# Import the CERN GPG key.
$ sudo rpm --import http://linuxsoft.cern.ch/cern/centos/7/os/x86_64/RPM-GPG-KEY-cern

# Fetch the Apache Maven repo file.
$ sudo wget http://repos.fedorapeople.org/repos/dchen/apache-maven/epel-apache-maven.repo -O /etc/yum.repos.d/epel-apache-maven.repo

# 'Mesos > 0.21.0' requires 'subversion > 1.8' devel package, which is
# not available in the default repositories.
# Create a WANdisco SVN repo file to install the correct version:
$ sudo bash -c 'cat > /etc/yum.repos.d/wandisco-svn.repo <<EOF
[WANdiscoSVN]
name=WANdisco SVN Repo 1.8
enabled=1
baseurl=http://opensource.wandisco.com/centos/6/svn-1.8/RPMS/$basearch/
gpgcheck=1
gpgkey=http://opensource.wandisco.com/RPM-GPG-KEY-WANdisco
EOF'

# Install essential development tools.
$ sudo yum groupinstall -y "Development Tools"

# Install 'devtoolset-2-toolchain' which includes GCC 4.8.2 and related packages.
# Installing 'devtoolset-3' might be a better choice since `perf` might
# conflict with the version of `elfutils` included in devtoolset-2.
$ sudo yum install -y devtoolset-2-toolchain

# Install other Mesos dependencies.
$ sudo yum install -y apache-maven python-devel python-six python-virtualenv java-1.7.0-openjdk-devel zlib-devel libcurl-devel openssl-devel cyrus-sasl-devel cyrus-sasl-md5 apr-devel subversion-devel apr-util-devel

# Enter a shell with 'devtoolset-2' enabled.
$ scl enable devtoolset-2 bash
$ g++ --version  # Make sure you've got GCC > 4.8!

# Process isolation is using cgroups that are managed by 'cgconfig'.
# The 'cgconfig' service is not started by default on CentOS 6.6.
# Also the default configuration does not attach the 'perf_event' subsystem.
# To do this, add 'perf_event = /cgroup/perf_event;' to the entries in '/etc/cgconfig.conf'.
$ sudo yum install -y libcgroup
$ sudo service cgconfig start
CentOS 7.1
Following are the instructions for stock CentOS 7.1. If you are using a different OS, please install the packages accordingly.
# Install a few utility tools
$ sudo yum install -y tar wget git

# Fetch the Apache Maven repo file.
$ sudo wget http://repos.fedorapeople.org/repos/dchen/apache-maven/epel-apache-maven.repo -O /etc/yum.repos.d/epel-apache-maven.repo

# Install the EPEL repo so that we can pull in 'libserf-1' as part of our
# subversion install below.
$ sudo yum install -y epel-release

# 'Mesos > 0.21.0' requires 'subversion > 1.8' devel package,
# which is not available in the default repositories.
# Create a WANdisco SVN repo file to install the correct version:
$ sudo bash -c 'cat > /etc/yum.repos.d/wandisco-svn.repo <<EOF
[WANdiscoSVN]
name=WANdisco SVN Repo 1.9
enabled=1
baseurl=http://opensource.wandisco.com/centos/7/svn-1.9/RPMS/\$basearch/
gpgcheck=1
gpgkey=http://opensource.wandisco.com/RPM-GPG-KEY-WANdisco
EOF'

# Parts of Mesos require systemd in order to operate. However, Mesos
# only supports versions of systemd that contain the 'Delegate' flag.
# This flag was first introduced in 'systemd version 218', which is
# lower than the default version installed by centos. Luckily, centos
# 7.1 has a patched 'systemd < 218' that contains the 'Delegate' flag.
# Explicity update systemd to this patched version.
$ sudo yum update systemd

# Install essential development tools.
$ sudo yum groupinstall -y "Development Tools"

# Install other Mesos dependencies.
$ sudo yum install -y apache-maven python-devel python-six python-virtualenv java-1.8.0-openjdk-devel zlib-devel libcurl-devel openssl-devel cyrus-sasl-devel cyrus-sasl-md5 apr-devel subversion-devel apr-util-devel
Windows
Follow the instructions in the Windows section.
Building Mesos (Posix)
# Change working directory.
$ cd mesos

# Bootstrap (Only required if building from git repository).
$ ./bootstrap

# Configure and build.
$ mkdir build
$ cd build
$ ../configure
$ make
In order to speed up the build and reduce verbosity of the logs, you can append -j <number of cores> V=0 to make.
# Run test suite.
$ make check

# Install (Optional).
$ make install
Examples
Mesos comes bundled with example frameworks written in C++, Java and Python.
The framework binaries will only be available after running make check, as
described in the Building Mesos section above.
# Change into build directory.
$ cd build

# Start Mesos master (ensure work directory exists and has proper permissions).
$ ./bin/mesos-master.sh --ip=127.0.0.1 --work_dir=/var/lib/mesos

# Start Mesos agent (ensure work directory exists and has proper permissions).
$ ./bin/mesos-agent.sh --master=127.0.0.1:5050 --work_dir=/var/lib/mesos

# Visit the Mesos web page.
$ http://127.0.0.1:5050

# Run C++ framework (exits after successfully running some tasks).
$ ./src/test-framework --master=127.0.0.1:5050

# Run Java framework (exits after successfully running some tasks).
$ ./src/examples/java/test-framework 127.0.0.1:5050

# Run Python framework (exits after successfully running some tasks).
$ ./src/examples/python/test-framework 127.0.0.1:5050
Note: These examples assume you are running Mesos on your local machine. Following them will not allow you to access the Mesos web page in a production environment (e.g. on AWS). For that you will need to specify the actual IP of your host when launching the Mesos master and ensure your firewall settings allow access to port 5050 from the outside world.
Binary Packages
Downloading the Mesos RPM
Download and install the latest stable CentOS7 RPM binary from the Repository:
$ cat > /tmp/aventer.repo <<EOF
#aventer-mesos-el - packages by mesos from aventer
[aventer-rel]
name=AVENTER stable repository $releasever
baseurl=http://rpm.aventer.biz/CentOS/$releasever/$basearch/
enabled=1
gpgkey=https://www.aventer.biz/CentOS/support_aventer.asc
EOF

$ sudo mv /tmp/aventer.repo /etc/yum.repos.d/aventer.repo

$ sudo yum update

$ sudo yum install mesos
The above instructions show how to install the latest version of Mesos for RHEL 7.
Substitute baseurl the with the appropriate URL for your operating system.
Start Mesos Master and Agent.
The RPM installation creates the directory /var/lib/mesos that can be used as a work directory.
Start the Mesos master with the following command:
$ mesos-master --work_dir=/var/lib/mesos
On a different terminal, start the Mesos agent, and associate it with the Mesos master started above:
$ mesos-agent --work_dir=/var/lib/mesos --master=127.0.0.1:5050
This is the simplest way to try out Mesos after downloading the RPM. For more complex and production setup instructions refer to the Administration section of the docs.
Mesos Runtime Configuration
The Mesos master and agent can take a variety of configuration options
through command-line arguments or environment variables. A list of the
available options can be seen by running mesos-master --help or
mesos-agent --help. Each option can be set in two ways:
-
By passing it to the binary using
--option_name=value, either specifying the value directly, or specifying a file in which the value resides (--option_name=file://path/to/file). The path can be absolute or relative to the current working directory. -
By setting the environment variable
MESOS_OPTION_NAME(the option name with aMESOS_prefix added to it).
Configuration values are searched for first in the environment, then on the command-line.
Additionally, this documentation lists only a recent snapshot of the options in
Mesos. A definitive source for which flags your version of Mesos supports can be
found by running the binary with the flag --help, for example mesos-master --help.
Master and Agent Options
These are options common to both the Mesos master and agent.
See configuration/master-and-agent.md.
Master Options
Agent Options
Libprocess Options
See configuration/libprocess.md.
Mesos Build Configuration
Autotools Options
If you have special compilation requirements, please refer to ./configure --help when configuring Mesos.
See configuration/autotools.md.
CMake Options
Install CMake 3.7+
Linux
Install the latest version of CMake from CMake.org. A self-extracting tarball is available to make this process painless.
Currently, few of the common Linux flavors package a sufficient CMake
version. Ubuntu versions 12.04 and 14.04 package CMake 2;
Ubuntu 16.04 packages CMake 3.5. If you already installed cmake from packages,
you may remove it via: apt-get purge cmake.
The standard CentOS package is CMake 2, and unfortunately even the cmake3
package in EPEL is only CMake 3.6, you may remove them via:
yum remove cmake cmake3.
Mac OS X
HomeBrew's CMake version is sufficient: brew install cmake.
Windows
Download and install the MSI from CMake.org.
NOTE: Windows needs CMake 3.8+, rather than 3.7+.
Quick Start
The most basic way to build with CMake, with no configuration, is fairly straightforward:
mkdir build
cd build
cmake ..
cmake --build .
The last step, cmake --build . can also take a --target command to build any
particular target (e.g. mesos-tests, or tests to build mesos-tests,
libprocess-tests, and stout-tests): cmake --build . --target tests. To
send arbitrary flags to the native build system underneath (e.g. make), append
the command with -- <flags to be passed>: cmake --build . -- -j4.
Also, cmake --build can be substituted by your build system of choice. For
instance, the default CMake generator on Linux produces GNU Makefiles, so after
configuring with cmake .., you can just run make tests in the build folder
like usual. Similarly, if you configure with -G Ninja to use the Ninja
generator, you can then run ninja tests to build the tests target with
Ninja.
Installable build
This example will build Mesos and install it into a custom prefix:
mkdir build && cd build
cmake -DCMAKE_INSTALL_PREFIX=/home/current_user/mesos
cmake --build . --target install
To additionally install mesos-tests executable and related test helpers
(this can be used to run Mesos tests against the installed binaries),
one can enable the MESOS_INSTALL_TESTS option.
To produce a set of binaries and libraries that will work after being
copied/moved to a different location, use MESOS_FINAL_PREFIX.
The example below employs both MESOS_FINAL_PREFIX and MESOS_INSTALL_TESTS.
On a build system:
mkdir build && cd build
cmake -DMESOS_FINAL_PREFIX=/opt/mesos -DCMAKE_INSTALL_PREFIX=/home/current_user/mesos -DMESOS_INSTALL_TESTS=ON
cmake --build . --target install
tar -czf mesos.tar.gz mesos -C /home/current_user
On a target system:
sudo tar -xf mesos.tar.gz -C /opt
# Run tests against Mesos installation
sudo /opt/mesos/bin/mesos-tests
# Start Mesos agent
sudo /opt/mesos/bin/mesos-agent --work-dir=/var/lib/mesos ...
Supported options
Examples
See CMake By Example.
Documentation
The CMake documentation is written as a reference module. The most commonly used sections are:
The wiki also has a set of useful variables.
Dependency graph
Like any build system, CMake has a dependency graph. The difference is that targets in CMake's dependency graph are much richer compared to other build systems. CMake targets have the notion of 'interfaces', where build properties are saved as part of the target, and these properties can be inherited transitively within the graph.
For example, say there is a library mylib, and anything which links it must
include its headers, located in mylib/include. When building the library, some
private headers must also be included, but not when linking to it. When
compiling the executable myprogram, mylib's public headers must be included,
but not its private headers. There is no manual step to add mylib/include to
myprogram (and any other program which links to mylib), it is instead
deduced from the public interface property of mylib. This is represented by
the following code:
# A new library with a single source file (headers are found automatically).
add_library(mylib mylib.cpp)

# The folder of private headers, not exposed to consumers of `mylib`.
target_include_directories(mylib PRIVATE mylib/private)

# The folder of public headers, added to the compilation of any consumer.
target_include_directories(mylib PUBLIC mylib/include)

# A new exectuable with a single source file.
add_executable(myprogram main.cpp)

# The creation of the link dependency `myprogram` -> `mylib`.
target_link_libraries(myprogram mylib)

# There is no additional step to add `mylib/include` to `myprogram`.
This same notion applies to practically every build property:
compile definitions via target_compile_definitions,
include directories via target_include_directories,
link libraries via target_link_libraries,
compile options via target_compile_options,
and compile features via target_compile_features.
All of these commands also take an optional argument of
<INTERFACE|PUBLIC|PRIVATE>, which constrains their transitivity in the graph.
That is, a PRIVATE include directory is recorded for the target, but not
shared transitively to anything depending on the target, PUBLIC is used
for both the target and dependencies on it, and INTERFACE is used only
for dependencies.
Notably missing from this list are link directories. CMake explicitly prefers finding and using the absolute paths to libraries, obsoleting link directories.
Common mistakes
Booleans
CMake treats ON, OFF, TRUE, FALSE, 1, and 0 all as true/false
booleans. Furthermore, variables of the form <target>-NOTFOUND are also
treated as false (this is used for finding packages).
In Mesos, we prefer the boolean types TRUE and FALSE.
See if for more info.
Conditionals
For historical reasons, CMake conditionals such as if and elseif
automatically interpolate variable names. It is therefore dangerous to
interpolate them manually, because if ${FOO} evaluates to BAR, and BAR is
another variable name, then if (${FOO}) becomes if (BAR), and BAR is then
evaluated again by the if. Stick to if (FOO) to check the value of ${FOO}.
Do not use if (${FOO}).
Also see the CMake policies CMP0012 and CMP0054.
Definitions
When using add_definitions() (which should be used rarely, as it is for
"global" compile definitions), the flags must be prefixed with -D to be
treated as preprocessor definitions. However, when using
target_compile_definitions() (which should be preferred, as it is
for specific targets), the flags do not need the prefix.
Style
In general, wrap at 80 lines, and use a two-space indent. When wrapping arguments, put the command on a separate line and arguments on subsequent lines:
target_link_libraries(
  program PRIVATE
  alpha
  beta
  gamma)
Otherwise keep it together:
target_link_libraries(program PUBLIC library)
Always keep the trailing parenthesis with the last argument.
Use a single space between conditionals and their open parenthesis, e.g.
if (FOO), but not for commands, e.g. add_executable(program).
CAPITALIZE the declaration and use of custom functions and macros (e.g.
EXTERNAL and PATCH_CMD), and do not capitalize the use of CMake built-in
(including modules) functions and macros. CAPITALIZE variables.
CMake anti-patterns
Because CMake handles much more of the grunt work for you than other build systems, there are unfortunately a lot of CMake anti-patterns you should look out for when writing new CMake code. These are some common problems that should be avoided when writing new CMake code:
Superfluous use of add_dependencies
When you've linked library a to library b with target_link_libraries(a b),
the CMake graph is already updated with the dependency information. It is
redundant to use add_dependencies(a b) to (re)specify the dependency. In fact,
this command should rarely be used.
The exceptions to this are:
- Setting a dependency from an imported library to a target added via
ExternalProject_Add. - Setting a dependency on Mesos modules since no explicit linking is done.
- Setting a dependency between executables (e.g. the
mesos-agentrequiring themesos-containerizerexecutable). In general, runtime dependencies need to be setup withadd_dependency, but never link dependencies.
Use of link_libraries or link_directories
Neither of these commands should ever be used. The only appropriate command used
to link libraries is target_link_libraries, which records the information
in the CMake dependency graph. Furthermore, imported third-party libraries
should have correct locations recorded in their respective targets, so the use
of link_directories should never be necessary. The
official documentation states:
Note that this command is rarely necessary. Library locations returned by
find_package()andfind_library()are absolute paths. Pass these absolute library file paths directly to thetarget_link_libraries()command. CMake will ensure the linker finds them.
The difference is that the former sets global (or directory level) side effects, and the latter sets specific target information stored in the graph.
Use of include_directories
This is similar to the above: the target_include_directories should always
be preferred so that the include directory information remains localized to the
appropriate targets.
Adding anything to endif ()
Old versions of CMake expected the style if (FOO) ... endif (FOO), where the
endif contained the same expression as the if command. However, this is
tortuously redundant, so leave the parentheses in endif () empty. This goes
for other endings too, such as endforeach (), endwhile (), endmacro () and
endfunction ().
Specifying header files superfluously
One of the distinct advantages of using CMake for C and C++ projects is that
adding header files to the source list for a target is unnecessary. CMake is
designed to parse the source files (.c, .cpp, etc.) and determine their
required headers automatically. The exception to this is headers generated as
part of the build (such as protobuf or the JNI headers).
Checking CMAKE_BUILD_TYPE
See the "Building debug or release configurations"
example for more information. In short, not all generators respect the variable
CMAKE_BUILD_TYPE at configuration time, and thus it must not be used in CMake
logic. A usable alternative (where supported) is a generator expression such
as $<$<CONFIG:Debug>:DEBUG_MODE>.
Remaining hacks
3RDPARTY_DEPENDENCIES
Until Mesos on Windows is stable, we keep some dependencies in an external
repository, 3rdparty. When
all dependencies are bundled with Mesos, this extra repository will no longer be
necessary. Until then, the CMake variable 3RDPARTY_DEPENDENCIES points by
default to this URL, but it can also point to the on-disk location of a local
clone of the repo. With this option you can avoid pulling from GitHub for every
clean build. Note that this must be an absolute path with forward slashes, e.g.
-D3RDPARTY_DEPENDENCIES=C:/3rdparty, otherwise it will fail on Windows.
EXTERNAL
The CMake function EXTERNAL defines a few variables that make it easy for us
to track the directory structure of a dependency. In particular, if our
library's name is boost, we invoke:
EXTERNAL(boost ${BOOST_VERSION} ${CMAKE_CURRENT_BINARY_DIR})
Which will define the following variables as side-effects in the current scope:
BOOST_TARGET(a target folder name to put dep in e.g.,boost-1.53.0)BOOST_CMAKE_ROOT(where to have CMake put the uncompressed source, e.g.,build/3rdparty/boost-1.53.0)BOOST_ROOT(where the code goes in various stages of build, e.g.,build/.../boost-1.53.0/src, which might contain foldersbuild-1.53.0-build,-lib, and so on, for each build step that dependency has)
The implementation is in 3rdparty/cmake/External.cmake.
This is not to be confused with the CMake module ExternalProject, from which
we use ExternalProject_Add to download, extract, configure, and build our
dependencies.
CMAKE_NOOP
This is a CMake variable we define in 3rdparty/CMakeLists.txt so that we can
cancel steps of ExternalProject. ExternalProject's default behavior is to
attempt to configure, build, and install a project using CMake. So when one of
these steps must be skipped, we use set it to CMAKE_NOOP so that nothing
is run instead.
CMAKE_FORWARD_ARGS
The CMAKE_FORWARD_ARGS variable defined in 3rdparty/CMakeLists.txt is sent
as the CMAKE_ARGS argument to the ExternalProject_Add macro (along with any
per-project arguments), and is used when the external project is configured as a
CMake project. If either the CONFIGURE_COMMAND or BUILD_COMMAND arguments of
ExternalProject_Add are used, then the CMAKE_ARGS argument will be ignored.
This variable ensures that compilation configurations are properly propagated to
third-party dependencies, such as compiler flags.
CMAKE_SSL_FORWARD_ARGS
The CMAKE_SSL_FORWARD_ARGS variable defined in 3rdparty/CMakeLists.txt
is like CMAKE_FORWARD_ARGS, but only used for specific external projects
that find and link against OpenSSL.
LIBRARY_LINKAGE
This variable is a shortcut used in 3rdparty/CMakeLists.txt. It is set to
SHARED when BUILD_SHARED_LIBS is true, and otherwise it is set to STATIC.
The SHARED and STATIC keywords are used to declare how a library should be
built; however, if left out then the type is deduced automatically from
BUILD_SHARED_LIBS.
MAKE_INCLUDE_DIR
This function works around a CMake issue with setting include
directories of imported libraries built with ExternalProject_Add. We have to
call this for each IMPORTED third-party dependency which has set
INTERFACE_INCLUDE_DIRECTORIES, just to make CMake happy. An example is Glog:
MAKE_INCLUDE_DIR(glog)
GET_BYPRODUCTS
This function works around a CMake issue with the Ninja
generator where it does not understand imported libraries, and instead needs
BUILD_BYPRODUCTS explicitly set. This simply allows us to use
ExternalProject_Add and Ninja. For Glog, it looks like this:
GET_BYPRODUCTS(glog)
Also see the CMake policy CMP0058.
PATCH_CMD
The CMake function PATCH_CMD generates a patch command given a patch file.
If the path is not absolute, it's resolved to the current source directory.
It stores the command in the variable name supplied. This is used to easily
patch third-party dependencies. For Glog, it looks like this:
PATCH_CMD(GLOG_PATCH_CMD glog-${GLOG_VERSION}.patch)
ExternalProject_Add(
  ${GLOG_TARGET}
  ...
  PATCH_COMMAND     ${GLOG_PATCH_CMD})
The implementation is in 3rdparty/cmake/PatchCommand.cmake.
Windows patch.exe
While using patch on Linux is straightforward, doing the same on Windows takes
a bit of work. PATH_CMD encapsulates this:
- Checks the cache variable
PATCHEXE_PATHforpatch.exe. - Searches for
patch.exein its default locations. - Copies
patch.exeand a custom manifest to the temporary directory. - Applies the manifest to avoid the UAC prompt.
- Uses the patched
patch.exe.
As such, PATCH_CMD lets us apply patches as we do on Linux, without requiring
an administrative prompt.
Note that on Windows, the patch file must have CRLF line endings. A file with LF
line endings will cause the error: "Assertion failed, hunk, file patch.c, line
343". For this reason, it is required to checkout the Mesos repo with git config core.autocrlf true.
Windows
Mesos 1.0.0 introduced experimental support for Windows.
Building Mesos
System Requirements
-
Install the latest Visual Studio 2017: The "Community" edition is sufficient (and free of charge). During installation, choose the "Desktop development with C++" workload.
-
Install CMake 3.8.0 or later. During installation, choose to "Add CMake to the system PATH for all users".
-
Install GNU patch for Windows.
-
If building from source, install Git.
-
Make sure there are no spaces in your build directory. For example,
C:/Program Files (x86)/mesosis an invalid build directory. -
If developing Mesos, install Python 3 (not Python 2), in order to use our
supportscripts (e.g. to post and apply patches, or lint source code).
Build Instructions
Following are the instructions for Windows 10.
# Clone (or extract) Mesos.
git clone https://gitbox.apache.org/repos/asf/mesos.git
cd mesos

# Configure using CMake for an out-of-tree build.
mkdir build
cd build
cmake .. -G "Visual Studio 15 2017 Win64" -T "host=x64"

# Build Mesos.
# To build just the Mesos agent, add `--target mesos-agent`.
cmake --build .

# The Windows agent exposes new isolators that must be used as with
# the `--isolation` flag. To get started point the agent to a working
# master, using eiher an IP address or zookeeper information.
.\src\mesos-agent.exe --master=<master> --work_dir=<work folder> --launcher_dir=<repository>\build\src
Running Mesos
If you deploy the executables to another machine, you must also install the Microsoft Visual C++ Redistributable for Visual Studio 2017.
Known Limitations
The current implementation is known to have the following limitations:
-
Only the agent should be run on Windows. The Mesos master can be launched, but only for testing as the master does not support high-availability setups on Windows.
-
While Mesos supports NTFS long paths internally, tasks which do not support long paths must be run on agent whose
--work_diris a short path. -
The minimum versions of Windows supported are: Windows 10 Creators Update (AKA version 1703, build number 15063), and Windows Server, version 1709. It is likely that this will increase, due to evolving Windows container support and developer features which ease porting.
-
The ability to create symlinks as a non-admin user requires Developer Mode to be enabled. Otherwise the agent will need to be run under an administrator.
Build Configuration Examples
Building with Ninja
Instead of using MSBuild, it is also possible to build Mesos on
Windows using Ninja, which can result in
significantly faster builds. To use Ninja, you need to download it and
ensure ninja.exe is in your PATH.
- Download the Windows binary.
- Unzip it and place
ninja.exein yourPATH. - Open an "x64 Native Tools Command Prompt for VS 2017" to set your environment.
- In that command prompt, type
powershellto use a better shell. - Similar to above, configure CMake with
cmake .. -G Ninja. - Now you can use
ninjato build the various targets. - You may want to use
ninja -vto make it verbose, as it's otherwise very quiet.
Note that with Ninja it is imperative to open the correct developer command prompt so that the 64-bit build tools are used, as Ninja does not otherwise know how to find them.
Building with Java
This enables more unit tests, but we do not yet officially produce
mesos-master.
When building with Java on Windows, you must add the Maven build tool to
your path. The JAVA_HOME environment variable must also be manually set.
An installation of the Java SDK can be found form Oracle.
As of this writing, Java 9 is not yet supported, but Java 8 has been tested.
The Java build defaults to OFF because it is slow. To build the Java
components on Windows, turn it ON:
mkdir build; cd build
$env:PATH += ";C:\...\apache-maven-3.3.9\bin\"
$env:JAVA_HOME = "C:\Program Files\Java\jdk1.8.0_144"
cmake .. -DENABLE_JAVA=ON -G "Visual Studio 15 2017 Win64" -T "host=x64"
cmake --build . --target mesos-java
Note that the mesos-java library does not have to be manually built; as
libmesos will link it when Java is enabled.
Unfortunately, on Windows the FindJNI CMake module will populate JAVA_JVM_LIBRARY with
the path to the static jvm.lib, but this variable must point to the shared
library, jvm.dll, as it is loaded at runtime. Set it correctly like this:
$env:JAVA_JVM_LIBRARY = "C:\Program Files\Java\jdk1.8.0_144\jre\bin\server\jvm.dll"
The library may still fail to load at runtime with the following error:
"The specified module could not be found."
If this is the case, and the path to jvm.dll is verified to be correct, then
the error message actually indicates that the dependencies of jvm.dll could
not be found. On Windows, the DLL search path includes the environment variable
PATH, so add the bin folder which contains server\jvm.dll to PATH:
$env:PATH += ";C:\Program Files\Java\jdk1.8.0_144\jre\bin"
Building with OpenSSL
When building with OpenSSL on Windows, you must build or install a distribution of OpenSSL for Windows. A commonly chosen distribution is Shining Light Productions' OpenSSL.
As of this writing, OpenSSL 1.1.x is supported.
Use -DENABLE_SSL=ON to build with OpenSSL.
Note that it will link to OpenSSL dynamically, so if the built executables are deployed elsewhere, that machine also needs OpenSSL installed.
Beware that the OpenSSL installation, nor Mesos itself, comes with a certificate bundle, and so it is likely that certificate verification will fail.
ClusterD Agent Options
Required Flags
| Flag | Explanation |
|---|---|
| --master=VALUE |
May be one of:
host:port
zk://host1:port1,host2:port2,.../path
zk://username:password@host1:port1,host2:port2,.../path
file:///path/to/file (where file contains one of the above)
|
| --work_dir=VALUE |
Path of the agent work directory. This is where executor sandboxes
will be placed, as well as the agent's checkpointed state in case of
failover. Note that locations like /tmp which are cleaned
automatically are not suitable for the work directory when running in
production, since long-running agents could lose data when cleanup
occurs. (Example: /var/lib/mesos/agent)
|
Optional Flags
| Flag | Explanation |
|---|---|
| --acls=VALUE |
The value could be a JSON-formatted string of ACLs
or a file path containing the JSON-formatted ACLs used
for authorization. Path could be of the form file:///path/to/file
or /path/to/file.
Note that if the --authorizer flag is provided with a value
other than local, the ACLs contents will be
ignored.
See the ACLs protobuf in acls.proto for the expected format.
Example:
|
| --agent_features=VALUE |
JSON representation of agent features to whitelist. We always require
'MULTI_ROLE', 'HIERARCHICAL_ROLE', 'RESERVATION_REFINEMENT',
'AGENT_OPERATION_FEEDBACK', 'RESOURCE_PROVIDER', 'AGENT_DRAINING', and
'TASK_RESOURCE_LIMITS'.
Example:
|
| --agent_subsystems=VALUE, --slave_subsystems=VALUE |
List of comma-separated cgroup subsystems to run the agent binary
in, e.g., memory,cpuacct. The default is none.
Present functionality is intended for resource monitoring and
no cgroup limits are set, they are inherited from the root mesos
cgroup.
|
| --effective_capabilities=VALUE |
JSON representation of the Linux capabilities that the agent will
grant to a task that will be run in containers launched by the
containerizer (currently only supported by the Mesos Containerizer).
This set overrides the default capabilities for the user but not
the capabilities requested by the framework.
To set capabilities the agent should have the SETPCAP capability.
This flag is effective iff linux/capabilities isolation is enabled.
When linux/capabilities isolation is enabled, the absence of this flag
implies that the operator intends to allow ALL capabilities.
Example:
|
| --bounding_capabilities=VALUE |
JSON representation of the Linux capabilities that the operator
will allow as the maximum level of privilege that a task launched
by the containerizer may acquire (currently only supported by the
Mesos Containerizer).
This flag is effective iff linux/capabilities isolation is enabled.
When linux/capabilities isolation is enabled, the absence of this flag
implies that the operator intends to allow ALL capabilities.
This flag has the same syntax as --effective_capabilities.
|
| --appc_simple_discovery_uri_prefix=VALUE |
URI prefix to be used for simple discovery of appc images,
e.g., http://, https://,
hdfs://.
(default: http://)
|
| --appc_store_dir=VALUE | Directory the appc provisioner will store images in. (default: /tmp/mesos/store/appc) |
| --attributes=VALUE |
Attributes of the agent machine, in the form:
rack:2 or rack:2;u:1
|
| --[no-]authenticate_http_executors |
If true, only authenticated requests for the HTTP executor API are
allowed. If false, unauthenticated requests are also allowed. This
flag is only available when Mesos is built with SSL support.
(default: false)
|
| --authenticatee=VALUE |
Authenticatee implementation to use when authenticating against the
master. Use the default crammd5, or
load an alternate authenticatee module using --modules. (default: crammd5)
|
| --authentication_backoff_factor=VALUE |
The agent will time out its authentication with the master based on
exponential backoff. The timeout will be randomly chosen within the
range [min, min + factor*2^n] where n is the number
of failed attempts. To tune these parameters, set the
--authentication_timeout_[min|max|factor] flags. (default: 1secs)
|
| --authentication_timeout_min=VALUE |
The minimum amount of time the agent waits before retrying authenticating
with the master. See --authentication_backoff_factor for more
details. (default: 5secs)
NOTE that since authentication retry cancels the previous authentication
request, one should consider what is the normal authentication delay when
setting this flag to prevent premature retry.
|
| --authentication_timeout_max=VALUE |
The maximum amount of time the agent waits before retrying authenticating
with the master. See --authentication_backoff_factor for more
details. (default: 1mins)
|
| --authorizer=VALUE |
Authorizer implementation to use when authorizing actions that
require it.
Use the default local, or
load an alternate authorizer module using --modules.
Note that if the --authorizer flag is provided with a value
other than the default local, the ACLs
passed through the --acls flag will be ignored.
|
| --[no]-cgroups_cpu_enable_pids_and_tids_count | Cgroups feature flag to enable counting of processes and threads inside a container. (default: false) |
| --cgroups_destroy_timeout=VALUE | Amount of time allowed to destroy a cgroup hierarchy. If the cgroup hierarchy is not destroyed within the timeout, the corresponding container destroy is considered failed. (default: 1mins) |
| --[no]-cgroups_enable_cfs | Cgroups feature flag to enable hard limits on CPU resources via the CFS bandwidth limiting subfeature. (default: false) |
| --enable_cgroupsv2 | Enable support for cgroupsv2 (Currently only the Docker executor supports CgroupsV2. Set these flag to true, will break the Mesos contrainerizer). |
| --cgroups_hierarchy=VALUE | The path to the cgroups hierarchy root. (default: /sys/fs/cgroup) |
| --[no]-cgroups_limit_swap | Cgroups feature flag to enable memory limits on both memory and swap instead of just memory. (default: false) |
| --cgroups_net_cls_primary_handle | A non-zero, 16-bit handle of the form `0xAAAA`. This will be used as the primary handle for the net_cls cgroup. |
| --cgroups_net_cls_secondary_handles |
A range of the form 0xAAAA,0xBBBB, specifying the valid secondary
handles that can be used with the primary handle. This will take
effect only when the --cgroups_net_cls_primary_handle is set.
|
| --allowed_devices |
JSON object representing the devices that will be additionally
whitelisted by cgroups devices subsystem. Noted that the following
devices always be whitelisted by default:
cgroups/devices is set in
--isolation flag.
Example:
|
| --cgroups_root=VALUE | Name of the root cgroup. (default: mesos) |
| --[no-]check_agent_port_range_only |
When this is true, the network/ports isolator allows tasks to
listen on additional ports provided they fall outside the range
published by the agent's resources. Otherwise tasks are restricted
to only listen on ports for which they have been assigned resources.
(default: false); This flag can't be used in conjunction with
--container_ports_isolated_range.
|
| --container_disk_watch_interval=VALUE |
The interval between disk quota checks for containers. This flag is
used for the disk/du isolator. (default: 15secs)
|
| --container_logger=VALUE |
The name of the container logger to use for logging container
(i.e., executor and task) stdout and stderr. The default
container logger writes to stdout and stderr files
in the sandbox directory.
|
| --container_ports_isolated_range=VALUE |
When this flag is set, network/ports isolator will only enforce
the port isolation for the given range of ports range. This flag can't
be used in conjunction with --check_agent_port_range_only.
Example: [0-35000]
|
| --container_ports_watch_interval=VALUE |
Interval at which the network/ports isolator should check for
containers listening on ports they don't have resources for.
(default: 30secs)
|
| --containerizers=VALUE |
Comma-separated list of containerizer implementations
to compose in order to provide containerization.
Available options are mesos and
docker (on Linux). The order the containerizers
are specified is the order they are tried.
(default: mesos)
|
| --credential=VALUE |
Path to a JSON-formatted file containing the credential
to use to authenticate with the master.
Path could be of the form file:///path/to/file or /path/to/file.
Example:
|
| --default_container_dns=VALUE |
JSON-formatted DNS information for CNI networks (Mesos containerizer)
and CNM networks (Docker containerizer). For CNI networks, this flag
can be used to configure `nameservers`, `domain`, `search` and
`options`, and its priority is lower than the DNS information returned
by a CNI plugin, but higher than the DNS information in agent host's
/etc/resolv.conf. For CNM networks, this flag can be used to configure
`nameservers`, `search` and `options`, it will only be used if there
is no DNS information provided in the ContainerInfo.docker.parameters
message.
See the ContainerDNS message in `flags.proto` for the expected format.
Example:
|
| --default_container_info=VALUE |
JSON-formatted ContainerInfo that will be included into
any ExecutorInfo that does not specify a ContainerInfo.
See the ContainerInfo protobuf in mesos.proto for
the expected format.
Example:
|
| --default_role=VALUE |
Any resources in the --resources flag that
omit a role, as well as any resources that
are not present in --resources but that are
automatically detected, will be assigned to
this role. (default: *)
|
| --default_container_shm_size |
The default size of the /dev/shm for the container which has its own
/dev/shm but does not specify the shm_size field in its
LinuxInfo. The format is [number][unit], number must be
a positive integer and unit can be B (bytes), KB (kilobytes), MB
(megabytes), GB (gigabytes) or TB (terabytes). Note that this flag is
only relevant for the Mesos Containerizer and it will be ignored if
the namespaces/ipc isolator is not enabled.
|
| --[no-]disallow_sharing_agent_ipc_namespace |
If set to true, each top-level container will have its own IPC
namespace and /dev/shm, and if the framework requests to share the agent IPC
namespace and /dev/shm for the top level container, the container launch will
be rejected. If set to false, the top-level containers will share
the IPC namespace and /dev/shm with agent if the framework requests it. This
flag will be ignored if the namespaces/ipc isolator is not enabled.
(default: false)
|
| --[no-]disallow_sharing_agent_pid_namespace |
If set to true, each top-level container will have its own pid
namespace, and if the framework requests to share the agent pid namespace for
the top level container, the container launch will be rejected. If set to
false, the top-level containers will share the pid namespace with
agent if the framework requests it. This flag will be ignored if the
namespaces/pid isolator is not enabled.
(default: false)
|
| --disk_profile_adaptor=VALUE | The name of the disk profile adaptor module that storage resource providers should use for translating a 'disk profile' into inputs consumed by various Container Storage Interface (CSI) plugins. If this flag is not specified, the default behavior for storage resource providers is to only expose resources for pre-existing volumes and not publish RAW volumes. |
| --disk_watch_interval=VALUE | Periodic time interval (e.g., 10secs, 2mins, etc) to check the overall disk usage managed by the agent. This drives the garbage collection of archived information and sandboxes. (default: 1mins) |
| --docker=VALUE | The absolute path to the docker executable for docker containerizer. (default: docker) |
| --docker_config=VALUE |
The default docker config file for agent. Can be provided either as an
absolute path pointing to the agent local docker config file, or as a
JSON-formatted string. The format of the docker config file should be
identical to docker's default one (e.g., either
$HOME/.docker/config.json or $HOME/.dockercfg).
Example JSON ($HOME/.docker/config.json):
|
| --docker_ignore_runtime=VALUE |
Ignore any runtime configuration specified in the Docker image. The
Mesos containerizer will not propagate Docker runtime specifications
such as WORKDIR, ENV and CMD
to the container.
(default: false)
|
| --[no-]docker_kill_orphans | Enable docker containerizer to kill orphaned containers. You should consider setting this to false when you launch multiple agents in the same OS, to avoid one of the DockerContainerizer removing docker tasks launched by other agents. (default: true) |
| --docker_mesos_image=VALUE | The Docker image used to launch this Mesos agent instance. If an image is specified, the docker containerizer assumes the agent is running in a docker container, and launches executors with docker containers in order to recover them when the agent restarts and recovers. |
| --docker_registry=VALUE |
The default url for Mesos containerizer to pull Docker images. It could
either be a Docker registry server url (e.g., https://registry.docker.io),
or a source that Docker image archives (result of docker save) are
stored. The Docker archive source could be specified either as a local
path (e.g., /tmp/docker/images), or as an HDFS URI (*experimental*)
(e.g., hdfs://localhost:8020/archives/). Note that this option won't
change the default registry server for Docker containerizer.
(default: https://registry-1.docker.io)
|
| --docker_remove_delay=VALUE |
The amount of time to wait before removing docker containers (i.e., `docker rm`)
after Mesos regards the container as TERMINATED
(e.g., 3days, 2weeks, etc).
This only applies for the Docker Containerizer. (default: 6hrs)
|
| --docker_socket=VALUE |
Resource used by the agent and the executor to provide CLI access to the
Docker daemon. On Unix, this is typically a path to a socket, such as
/var/run/docker.sock. On Windows this must be a named pipe,
such as //./pipe/docker_engine. NOTE: This must be the path
used by the Docker image used to run the agent. (default:
//./pipe/docker_engine on Windows; /var/run/docker.sock on other
platforms).
|
| --docker_stop_timeout=VALUE | The time docker daemon waits after stopping a container before killing that container. This flag is deprecated; use task's kill policy instead. (default: 0ns) |
| --docker_store_dir=VALUE | Directory the Docker provisioner will store images in (default: /tmp/mesos/store/docker) |
| --docker_volume_checkpoint_dir=VALUE | The root directory where we checkpoint the information about docker volumes that each container uses. (default: /var/run/mesos/isolators/docker/volume) |
| --[no-]docker_volume_chown | Whether to chown the docker volume's mount point non-recursively to the container user. Please notice that this flag is not recommended to turn on if there is any docker volume shared by multiple non-root users. By default, this flag is off. (default: false) |
| --domain_socket_location=VALUE |
Location on the host filesystem of the domain socket used for
communication with executors. Alternatively, this can be set to
'systemd:<identifier>' to use the domain socket
with the given identifier, which is expected to be passed by systemd.
This flag will be ignored unless the Total path length must be less than 108 characters. Will be set to |
| --[no-]enforce_container_disk_quota |
Whether to enable disk quota enforcement for containers. This flag
is used by the disk/du and disk/xfs isolators. (default: false)
|
| --[no-]enforce_container_ports |
Whether to enable network port enforcement for containers. This flag
is used by the network/ports isolator. (default: false)
|
| --executor_environment_variables=VALUE |
JSON object representing the environment variables that should be
passed to the executor, and thus subsequently task(s). By default this
flag is none. Users have to define executor environment explicitly.
Example:
|
| --executor_registration_timeout=VALUE | Amount of time to wait for an executor to register with the agent before considering it hung and shutting it down (e.g., 60secs, 3mins, etc) (default: 1mins) |
| --executor_reregistration_timeout=VALUE | The timeout within which an executor is expected to reregister after the agent has restarted, before the agent considers it gone and shuts it down. Note that currently, the agent will not reregister with the master until this timeout has elapsed (see MESOS-7539). (default: 2secs) |
| --executor_reregistration_retry_interval=VALUE | For PID-based executors, how long the agent waits before retrying the reconnect message sent to the executor during recovery. NOTE: Do not use this unless you understand the following (see MESOS-5332): PID-based executors using Mesos libraries >= 1.1.2 always re-link with the agent upon receiving the reconnect message. This avoids the executor replying on a half-open TCP connection to the old agent (possible if netfilter is dropping packets, see: MESOS-7057). However, PID-based executors using Mesos libraries < 1.1.2 do not re-link and are therefore prone to replying on a half-open connection after the agent restarts. If we only send a single reconnect message, these "old" executors will reply on their half-open connection and receive a RST; without any retries, they will fail to reconnect and be killed by the agent once the executor re-registration timeout elapses. To ensure these "old" executors can reconnect in the presence of netfilter dropping packets, we introduced optional retries of the reconnect message. This results in "old" executors correctly establishing a link when processing the second reconnect message. (default: no retries) |
| --max_completed_executors_per_framework=VALUE | Maximum number of completed executors per framework to store in memory. (default: 150) |
| --jwt_secret_key=VALUE | Path to a file containing the key used when generating JWT secrets. This flag is only available when Mesos is built with SSL support. |
| --executor_shutdown_grace_period=VALUE | Default amount of time to wait for an executor to shut down (e.g. 60secs, 3mins, etc). ExecutorInfo.shutdown_grace_period overrides this default. Note that the executor must not assume that it will always be allotted the full grace period, as the agent may decide to allot a shorter period, and failures / forcible terminations may occur. (default: 5secs) |
| --fetcher_cache_dir=VALUE |
Parent directory for fetcher cache directories
(one subdirectory per agent). (default: /tmp/mesos/fetch)
Directory for the fetcher cache. The agent will clear this directory on startup. It is recommended to set this value to a separate volume for several reasons:
|
| --fetcher_cache_size=VALUE | Size of the fetcher cache in Bytes. (default: 2GB) |
| --fetcher_stall_timeout=VALUE | Amount of time for the fetcher to wait before considering a download being too slow and abort it when the download stalls (i.e., the speed keeps below one byte per second). NOTE: This feature only applies when downloading data from the net and does not apply to HDFS. (default: 1mins) |
| --frameworks_home=VALUE | Directory path prepended to relative executor URIs (default: ) |
| --gc_delay=VALUE | Maximum amount of time to wait before cleaning up executor directories (e.g., 3days, 2weeks, etc). Note that this delay may be shorter depending on the available disk usage. (default: 1weeks) |
| --gc_disk_headroom=VALUE |
Adjust disk headroom used to calculate maximum executor
directory age. Age is calculated by:
gc_delay * max(0.0, (1.0 - gc_disk_headroom - disk usage))
every --disk_watch_interval duration. gc_disk_headroom must
be a value between 0.0 and 1.0 (default: 0.1)
|
| --[no-]gc_non_executor_container_sandboxes |
Determines whether nested container sandboxes created via the
LAUNCH_CONTAINER and LAUNCH_NESTED_CONTAINER APIs will be
automatically garbage collected by the agent upon termination.
The REMOVE_(NESTED_)CONTAINER API is unaffected by this flag
and can still be used. (default: false).
|
| --hadoop_home=VALUE |
Path to find Hadoop installed (for
fetching framework executors from HDFS)
(no default, look for HADOOP_HOME in
environment or find hadoop on PATH)
|
| --host_path_volume_force_creation |
A colon-separated list of directories where descendant directories are
allowed to be created by the volume/host_path isolator,
if the directories do not exist.
|
| --http_credentials=VALUE |
Path to a JSON-formatted file containing credentials. These
credentials are used to authenticate HTTP endpoints on the agent.
Path can be of the form file:///path/to/file or /path/to/file.
Example:
|
| --[no-]http_command_executor |
The underlying executor library to be used for the command executor.
If set to true, the command executor would use the HTTP based
executor library to interact with the Mesos agent. If set to false,
the driver based implementation would be used.
NOTE: This flag is *experimental* and should not be used in
production yet. (default: false)
|
| --http_executor_domain_sockets | If true, the agent will provide a unix domain sockets that the executor can use to connect to the agent, instead of relying on a TCP connection. |
| --http_heartbeat_interval=VALUE |
This flag sets a heartbeat interval (e.g. '5secs', '10mins') for
messages to be sent over persistent connections made against
the agent HTTP API. Currently, this only applies to the
LAUNCH_NESTED_CONTAINER_SESSION and ATTACH_CONTAINER_OUTPUT calls.
(default: 30secs)
|
| --image_providers=VALUE |
Comma-separated list of supported image providers,
e.g., APPC,DOCKER.
|
| --image_provisioner_backend=VALUE |
Strategy for provisioning container rootfs from images, e.g., aufs,
bind, copy, overlay.
|
| --image_gc_config=VALUE |
JSON-formatted configuration for automatic container image garbage
collection. This is an optional flag. If it is not set, it means
the automatic container image gc is not enabled. Users have to
trigger image gc manually via the operator API. If it is set, the
auto image gc is enabled. This image gc config can be provided either
as a path pointing to a local file, or as a JSON-formatted string.
Please note that the image garbage collection only work with Mesos
Containerizer for now.
See the ImageGcConfig message in `flags.proto` for the expected
format.
In the following example, image garbage collection is configured to
sample disk usage every hour, and will attempt to maintain at least
10% of free space on the container image filesystem:
|
| --ip6=VALUE |
IPv6 address to listen on. This cannot be used in conjunction
with --ip6_discovery_command.
NOTE: Currently Mesos doesn't listen on IPv6 sockets and hence
this IPv6 address is only used to advertise IPv6 addresses for
containers running on the host network.
|
| --ip6_discovery_command=VALUE | Optional IPv6 discovery binary: if set, it is expected to emit the IPv6 address on which Mesos will try to bind when IPv6 socket support is enabled in Mesos. NOTE: Currently Mesos doesn't listen on IPv6 sockets and hence this IPv6 address is only used to advertise IPv6 addresses for containers running on the host network. |
| --isolation=VALUE |
Isolation mechanisms to use, e.g., posix/cpu,posix/mem (or
windows/cpu,windows/mem if you are on Windows), or
cgroups/cpu,cgroups/mem, or network/port_mapping
(configure with flag: --with-network-isolator to enable),
or gpu/nvidia for nvidia specific gpu isolation, or load an alternate
isolator module using the --modules flag. If cgroups/all
is specified, any other cgroups related isolation options (e.g.,
cgroups/cpu) will be ignored, and all the local enabled cgroups
subsystems on the agent host will be automatically loaded by the cgroups isolator.
Note that this flag is only relevant for the Mesos Containerizer. (default:
windows/cpu,windows/mem on Windows; posix/cpu,posix/mem on other platforms)
|
| --launcher=VALUE |
The launcher to be used for Mesos containerizer. It could either be
linux or posix. The Linux launcher is required for cgroups
isolation and for any isolators that require Linux namespaces such as
network, pid, etc. If unspecified, the agent will choose the Linux
launcher if it's running as root on Linux.
|
| --launcher_dir=VALUE | Directory path of Mesos binaries. Mesos looks for the fetcher, containerizer, and executor binary files under this directory. (default: /usr/local/libexec/mesos) |
| --master_detector=VALUE |
The symbol name of the master detector to use. This symbol should exist in a
module specified through the --modules flag. Cannot be used in
conjunction with --master.
|
| --nvidia_gpu_devices=VALUE |
A comma-separated list of Nvidia GPU devices. When gpus is specified
in the --resources flag, this flag determines which GPU devices will
be made available. The devices should be listed as numbers that
correspond to Nvidia's NVML device enumeration (as seen by running the
command nvidia-smi on an Nvidia GPU equipped system). The GPUs
listed will only be isolated if the --isolation flag contains the
string gpu/nvidia.
|
| --network_cni_plugins_dir=VALUE |
Directory path of the CNI plugin binaries. The network/cni
isolator will find CNI plugins under this directory so that it can execute
the plugins to add/delete container from the CNI networks. It is the operator's
responsibility to install the CNI plugin binaries in the specified directory.
|
| --network_cni_config_dir=VALUE | Directory path of the CNI network configuration files. For each network that containers launched in Mesos agent can connect to, the operator should install a network configuration file in JSON format in the specified directory. |
| --[no-]network_cni_root_dir_persist | This setting controls whether the CNI root directory persists across reboot or not. |
| --[no-]network_cni_metrics | This setting controls whether the networking metrics of the CNI isolator should be exposed. |
| --oversubscribed_resources_interval=VALUE | The agent periodically updates the master with the current estimation about the total amount of oversubscribed resources that are allocated and available. The interval between updates is controlled by this flag. (default: 15secs) |
| --perf_duration=VALUE |
Duration of a perf stat sample. The duration must be less
than the perf_interval. (default: 10secs)
|
| --perf_events=VALUE |
List of command-separated perf events to sample for each container
when using the perf_event isolator. Default is none.
Run command perf list to see all events. Event names are
sanitized by downcasing and replacing hyphens with underscores
when reported in the PerfStatistics protobuf, e.g., cpu-cycles
becomes cpu_cycles; see the PerfStatistics protobuf for all names.
|
| --perf_interval=VALUE |
Interval between the start of perf stat samples. Perf samples are
obtained periodically according to perf_interval and the most
recently obtained sample is returned rather than sampling on
demand. For this reason, perf_interval is independent of the
resource monitoring interval. (default: 60secs)
|
| --qos_controller=VALUE | The name of the QoS Controller to use for oversubscription. |
| --qos_correction_interval_min=VALUE | The agent polls and carries out QoS corrections from the QoS Controller based on its observed performance of running tasks. The smallest interval between these corrections is controlled by this flag. (default: 0secs) |
| --reconfiguration_policy=VALUE |
This flag controls which agent configuration changes are considered
acceptable when recovering the previous agent state. Possible values:
equal: The old and the new state must match exactly.
additive: The new state must be a superset of the old state:
it is permitted to add additional resources, attributes
and domains but not to remove or to modify existing ones.
Note that this only affects the checking done on the agent itself, the master may still reject the agent if it detects a change that it considers unacceptable, which, e.g., currently happens when port or hostname are changed. (default: equal) |
| --recover=VALUE |
Whether to recover status updates and reconnect with old executors.
Valid values for recover are
reconnect: Reconnect with any old live executors.
cleanup : Kill any old live executors and exit.
Use this option when doing an incompatible agent
or executor upgrade!). (default: reconnect)
|
| --recovery_timeout=VALUE | Amount of time allotted for the agent to recover. If the agent takes longer than recovery_timeout to recover, any executors that are waiting to reconnect to the agent will self-terminate. (default: 15mins) |
| --registration_backoff_factor=VALUE |
Agent initially picks a random amount of time between [0, b], where
b = registration_backoff_factor, to (re-)register with a new master.
Subsequent retries are exponentially backed off based on this
interval (e.g., 1st retry uses a random value between [0, b * 2^1],
2nd retry between [0, b * 2^2], 3rd retry between [0, b * 2^3],
etc) up to a maximum of 1mins (default: 1secs)
|
| --resource_estimator=VALUE | The name of the resource estimator to use for oversubscription. |
| --resources=VALUE |
Total consumable resources per agent. Can be provided in JSON format
or as a semicolon-delimited list of key:value pairs, with the role
optionally specified.
As a key:value list:
name(role):value;name:value...
To use JSON, pass a JSON-formatted string or use
--resources=filepath to specify the resources via a file containing
a JSON-formatted string. 'filepath' can only be of the form
file:///path/to/file.
Example JSON:
|
| --resource_provider_config_dir=VALUE |
Path to a directory that contains local resource provider configs.
Each file in the config dir should contain a JSON object representing
a ResourceProviderInfo object. Each local resource
provider provides resources that are local to the agent. It is also
responsible for handling operations on the resources it provides.
Please note that resources field might not need to be
specified if the resource provider determines the resources
automatically.
Example config file in this directory:
|
| --csi_plugin_config_dir=VALUE |
Path to a directory that contains CSI plugin configs.
Each file in the config dir should contain a JSON object representing
a CSIPluginInfo object which can be either a managed CSI
plugin (i.e. the plugin launched by Mesos as a standalone container)
or an unmanaged CSI plugin (i.e. the plugin launched out of Mesos).
Example config files in this directory:
|
| --[no-]revocable_cpu_low_priority | Run containers with revocable CPU at a lower priority than normal containers (non-revocable cpu). Currently only supported by the cgroups/cpu isolator. (default: true) |
| --runtime_dir |
Path of the agent runtime directory. This is where runtime data
is stored by an agent that it needs to persist across crashes (but
not across reboots). This directory will be cleared on reboot.
(Example: /var/run/mesos)
|
| --sandbox_directory=VALUE | The absolute path for the directory in the container where the sandbox is mapped to. (default: /mnt/mesos/sandbox) |
| --[no-]strict |
If strict=true, any and all recovery errors are considered fatal.
If strict=false, any expected errors (e.g., agent cannot recover
information about an executor, because the agent died right before
the executor registered.) during recovery are ignored and as much
state as possible is recovered.
(default: true)
|
| --secret_resolver=VALUE | The name of the secret resolver module to use for resolving environment and file-based secrets. If this flag is not specified, the default behavior is to resolve value-based secrets and error on reference-based secrets. |
| --[no-]switch_user |
If set to true, the agent will attempt to run tasks as
the user who submitted them (as defined in FrameworkInfo)
(this requires setuid permission and that the given user
exists on the agent).
If the user does not exist, an error occurs and the task will fail.
If set to false, tasks will be run as the same user as the Mesos
agent process.
NOTE: This feature is not yet supported on Windows agent, and
therefore the flag currently does not exist on that platform. (default: true)
|
| --[no-]systemd_enable_support | Top level control of systemd support. When enabled, features such as executor life-time extension are enabled unless there is an explicit flag to disable these (see other flags). This should be enabled when the agent is launched as a systemd unit. (default: true) |
| --systemd_runtime_directory=VALUE | The path to the systemd system run time directory. (default: /run/systemd/system) |
| --volume_gid_range=VALUE |
When this flag is specified, if a task running as non-root user uses a
shared persistent volume or a PARENT type SANDBOX_PATH volume, the
volume will be owned by a gid allocated from this range and have the
`setgid` bit set, and the task process will be launched with the gid
as its supplementary group to make sure it can access the volume.
(Example: [10000-20000])
|
Network Isolator Flags
Available when configured with --with-network-isolator.
| Flag | Explanation |
|---|---|
| --ephemeral_ports_per_container=VALUE |
Number of ephemeral ports allocated to a container by the network
isolator. This number has to be a power of 2. This flag is used
for the network/port_mapping isolator. (default: 1024)
|
| --eth0_name=VALUE |
The name of the public network interface (e.g., eth0). If it is
not specified, the network isolator will try to guess it based
on the host default gateway. This flag is used for the
network/port_mapping isolator.
|
| --lo_name=VALUE |
The name of the loopback network interface (e.g., lo). If it is
not specified, the network isolator will try to guess it. This
flag is used for the network/port_mapping isolator.
|
| --egress_rate_limit_per_container=VALUE |
The limit of the egress traffic for each container, in Bytes/s.
If not specified or specified as zero, the network isolator will
impose no limits to containers' egress traffic throughput.
This flag uses the Bytes type (defined in stout) and is used for
the network/port_mapping isolator.
|
| --[no-]egress_unique_flow_per_container |
Whether to assign an individual flow for each container for the
egress traffic. This flag is used for the network/port_mapping
isolator. (default: false)
|
| --egress_flow_classifier_parent=VALUE |
When egress_unique_flow_per_container is enabled, we need to install
a flow classifier (fq_codel) qdisc on egress side. This flag specifies
where to install it in the hierarchy. By default, we install it at root.
|
| --[no-]network_enable_socket_statistics_summary |
Whether to collect socket statistics summary for each container.
This flag is used for the network/port_mapping isolator.
(default: false)
|
| --[no-]network_enable_socket_statistics_details |
Whether to collect socket statistics details (e.g., TCP RTT) for
each container. This flag is used for the network/port_mapping
isolator. (default: false)
|
| --[no-]network_enable_snmp_statistics | Whether to collect SNMP statistics details (e.g., TCPRetransSegs) for each container. This flag is used for the 'network/port_mapping' isolator. (default: false) |
Seccomp Isolator flags
Available when configured with --enable-seccomp-isolator.
| Flag | Explanation |
|---|---|
| --seccomp_config_dir=VALUE |
Directory path of the Seccomp profiles.
If a container is launched with a specified Seccomp profile name,
the linux/seccomp isolator will try to locate a Seccomp
profile in the specified directory.
|
| --seccomp_profile_name=VALUE |
Path of the default Seccomp profile relative to the seccomp_config_dir.
If this flag is specified, the linux/seccomp isolator applies the Seccomp
profile by default when launching a new Mesos container.
NOTE: A Seccomp profile must be compatible with the
Docker Seccomp profile format (e.g., https://github.com/moby/moby/blob/master/profiles/seccomp/default.json).
|
XFS Disk Isolator flags
Available when configured with --enable-xfs-disk-isolator.
| Flag | Explanation |
|---|---|
| --xfs_project_range=VALUE | The ranges of XFS project IDs that the isolator can use to track disk quotas for container sandbox directories. Valid project IDs range from 1 to max(uint32). (default `[5000-10000]`) |
Autotools Options
The most up-to-date options can be found with ./configure --help.
Autotools configure script options
| Flag | Explanation |
|---|---|
| --enable-static[=PKGS] | Build static libraries. [default=yes] |
| --enable-dependency-tracking | Do not reject slow dependency extractors. |
| --disable-dependency-tracking | Speeds up one-time build. |
| --enable-silent-rules | Less verbose build output (undo: "make V=1"). |
| --disable-silent-rules | Verbose build output (undo: "make V=0"). |
| --disable-maintainer-mode | Disable make rules and dependencies not useful (and sometimes confusing) to the casual installer. |
| --enable-shared[=PKGS] | Build shared libraries. [default=yes] |
| --enable-fast-install[=PKGS] | Optimize for fast installation. [default=yes] |
| --enable-gc-unused | Enable garbage collection of unused program segments. This option significantly reduces the size of the final build artifacts. [default=no] |
| --disable-libtool-lock | Avoid locking. Note that this might break parallel builds. |
| --disable-bundled | Configures Mesos to build against preinstalled dependencies instead of bundled libraries. |
| --disable-bundled-pip |
Excludes building and using the bundled pip package in lieu of an
installed version in PYTHONPATH.
|
| --disable-bundled-setuptools |
Excludes building and using the bundled setuptools package in lieu of an
installed version in PYTHONPATH.
|
| --disable-bundled-wheel |
Excludes building and using the bundled wheel package in lieu of an
installed version in PYTHONPATH.
|
| --enable-debug | Whether debugging is enabled. If CFLAGS/CXXFLAGS are set, this option won't change them. [default=no] |
| --enable-install-module-dependencies | Install third-party bundled dependencies required for module development. [default=no] |
| --disable-java | Don't build Java bindings. |
| --enable-libevent | Use libevent instead of libev for the libprocess event loop. Note that the libevent version 2+ development package is required. [default=no] |
| --disable-use-nvml | Disable use of the NVML headers.|
| --enable-optimize | Whether optimizations are enabled. If CFLAGS/CXXFLAGS are set, this option won't change them. [default=no] |
| --enable-perftools | Whether profiling with Google perftools is enabled. [default=no] |
| --enable-parallel-test-execution | Whether to attempt to run tests in parallel. |
| --enable-new-cli | Whether to build the new Python CLI. This option requires Python 3 which can be set using the PYTHON_3 environment variable. [default=no] |
| --disable-python | Don't build Python bindings. |
| --disable-python-dependency-install | When the python packages are installed during make install, no external dependencies will be downloaded or installed. |
| --enable-ssl | Enable SSL for libprocess communication. [default=no] |
| --enable-static-unimplemented | Generate static assertion errors for unimplemented functions. [default=no] |
| --enable-tests-install | Build and install tests and their helper tools. [default=no] |
| --enable-xfs-disk-isolator | Builds the XFS disk isolator. [default=no] |
| --disable-zlib | Disables zlib compression, which means the webui will be far less responsive; not recommended. |
| --enable-lock-free-event-queue | Enables the lock-free event queue to be used in libprocess which greatly improves message passing performance! |
| --disable-werror | Disables treating compiler warnings as fatal errors. |
Autotools configure script optional package flags
| Flag | Explanation |
|---|---|
| --with-gnu-ld |
Assume the C compiler uses GNU ld. [default=no]
|
| --with-sysroot[=DIR] |
Search for dependent libraries within DIR
(or the compiler's sysroot if not specified).
|
| --with-apr[=DIR] | Specify where to locate the apr-1 library. |
| --with-boost[=DIR] | Excludes building and using the bundled Boost package in lieu of an installed version at a location prefixed by the given path. |
| --with-concurrentqueue[=DIR] | Excludes building and using the bundled concurrentqueue package in lieu of an installed version at a location prefixed by the given path. |
| --with-curl[=DIR] | Specify where to locate the curl library. |
| --with-elfio[=DIR] | Excludes building and using the bundled ELFIO package in lieu of an installed version at a location prefixed by the given path. |
| --with-glog[=DIR] | excludes building and using the bundled glog package in lieu of an installed version at a location prefixed by the given path. |
| --with-gmock[=DIR] | Excludes building and using the bundled gmock package in lieu of an installed version at a location prefixed by the given path. |
| --with-http-parser[=DIR] | Excludes building and using the bundled http-parser package in lieu of an installed version at a location prefixed by the given path. |
| --with-leveldb[=DIR] | Excludes building and using the bundled LevelDB package in lieu of an installed version at a location prefixed by the given path. |
| --with-libev[=DIR] | Excludes building and using the bundled libev package in lieu of an installed version at a location prefixed by the given path. |
| --with-libevent[=DIR] | Specify where to locate the libevent library. |
| --with-libprocess[=DIR] | Specify where to locate the libprocess library. |
| --with-network-isolator | Builds the network isolator. |
| --with-nl[=DIR] | Specify where to locate the libnl3 library, which is required for the network isolator. |
| --with-nvml[=DIR] | Excludes building and using the bundled NVML headers in lieu of an installed version at a location prefixed by the given path. |
| --with-picojson[=DIR] | Excludes building and using the bundled picojson package in lieu of an installed version at a location prefixed by the given path. |
| --with-protobuf[=DIR] | Excludes building and using the bundled protobuf package in lieu of an installed version at a location prefixed by the given path. |
| --with-sasl[=DIR] | Specify where to locate the sasl2 library. |
| --with-ssl[=DIR] | Specify where to locate the ssl library. |
| --with-stout[=DIR] | Specify where to locate stout library. |
| --with-svn[=DIR] | Specify where to locate the svn-1 library. |
| --with-zlib[=DIR] | Specify where to locate the zlib library. |
| --with-zookeeper[=DIR] | Excludes building and using the bundled ZooKeeper package in lieu of an installed version at a location prefixed by the given path. |
Environment variables which affect the Autotools configure script
Use these variables to override the choices made by configure or to help
it to find libraries and programs with nonstandard names/locations.
| Variable | Explanation |
|---|---|
| JAVA_HOME | Location of Java Development Kit (JDK). |
| JAVA_CPPFLAGS | Preprocessor flags for JNI. |
| JAVA_JVM_LIBRARY |
Full path to libjvm.so.
|
| MAVEN_HOME |
Looks for mvn at MAVEN_HOME/bin/mvn.
|
| PROTOBUF_JAR | Full path to protobuf jar on prefixed builds. |
| PYTHON | Which Python 2 interpreter to use. |
| PYTHON_VERSION | The installed Python 2 version to use, for example '2.3'. This string will be appended to the Python 2 interpreter canonical name. |
| PYTHON_3 | Which Python 3 interpreter to use. |
| PYTHON_3_VERSION | The installed Python 3 version to use, for example '3.6'. This string will be appended to the Python 3 interpreter canonical name. |
CMake Options
The most up-to-date options can be found with cmake .. -LAH.
See more information in the CMake documentation.
| Flag | Explanation |
|---|---|
| -DVERBOSE=(TRUE|FALSE) | Generate a build solution that produces verbose output (for example, verbose Makefiles). [default=TRUE] |
| -DBUILD_SHARED_LIBS=(TRUE|FALSE) | Build shared libraries (where possible). [default=FALSE for Windows, TRUE otherwise] |
| -DENABLE_GC_UNUSED=(TRUE|FALSE) | Enable garbage collection of unused program segments. This option significantly reduces the size of the final build artifacts. [default=FALSE] |
| -DENABLE_PRECOMPILED_HEADERS=(TRUE|FALSE) | Enable auto-generated precompiled headers using cotire. [default=TRUE for Windows, FALSE otherwise] |
| -DCPACK_BINARY_[TYPE]=(TRUE|FALSE) | Where [TYPE] is one of BUNDLE, DEB, DRAGNDROP, IFW, NSIS, OSXX11, PACKAGEMAKER, RPM, STGZ, TBZ2, TGZ, TXZ. This modifies the 'package' target to generate binary package of the specified format. A binary package contains everything that would be installed via CMake's 'install' target. [default=FALSE] |
| -DCPACK_SOURCE_[TYPE]=(TRUE|FALSE) | Where [TYPE] is one of TBZ2, TXZ, TZ, ZIP. This modifies the 'package_source' target to generate a package of the sources required to build and test Mesos, in the specified format. [default=FALSE] |
| -DREBUNDLED=(TRUE|FALSE) |
Attempt to build against the third-party dependencies included as tarballs
in the Mesos repository. NOTE: This is not always possible. For example, a
dependency might not be included as a tarball in the Mesos repository;
additionally, Windows does not have a package manager, so we do not expect
system dependencies like APR to exist natively, and we therefore must
acquire them. In these cases (or when -DREBUNDLED=FALSE), we
will acquire the dependency from the location specified by the
3RDPARTY_DEPENDENCIES, which by default points to the
official Mesos third-party dependency
mirror. [default=TRUE]
|
| -DENABLE_LIBEVENT=(TRUE|FALSE) | Use libevent instead of libev for the event loop. This is required (but not the default) on Windows. [default=FALSE] |
| -DUNBUNDLED_LIBEVENT=(TRUE|FALSE) | Build libprocess with an installed libevent version instead of the bundled. [default=TRUE for macOS, FALSE otherwise] |
| -DLIBEVENT_ROOT_DIR=[path] | Specify the path to libevent, e.g. "C:\libevent-Win64". [default=unspecified] |
| -DENABLE_SSL=(TRUE|FALSE) | Build libprocess with SSL support. [default=FALSE] |
| -DOPENSSL_ROOT_DIR=[path] | Specify the path to OpenSSL, e.g. "C:\OpenSSL-Win64". [default=unspecified] |
| -DENABLE_LOCK_FREE_RUN_QUEUE=(TRUE|FALSE) | Build libprocess with lock free run queue. [default=FALSE] |
| -DENABLE_JAVA=(TRUE|FALSE) | Build Java components. Warning: this is SLOW. [default=FALSE] |
| -DENABLE_NEW_CLI=(TRUE|FALSE) | Enable the new Python CLI by building a binary using PyInstaller. This option requires Python 3 which can be set using the CMake option. [default=FALSE] |
| -DPYTHON_3=[path] | Specify the path to Python 3, e.g. "python36". [default=unspecified] |
| -D3RDPARTY_DEPENDENCIES=[path_or_url] | Location of the dependency mirror. In some cases, the Mesos build system needs to acquire third-party dependencies that aren't rebundled as tarballs in the Mesos repository. For example, on Windows, we must aquire newer versions of some dependencies, and since Windows does not have a package manager, we must acquire system dependencies like cURL. This parameter can be either a URL (for example, pointing at the Mesos official third-party dependency mirror), or a local folder (for example, a local clone of the dependency mirror). [default="https://github.com/mesos/3rdparty/raw/master"] |
| -DPATCHEXE_PATH=[path] | Location of GNU Patch for Windows binary. [default=%PROGRAMFILESX86%/GnuWin32/bin/patch.exe] |
| -DENABLE_NVML=(TRUE|FALSE) | Enable use of the NVML headers. [default=TRUE] |
| -DMESOS_FINAL_PREFIX=[path] | Adjust built-in paths (rpath in shared objects, default paths in Mesos flags and so on) so that cmake install output works after being copied into this prefix. This path does not have to exist on the build system (the system where cmake install is invoked). This option is typically used by package managers that use different prefixes on a build system and on a target system. [default=`${CMAKE_INSTALL_PREFIX}`] |
| -DMESOS_INSTALL_TESTS=(TRUE|FALSE) | Add test executables and their dependencies to the install output. |
Libprocess Options
The bundled libprocess library can be controlled with the following environment variables.
| Variable | Explanation |
|---|---|
| LIBPROCESS_IP | Sets the IP address for communication to and from libprocess. |
| LIBPROCESS_PORT | Sets the port for communication to and from libprocess. |
| LIBPROCESS_ADVERTISE_IP | If set, this provides the IP address that will be advertised to the outside world for communication to and from libprocess. This is useful, for example, for containerized tasks in which communication is bound locally to a non-public IP that will be inaccessible to the master. |
| LIBPROCESS_ADVERTISE_PORT | If set, this provides the port that will be advertised to the outside world for communication to and from libprocess. Note that this port will not actually be bound (the local LIBPROCESS_PORT will be), so redirection to the local IP and port must be provided separately. |
| LIBPROCESS_REQUIRE_PEER_ADDRESS_IP_MATCH | If set, the IP address portion of the libprocess UPID in incoming messages is required to match the IP address of the socket from which the message was sent. This can be a security enhancement since it prevents unauthorized senders impersonating other libprocess actors. This check may break configurations that require setting LIBPROCESS_IP, or LIBPROCESS_ADVERTISE_IP. Additionally, multi-homed configurations may be affected since the address on which libprocess is listening may not match the address from which libprocess connects to other actors. |
| LIBPROCESS_ENABLE_PROFILER |
To enable the profiler, this variable must be set to 1. Note that this
variable will only work if Mesos has been configured with
--enable-perftools.
|
| LIBPROCESS_METRICS_SNAPSHOT_ENDPOINT_RATE_LIMIT |
If set, this variable can be used to configure the rate limit
applied to the /metrics/snapshot endpoint. The format is
` |
| LIBPROCESS_NUM_WORKER_THREADS | If set to an integer value in the range 1 to 1024, it overrides the default setting of the number of libprocess worker threads, which is the maximum of 8 and the number of cores on the machine. |
Master and Agent Options
These options can be supplied to both masters and agents.
| Flag | Explanation |
|---|---|
| --advertise_ip=VALUE | IP address advertised to reach this Mesos master/agent. The master/agent does not bind to this IP address. However, this IP address may be used to access this master/agent. |
| --advertise_port=VALUE |
Port advertised to reach this Mesos master/agent (along with
advertise_ip). The master/agent does not bind using this port.
However, this port (along with advertise_ip) may be used to
access Mesos master/agent.
|
| --[no-]authenticate_http_readonly |
If true, only authenticated requests for read-only HTTP endpoints
supporting authentication are allowed. If false, unauthenticated
requests to such HTTP endpoints are also allowed.
|
| --[no-]authenticate_http_readwrite |
If true, only authenticated requests for read-write HTTP endpoints
supporting authentication are allowed. If false, unauthenticated
requests to such HTTP endpoints are also allowed.
|
| --firewall_rules=VALUE |
The value could be a JSON-formatted string of rules or a
file path containing the JSON-formatted rules used in the endpoints
firewall. Path must be of the form file:///path/to/file
or /path/to/file.
See the Firewall message in flags.proto for the expected format.
Example:
|
| --domain=VALUE |
Domain that the master or agent belongs to. Mesos currently only supports
fault domains, which identify groups of hosts with similar failure
characteristics. A fault domain consists of a region and a zone. All masters
in the same Mesos cluster must be in the same region (they can be in
different zones). Agents configured to use a different region than the
master's region will not appear in resource offers to frameworks that have
not enabled the REGION_AWARE capability. This value can be
specified as either a JSON-formatted string or a file path containing JSON.
See the documentation for further details. Example: |
| --[no-]help | Show the help message and exit. (default: false) |
| --hooks=VALUE | A comma-separated list of hook modules to be installed inside master/agent. |
| --hostname=VALUE |
The hostname the agent node should report, or that the master
should advertise in ZooKeeper.
If left unset, the hostname is resolved from the IP address
that the master/agent binds to; unless the user explicitly prevents
that, using --no-hostname_lookup, in which case the IP itself
is used.
|
| --[no-]hostname_lookup |
Whether we should execute a lookup to find out the server's hostname,
if not explicitly set (via, e.g., --hostname).
True by default; if set to false it will cause Mesos
to use the IP address, unless the hostname is explicitly set. (default: true)
|
| --http_authenticators=VALUE |
HTTP authenticator implementation to use when handling requests to
authenticated endpoints. Use the default basic, or load an
alternate HTTP authenticator module using --modules.
(default: basic, or basic and JWT if executor authentication is enabled)
|
| --ip=VALUE |
IP address to listen on. This cannot be used in conjunction
with --ip_discovery_command.
|
| --ip_discovery_command=VALUE |
Optional IP discovery binary: if set, it is expected to emit
the IP address which the master/agent will try to bind to.
Cannot be used in conjunction with --ip.
|
| --modules=VALUE |
List of modules to be loaded and be available to the internal
subsystems.
Use --modules=filepath to specify the list of modules via a
file containing a JSON-formatted string. filepath can be
of the form file:///path/to/file or /path/to/file.
Use --modules="{...}" to specify the list of modules inline.
Example:
|
| --modules_dir=VALUE |
Directory path of the module manifest files. The manifest files are processed in
alphabetical order. (See --modules for more information on module
manifest files). Cannot be used in conjunction with --modules.
|
| --port=VALUE | Port to listen on. (master default: 5050; agent default: 5051) |
| --[no-]version | Show version and exit. (default: false) |
| --zk_session_timeout=VALUE | ZooKeeper session timeout. (default: 10secs) |
Logging Options
These logging options can also be supplied to both masters and agents. For more about logging, see the logging documentation.
| Flag | Explanation |
|---|---|
| --[no-]quiet | Disable logging to stderr. (default: false) |
| --log_dir=VALUE | Location to put log files. By default, nothing is written to disk. Does not affect logging to stderr. If specified, the log file will appear in the Mesos WebUI. NOTE: 3rd party log messages (e.g. ZooKeeper) are only written to stderr! |
| --logbufsecs=VALUE | Maximum number of seconds that logs may be buffered for. By default, logs are flushed immediately. (default: 0) |
| --logging_level=VALUE |
Log message at or above this level.
Possible values: INFO, WARNING, ERROR.
If --quiet is specified, this will only affect the logs
written to --log_dir, if specified. (default: INFO)
|
| --[no-]initialize_driver_logging | Whether the master/agent should initialize Google logging for the scheduler and executor drivers, in the same way as described here. The scheduler/executor drivers have separate logs and do not get written to the master/agent logs. This option has no effect when using the HTTP scheduler/executor APIs. (default: true) |
| --external_log_file=VALUE |
Location of the externally managed log file. Mesos does not write to
this file directly and merely exposes it in the WebUI and HTTP API.
This is only useful when logging to stderr in combination with an
external logging mechanism, like syslog or journald.
This option is meaningless when specified along with --quiet.
This option takes precedence over --log_dir in the WebUI.
However, logs will still be written to the --log_dir if
that option is specified.
|
Master Options
Required Flags
| Flag | Explanation |
|---|---|
| --quorum=VALUE |
The size of the quorum of replicas when using replicated_log based
registry. It is imperative to set this value to be a majority of
masters i.e., quorum > (number of masters)/2.
NOTE: Not required if master is run in standalone mode (non-HA).
|
| --work_dir=VALUE |
Path of the master work directory. This is where the persistent
information of the cluster will be stored. Note that locations like
/tmp which are cleaned automatically are not suitable for the work
directory when running in production, since long-running masters could
lose data when cleanup occurs. (Example: /var/lib/mesos/master)
|
| --zk=VALUE |
ZooKeeper URL (used for leader election amongst masters).
May be one of:
|
Optional Flags
| Flag | Explanation |
|---|---|
| --acls=VALUE |
The value could be a JSON-formatted string of ACLs
or a file path containing the JSON-formatted ACLs used
for authorization. Path could be of the form file:///path/to/file
or /path/to/file.
Note that if the flag --authorizers is provided with a value
different than local, the ACLs contents will be
ignored.
See the ACLs protobuf in acls.proto for the expected format.
Example:
|
| --agent_ping_timeout=VALUE, --slave_ping_timeout=VALUE |
The timeout within which an agent is expected to respond to a
ping from the master. Agents that do not respond within
max_agent_ping_timeouts ping retries will be marked unreachable.
NOTE: The total ping timeout (agent_ping_timeout multiplied by
max_agent_ping_timeouts) should be greater than the ZooKeeper
session timeout to prevent useless re-registration attempts.
(default: 15secs)
|
| --agent_removal_rate_limit=VALUE --slave_removal_rate_limit=VALUE |
The maximum rate (e.g., 1/10mins, 2/3hrs, etc) at which agents
will be removed from the master when they fail health checks.
By default, agents will be removed as soon as they fail the health
checks. The value is of the form (Number of agents)/(Duration).
|
| --agent_reregister_timeout=VALUE --slave_reregister_timeout=VALUE | The timeout within which an agent is expected to reregister. Agents reregister when they become disconnected from the master or when a new master is elected as the leader. Agents that do not reregister within the timeout will be marked unreachable in the registry; if/when the agent reregisters with the master, any non-partition-aware tasks running on the agent will be terminated. NOTE: This value has to be at least 10mins. (default: 10mins) |
| --allocation_interval=VALUE | Amount of time to wait between performing (batch) allocations (e.g., 500ms, 1sec, etc). (default: 1secs) |
| --allocator=VALUE |
Allocator to use for resource allocation to frameworks.
Use the default HierarchicalDRF allocator, or
load an alternate allocator module using --modules.
(default: HierarchicalDRF)
|
| --min_allocatable_resources=VALUE | One or more sets of resource quantities that define the minimum allocatable resource for the allocator. The allocator will only offer resources that meets the quantity requirement of at least one of the specified sets. For `SCALAR` type resources, its quantity is its scalar value. For `RANGES` and `SET` type, their quantities are the number of different instances in the range or set. For example, `range:[1-5]` has a quantity of 5 and `set:{a,b}` has a quantity of 2. The resources in each set should be delimited by semicolons (acting as logical AND), and each set should be delimited by the pipe character (acting as logical OR). (Example: `disk:1|cpus:1;mem:32;ports:1` configures the allocator to only offer resources if they contain a disk resource of at least 1 megabyte, or if they at least contain 1 cpu, 32 megabytes of memory and 1 port.) (default: cpus:0.01|mem:32). |
| --[no-]authenticate_agents, --[no-]authenticate_slaves |
If true only authenticated agents are allowed to register.
If false unauthenticated agents are also allowed to register. (default: false)
|
| --[no-]authenticate_frameworks, --[no-]authenticate |
If true, only authenticated frameworks are allowed to register. If
false, unauthenticated frameworks are also allowed to register. For
HTTP based frameworks use the --authenticate_http_frameworks flag. (default: false)
|
| --[no-]authenticate_http_frameworks |
If true, only authenticated HTTP based frameworks are allowed to
register. If false, HTTP frameworks are not authenticated. (default: false)
|
| --authenticators=VALUE |
Authenticator implementation to use when authenticating frameworks
and/or agents. Use the default crammd5, or
load an alternate authenticator module using --modules. (default: crammd5)
|
| --authentication_v0_timeout=VALUE |
The timeout within which an authentication is expected to complete against a v0 framework or agent. This does not apply to the v0 or v1 HTTP APIs. (default: 15secs)
|
| --authorizers=VALUE |
Authorizer implementation to use when authorizing actions that
require it.
Use the default local, or
load an alternate authorizer module using --modules.
Note that if the flag --authorizers is provided with a value
different than the default local, the ACLs
passed through the --acls flag will be ignored.
Currently there is no support for multiple authorizers. (default: local)
|
| --cluster=VALUE | Human readable name for the cluster, displayed in the webui. |
| --credentials=VALUE |
Path to a JSON-formatted file containing credentials.
Path can be of the form file:///path/to/file or /path/to/file.
Example:
|
| --fair_sharing_excluded_resource_names=VALUE | A comma-separated list of the resource names (e.g. 'gpus') that will be excluded from fair sharing constraints. This may be useful in cases where the fair sharing implementation currently has limitations. E.g. See the problem of "scarce" resources: msg35631 MESOS-5377 |
| --[no-]filter_gpu_resources | When set to true, this flag will cause the mesos master to filter all offers from agents with GPU resources by only sending them to frameworks that opt into the 'GPU_RESOURCES' framework capability. When set to false, this flag will cause the master to not filter offers from agents with GPU resources, and indiscriminately send them to all frameworks whether they set the 'GPU_RESOURCES' capability or not. This flag is meant as a temporary workaround towards the eventual deprecation of the 'GPU_RESOURCES' capability. Please see the following for more information: msg37571 MESOS-7576 |
| --framework_sorter=VALUE |
Policy to use for allocating resources between a given role's
frameworks. Options are the same as for --role_sorter.
(default: drf)
|
| --http_framework_authenticators=VALUE |
HTTP authenticator implementation to use when authenticating HTTP frameworks.
Use the basic authenticator or load an alternate HTTP authenticator
module using --modules. This must be used in conjunction with
--authenticate_http_frameworks.
Currently there is no support for multiple HTTP authenticators.
|
| --[no-]log_auto_initialize | Whether to automatically initialize the [replicated log](../replicated-log-internals.md) used for the registry. If this is set to false, the log has to be manually initialized when used for the very first time. (default: true) |
| --master_contender=VALUE |
The symbol name of the master contender to use. This symbol should exist in a
module specified through the --modules flag. Cannot be used in
conjunction with --zk. Must be used in conjunction with
--master_detector.
|
| --master_detector=VALUE |
The symbol name of the master detector to use. This symbol should exist in a
module specified through the --modules flag. Cannot be used in
conjunction with --zk. Must be used in conjunction with
--master_contender.
|
| --max_agent_ping_timeouts=VALUE, --max_slave_ping_timeouts=VALUE |
The number of times an agent can fail to respond to a
ping from the master. Agents that do not respond within
max_agent_ping_timeouts ping retries will be marked unreachable.
(default: 5)
|
| --max_completed_frameworks=VALUE | Maximum number of completed frameworks to store in memory. (default: 50) |
| --max_completed_tasks_per_framework=VALUE | Maximum number of completed tasks per framework to store in memory. (default: 1000) |
| --max_operator_event_stream_subscribers=VALUE |
Maximum number of simultaneous subscribers to the master's operator event
stream. If new connections bring the total number of subscribers over this
value, older connections will be closed by the master.
This flag should generally not be changed unless the operator is mitigating known problems with their network setup, such as clients/proxies that do not close connections to the master. (default: 1000) |
| --max_unreachable_tasks_per_framework=VALUE | Maximum number of unreachable tasks per framework to store in memory. (default: 1000) |
| --offer_timeout=VALUE | Duration of time before an offer is rescinded from a framework. This helps fairness when running frameworks that hold on to offers, or frameworks that accidentally drop offers. If not set, offers do not timeout. |
| --offer_constraints_re2_max_mem=VALUE | Limit on the memory usage of each RE2 regular expression in framework's offer constraints. If `OfferConstraints` contain a regex from which a RE2 object cannot be constructed without exceeding this limit, then framework's attempt to subscribe or update subscription with these `OfferConstraints` will fail. (default: 4KB) |
| --offer_constraints_re2_max_program_size=VALUE | Limit on the RE2 program size of each regular expression in framework's offer constraints. If `OfferConstraints` contain a regex which results in a RE2 object exceeding this limit, then framework's attempt to subscribe or update subscription with these `OfferConstraints` will fail. (default: 100) |
| --[no-]publish_per_framework_metrics |
If true, an extensive set of metrics for each active framework will
be published. These metrics are useful for understanding cluster behavior,
but can be overwhelming for very large numbers of frameworks. (default: true)
|
| --rate_limits=VALUE |
The value could be a JSON-formatted string of rate limits
or a file path containing the JSON-formatted rate limits used
for framework rate limiting.
Path could be of the form file:///path/to/file
or /path/to/file.
See the RateLimits protobuf in mesos.proto for the expected format.
Example:
|
| --recovery_agent_removal_limit=VALUE, --recovery_slave_removal_limit=VALUE | For failovers, limit on the percentage of agents that can be removed from the registry *and* shutdown after the re-registration timeout elapses. If the limit is exceeded, the master will fail over rather than remove the agents. This can be used to provide safety guarantees for production environments. Production environments may expect that across master failovers, at most a certain percentage of agents will fail permanently (e.g. due to rack-level failures). Setting this limit would ensure that a human needs to get involved should an unexpected widespread failure of agents occur in the cluster. Values: [0%-100%] (default: 100%) |
| --registry=VALUE |
Persistence strategy for the registry; available options are
replicated_log, in_memory (for testing). (default: replicated_log)
|
| --registry_fetch_timeout=VALUE | Duration of time to wait in order to fetch data from the registry after which the operation is considered a failure. (default: 1mins) |
| --registry_gc_interval=VALUE |
How often to garbage collect the registry. The current leading
master will periodically discard information from the registry.
How long registry state is retained is controlled by other
parameters (e.g., registry_max_agent_age,
registry_max_agent_count); this parameter controls
how often the master will examine the registry to see if data
should be discarded. (default: 15mins)
|
| --registry_max_agent_age=VALUE |
Maximum length of time to store information in the registry about
agents that are not currently connected to the cluster. This
information allows frameworks to determine the status of unreachable
and gone agents. Note that the registry always stores
information on all connected agents. If there are more than
registry_max_agent_count partitioned/gone agents, agent
information may be discarded from the registry sooner than indicated
by this parameter. (default: 2weeks)
|
| --registry_max_agent_count=VALUE |
Maximum number of partitioned/gone agents to store in the
registry. This information allows frameworks to determine the status
of disconnected agents. Note that the registry always stores
information about all connected agents. See also the
registry_max_agent_age flag. (default: 102400)
|
| --registry_store_timeout=VALUE | Duration of time to wait in order to store data in the registry after which the operation is considered a failure. (default: 20secs) |
| --[no-]require_agent_domain | If true, only agents with a configured domain can register. (default: false) |
| --roles=VALUE | A comma-separated list of the allocation roles that frameworks in this cluster may belong to. This flag is deprecated; if it is not specified, any role name can be used. |
| --[no-]root_submissions | Can root submit frameworks? (default: true) |
| --role_sorter=VALUE | Policy to use for allocating resources between roles. May be one of: dominant_resource_fairness (drf) or weighted random uniform distribution (random) (default: drf) |
| --webui_dir=VALUE | Directory path of the webui files/assets (default: /usr/local/share/mesos/webui) |
| --weights=VALUE |
A comma-separated list of role/weight pairs of the form
role=weight,role=weight. Weights can be used to control the
relative share of cluster resources that is offered to different roles. This
flag is deprecated. Instead, operators should configure weights dynamically
using the /weights HTTP endpoint.
|
| --whitelist=VALUE |
Path to a file which contains a list of agents (one per line) to
advertise offers for. The file is watched and periodically re-read to
refresh the agent whitelist. By default there is no whitelist: all
machines are accepted. Path can be of the form
file:///path/to/file or /path/to/file.
|
Network Isolator Flags
Available when configured with --with-network-isolator.
| Flag | Explanation |
|---|---|
| --max_executors_per_agent=VALUE, --max_executors_per_slave=VALUE | Maximum number of executors allowed per agent. The network monitoring/isolation technique imposes an implicit resource acquisition on each executor (# ephemeral ports), as a result one can only run a certain number of executors on each agent. |
Mesos Runtime Configuration
The Mesos master and agent can take a variety of configuration options
through command-line arguments or environment variables. A list of the
available options can be seen by running mesos-master --help or
mesos-agent --help. Each option can be set in two ways:
-
By passing it to the binary using
--option_name=value, either specifying the value directly, or specifying a file in which the value resides (--option_name=file://path/to/file). The path can be absolute or relative to the current working directory. -
By setting the environment variable
MESOS_OPTION_NAME(the option name with aMESOS_prefix added to it).
Configuration values are searched for first in the environment, then on the command-line.
Additionally, this documentation lists only a recent snapshot of the options in
Mesos. A definitive source for which flags your version of Mesos supports can be
found by running the binary with the flag --help, for example mesos-master --help.
Master and Agent Options
These are options common to both the Mesos master and agent.
See configuration/master-and-agent.md.
Master Options
Agent Options
Libprocess Options
See configuration/libprocess.md.
Mesos Build Configuration
Autotools Options
If you have special compilation requirements, please refer to ./configure --help when configuring Mesos.
See configuration/autotools.md.
CMake Options
Mesos High-Availability Mode
If the Mesos master is unavailable, existing tasks can continue to execute, but new resources cannot be allocated and new tasks cannot be launched. To reduce the chance of this situation occurring, Mesos has a high-availability mode that uses multiple Mesos masters: one active master (called the leader or leading master) and several backups in case it fails. The masters elect the leader, with Apache ZooKeeper both coordinating the election and handling leader detection by masters, agents, and scheduler drivers. More information regarding how leader election works is available on the Apache Zookeeper website.
This document describes how to configure Mesos to run in high-availability mode. For more information on developing highly available frameworks, see a companion document.
Note: This document assumes you know how to start, run, and work with ZooKeeper, whose client library is included in the standard Mesos build.
Usage
To put Mesos into high-availability mode:
-
Ensure that the ZooKeeper cluster is up and running.
-
Provide the znode path to all masters, agents, and framework schedulers as follows:
-
Start the mesos-master binaries using the
--zkflag, e.g.--zk=zk://host1:port1,host2:port2,.../path -
Start the mesos-agent binaries with
--master=zk://host1:port1,host2:port2,.../path -
Start any framework schedulers using the same
zkpath as in the last two steps. The SchedulerDriver must be constructed with this path, as shown in the Framework Development Guide.
-
From now on, the Mesos masters and agents all communicate with ZooKeeper to find out which master is the current leading master. This is in addition to the usual communication between the leading master and the agents.
In addition to ZooKeeper, one can get the location of the leading master by sending an HTTP request to /redirect endpoint on any master.
For HTTP endpoints that only work at the leading master, requests made to endpoints at a non-leading master will result in either a 307 Temporary Redirect (with the location of the leading master) or 503 Service Unavailable (if the master does not know who the current leader is).
Refer to the Scheduler API for how to deal with leadership changes.
Component Disconnection Handling
When a network partition disconnects a component (master, agent, or scheduler driver) from ZooKeeper, the component's Master Detector induces a timeout event. This notifies the component that it has no leading master. Depending on the component, the following happens. (Note that while a component is disconnected from ZooKeeper, a master may still be in communication with agents or schedulers and vice versa.)
-
Agents disconnected from ZooKeeper no longer know which master is the leader. They ignore messages from masters to ensure they don't act on a non-leader's decisions. When an agent reconnects to ZooKeeper, ZooKeeper informs it of the current leader and the agent stops ignoring messages from the leader.
-
Masters enter leaderless state irrespective of whether they are a leader or not before the disconnection.
-
If the leader was disconnected from ZooKeeper, it aborts its process. The user/developer/administrator can then start a new master instance which will try to reconnect to ZooKeeper.
- Note that many production deployments of Mesos use a process supervisor (such as systemd or supervisord) that is configured to automatically restart the Mesos master if the process aborts unexpectedly.
-
Otherwise, the disconnected backup waits to reconnect with ZooKeeper and possibly get elected as the new leading master.
-
-
Scheduler drivers disconnected from the leading master notify the scheduler about their disconnection from the leader.
When a network partition disconnects an agent from the leader:
-
The agent fails health checks from the leader.
-
The leader marks the agent as deactivated and sends its tasks to the LOST state. The Framework Development Guide describes these various task states.
-
Deactivated agents may not reregister with the leader and are told to shut down upon any post-deactivation communication.
Monitoring
For monitoring the current number of masters in the cluster communicating with each other to form a quorum, see the monitoring guide's Replicated Log on registrar/log/ensemble_size.
For creating alerts covering failures in leader election, have a look at the monitoring guide's Basic Alerts on master/elected.
Implementation Details
Mesos implements two levels of ZooKeeper leader election abstractions, one in src/zookeeper and the other in src/master (look for contender|detector.hpp|cpp).
-
The lower level
LeaderContenderandLeaderDetectorimplement a generic ZooKeeper election algorithm loosely modeled after this recipe (sans herd effect handling due to the master group's small size, which is often 3). -
The higher level
MasterContenderandMasterDetectorwrap around ZooKeeper's contender and detector abstractions as adapters to provide/interpret the ZooKeeper data. -
Each Mesos master simultaneously uses both a contender and a detector to try to elect themselves and detect who the current leader is. A separate detector is necessary because each master's WebUI redirects browser traffic to the current leader when that master is not elected. Other Mesos components (i.e., agents and scheduler drivers) use the detector to find the current leader and connect to it.
The notion of the group of leader candidates is implemented in Group. This abstraction handles reliable (through queues and retries of retryable errors under the covers) ZooKeeper group membership registration, cancellation, and monitoring. It watches for several ZooKeeper session events:
- Connection
- Reconnection
- Session Expiration
- ZNode creation, deletion, updates
We also explicitly timeout our sessions when disconnected from ZooKeeper for a specified amount of time. See --zk_session_timeout configuration option. This is because the ZooKeeper client libraries only notify of session expiration upon reconnection. These timeouts are of particular interest for network partitions.
The Mesos Replicated Log
Mesos provides a library that lets you create replicated fault-tolerant append-only logs; this library is known as the replicated log. The Mesos master uses this library to store cluster state in a replicated, durable way; the library is also available for use by frameworks to store replicated framework state or to implement the common "replicated state machine" pattern.
What is the replicated log?
The replicated log provides append-only storage of log entries; each log entry can contain arbitrary data. The log is replicated, which means that each log entry has multiple copies in the system. Replication provides both fault tolerance and high availability. In the following example, we use Apache Aurora, a fault tolerant scheduler (i.e., framework) running on top of Mesos, to show a typical replicated log setup.
As shown above, there are multiple Aurora instances running simultaneously (for high availability), with one elected as the leader. There is a log replica on each host running Aurora. Aurora can access the replicated log through a thin library containing the log API.
Typically, the leader is the only one that appends data to the log. Each log entry is replicated and sent to all replicas in the system. Replicas are strongly consistent. In other words, all replicas agree on the value of each log entry. Because the log is replicated, when Aurora decides to failover, it does not need to copy the log from a remote host.
Use Cases
The replicated log can be used to build a wide variety of distributed applications. For example, Aurora uses the replicated log to store all task states and job configurations. The Mesos master's registry also leverages the replicated log to store information about all agents in the cluster.
The replicated log is often used to allow applications to manage replicated state in a strongly consistent way. One way to do this is to store a state-mutating operation in each log entry and have all instances of the distributed application agree on the same initial state (e.g., empty state). The replicated log ensures that each application instance will observe the same sequence of log entries in the same order; as long as applying a state-mutating operation is deterministic, this ensures that all application instances will remain consistent with one another. If any instance of the application crashes, it can reconstruct the current version of the replicated state by starting at the initial state and re-applying all the logged mutations in order.
If the log grows too large, an application can write out a snapshot and then delete all the log entries that occurred before the snapshot. Using this approach, we will be exposing a distributed state abstraction in Mesos with replicated log as a backend.
Similarly, the replicated log can be used to build replicated state machines. In this scenario, each log entry contains a state machine command. Since replicas are strongly consistent, all servers will execute the same commands in the same order.
Implementation

The replicated log uses the Paxos consensus algorithm to ensure that all replicas agree on every log entry's value. It is similar to what's described in these slides. Readers who are familiar with Paxos can skip this section.
The above figure is an implementation overview. When a user wants to append data to the log, the system creates a log writer. The log writer internally creates a coordinator. The coordinator contacts all replicas and executes the Paxos algorithm to make sure all replicas agree about the appended data. The coordinator is sometimes referred to as the proposer.
Each replica keeps an array of log entries. The array index is the log position. Each log entry is composed of three components: the value written by the user, the associated Paxos state and a learned bit where true means this log entry's value has been agreed. Therefore, a replica in our implementation is both an acceptor and a learner.
Reaching consensus for a single log entry
A Paxos round can help all replicas reach consensus on a single log entry's value. It has two phases: a promise phase and a write phase. Note that we are using slightly different terminology from the original Paxos paper. In our implementation, the prepare and accept phases in the original paper are referred to as the promise and write phases, respectively. Consequently, a prepare request (response) is referred to as a promise request (response), and an accept request (response) is referred to as a write request (response).
To append value X to the log at position p, the coordinator first broadcasts a promise request to all replicas with proposal number n, asking replicas to promise that they will not respond to any request (promise/write request) with a proposal number lower than n. We assume that n is higher than any other previously used proposal number, and will explain how we do this later.
When receiving the promise request, each replica checks its Paxos state to decide if it can safely respond to the request, depending on the promises it has previously given out. If the replica is able to give the promise (i.e., passes the proposal number check), it will first persist its promise (the proposal number n) on disk and reply with a promise response. If the replica has been previously written (i.e., accepted a write request), it needs to include the previously written value along with the proposal number used in that write request into the promise response it's about to send out.
Upon receiving promise responses from a quorum of replicas, the coordinator first checks if there exist any previously written value from those responses. The append operation cannot continue if a previously written value is found because it's likely that a value has already been agreed on for that log entry. This is one of the key ideas in Paxos: restrict the value that can be written to ensure consistency.
If no previous written value is found, the coordinator broadcasts a write request to all replicas with value X and proposal number n. On receiving the write request, each replica checks the promise it has given again, and replies with a write response if the write request's proposal number is equal to or larger than the proposal number it has promised. Once the coordinator receives write responses from a quorum of replicas, the append operation succeeds.
Optimizing append latency using Multi-Paxos
One naive solution to implement a replicated log is to run a full Paxos round (promise phase and write phase) for each log entry. As discussed in the original Paxos paper, if the leader is relatively stable, Multi-Paxos can be used to eliminate the need for the promise phase for most of the append operations, resulting in improved performance.
To do that, we introduce a new type of promise request called an implicit promise request. An implicit promise request can be viewed as a batched promise request for a (potentially infinite) set of log entries. Broadcasting an implicit promise request is conceptually equivalent to broadcasting a promise request for every log entry whose value has not yet been agreed. If the implicit promise request broadcasted by a coordinator gets accepted by a quorum of replicas, this coordinator is no longer required to run the promise phase if it wants to append to a log entry whose value has not yet been agreed because the promise phase has already been done in batch. The coordinator in this case is therefore called elected (a.k.a., the leader), and has exclusive access to the replicated log. An elected coordinator may be demoted (or lose exclusive access) if another coordinator broadcasts an implicit promise request with a higher proposal number.
One question remaining is how can we find out those log entries whose values have not yet been agreed. We have a very simple solution: if a replica accepts an implicit promise request, it will include its largest known log position in the response. An elected coordinator will only append log entries at positions larger than p, where p is greater than any log position seen in these responses.
Multi-Paxos has better performance if the leader is stable. The replicated log itself does not perform leader election. Instead, we rely on the user of the replicated log to choose a stable leader. For example, Aurora uses ZooKeeper to elect the leader.
Enabling local reads
As discussed above, in our implementation, each replica is both an acceptor and a learner. Treating each replica as a learner allows us to do local reads without involving other replicas. When a log entry's value has been agreed, the coordinator will broadcast a learned message to all replicas. Once a replica receives the learned message, it will set the learned bit in the corresponding log entry, indicating the value of that log entry has been agreed. We say a log entry is "learned" if its learned bit is set. The coordinator does not have to wait for replicas' acknowledgments.
To perform a read, the log reader will directly look up the underlying local replica. If the corresponding log entry is learned, the reader can just return the value to the user. Otherwise, a full Paxos round is needed to discover the agreed value. We always make sure that the replica co-located with the elected coordinator always has all log entries learned. We achieve that by running full Paxos rounds for those unlearned log entries after the coordinator is elected.
Reducing log size using garbage collection
In case the log grows large, the application has the choice to truncate the log. To perform a truncation, we append a special log entry whose value is the log position to which the user wants to truncate the log. A replica can actually truncate the log once this special log entry has been learned.
Unique proposal number
Many of the Paxos research papers assume that each proposal number is globally unique, and a coordinator can always come up with a proposal number that is larger than any other proposal numbers in the system. However, implementing this is not trivial, especially in a distributed environment. Some researchers suggest concatenating a globally unique server id to each proposal number. But it is still not clear how to generate a globally unique id for each server.
Our solution does not make the above assumptions. A coordinator can use an arbitrary proposal number initially. During the promise phase, if a replica knows a proposal number higher than the proposal number used by the coordinator, it will send the largest known proposal number back to the coordinator. The coordinator will retry the promise phase with a higher proposal number.
To avoid livelock (e.g., when two coordinators completing), we inject a randomly delay between T and 2T before each retry. T has to be chosen carefully. On one hand, we want T >> broadcast time such that one coordinator usually times out and wins before others wake up. On the other hand, we want T to be as small as possible such that we can reduce the wait time. Currently, we use T = 100ms. This idea is actually borrowed from Raft.
Automatic replica recovery
The algorithm described above has a critical vulnerability: if a replica loses its durable state (i.e., log files) due to either disk failure or operational error, that replica may cause inconsistency in the log if it is simply restarted and re-added to the group. The operator needs to stop the application on all hosts, copy the log files from the leader's host, and then restart the application. Note that the operator cannot copy the log files from an arbitrary replica because copying an unlearned log entry may falsely assemble a quorum for an incorrect value, leading to inconsistency.
To avoid the need for operator intervention in this situation, the Mesos replicated log includes support for auto recovery. As long as a quorum of replicas is working properly, the users of the application won't notice any difference.
Non-voting replicas
To enable auto recovery, a key insight is that a replica that loses its durable state should not be allowed to respond to requests from coordinators after restart. Otherwise, it may introduce inconsistency in the log as it could have accepted a promise/write request which it would not have accepted if its previous Paxos state had not been lost.
To solve that, we introduce a new status variable for each replica. A normal replica is said in VOTING status, meaning that it is allowed to respond to requests from coordinators. A replica with no persisted state is put in EMPTY status by default. A replica in EMPTY status is not allowed to respond to any request from coordinators.
A replica in EMPTY status will be promoted to VOTING status if the following two conditions are met:
- a sufficient amount of missing log entries are recovered such that if other replicas fail, the remaining replicas can recover all the learned log entries, and
- its future responses to a coordinator will not break any of the promises (potentially lost) it has given out.
In the following, we discuss how we achieve these two conditions.
Catch-up
To satisfy the above two conditions, a replica needs to perform catch-up to recover lost states. In other words, it will run Paxos rounds to find out those log entries whose values that have already been agreed. The question is how many log entries the local replica should catch-up before the above two conditions can be satisfied.
We found that it is sufficient to catch-up those log entries from position begin to position end where begin is the smallest position seen in a quorum of VOTING replicas and end is the largest position seen in a quorum of VOTING replicas.
Here is our correctness argument. For a log entry at position e where e is larger than end, obviously no value has been agreed on. Otherwise, we should find at least one VOTING replica in a quorum of replicas such that its end position is larger than end. For the same reason, a coordinator should not have collected enough promises for the log entry at position e. Therefore, it's safe for the recovering replica to respond requests for that log entry. For a log entry at position b where b is smaller than begin, it should have already been truncated and the truncation should have already been agreed. Therefore, allowing the recovering replica to respond requests for that position is also safe.
Auto initialization
Since we don't allow an empty replica (a replica in EMPTY status) to respond to requests from coordinators, that raises a question for bootstrapping because initially, each replica is empty. The replicated log provides two choices here. One choice is to use a tool (mesos-log) to explicitly initialize the log on each replica by setting the replica's status to VOTING, but that requires an extra step when setting up an application.
The other choice is to do automatic initialization. Our idea is: we allow a replica in EMPTY status to become VOTING immediately if it finds all replicas are in EMPTY status. This is based on the assumption that the only time all replicas are in EMPTY status is during start-up. This may not be true if a catastrophic failure causes all replicas to lose their durable state, and that's exactly the reason we allow conservative users to disable auto-initialization.
To do auto-initialization, if we use a single-phase protocol and allow a replica to directly transit from EMPTY status to VOTING status, we may run into a state where we cannot make progress even if all replicas are in EMPTY status initially. For example, say the quorum size is 2. All replicas are in EMPTY status initially. One replica will first set its status to VOTING because if finds all replicas are in EMPTY status. After that, neither the VOTING replica nor the EMPTY replicas can make progress. To solve this problem, we use a two-phase protocol and introduce an intermediate transient status (STARTING) between EMPTY and VOTING status. A replica in EMPTY status can transit to STARTING status if it finds all replicas are in either EMPTY or STARTING status. A replica in STARTING status can transit to VOTING status if it finds all replicas are in either STARTING or VOTING status. In that way, in our previous example, all replicas will be in STARTING status before any of them can transit to VOTING status.
Non-leading VOTING replica catch-up
Starting with Mesos 1.5.0 it is possible to perform eventually consistent reads from a non-leading VOTING log replica. This makes possible to do additional work on non-leading framework replicas, e.g. offload some reading from a leader to standbys reduce failover time by keeping in-memory storage represented by the replicated log "hot".
To serve eventually consistent reads a replica needs to perform catch-up to recover the latest log state in a manner similar to how it is done during EMPTY replica recovery. After that the recovered positions can be replayed without fear of seeing "holes".
A truncation can take place during the non-leading replica catch-up. The replica may try to fill the truncated position if truncation happens after the replica has recovered begin and end positions, which may lead to producing inconsistent data during log replay. In order to protect against it we use a special tombstone flag that signals to the replica that the position was truncated and begin needs to be adjusted. The replica is not blocked from truncations during or after catching-up, which means that the user may need to retry the catch-up procedure if positions that were recovered became truncated during log replay.
Future work
Currently, replicated log does not support dynamic quorum size change, also known as reconfiguration. Supporting reconfiguration would allow us more easily to add, move or swap hosts for replicas. We plan to support reconfiguration in the future.
Agent Recovery
If the mesos-agent process on a host exits (perhaps due to a Mesos bug or
because the operator kills the process while upgrading Mesos),
any executors/tasks that were being managed by the mesos-agent process will
continue to run.
By default, all the executors/tasks that were being managed by the old
mesos-agent process are expected to gracefully exit on their own, and
will be shut down after the agent restarted if they did not.
However, if a framework enabled checkpointing when it registered with the
master, any executors belonging to that framework can reconnect to the new
mesos-agent process and continue running uninterrupted. Hence, enabling
framework checkpointing allows tasks to tolerate Mesos agent upgrades and
unexpected mesos-agent crashes without experiencing any downtime.
Agent recovery works by having the agent checkpoint information about its own
state and about the tasks and executors it is managing to local disk, for
example the SlaveInfo, FrameworkInfo and ExecutorInfo messages or the
unacknowledged status updates of running tasks.
When the agent restarts, it will verify that its current configuration, set from the environment variables and command-line flags, is compatible with the checkpointed information and will refuse to restart if not.
A special case occurs when the agent detects that its host system was rebooted since the last run of the agent: The agent will try to recover its previous ID as usual, but if that fails it will actually erase the information of the previous run and will register with the master as a new agent.
Note that executors and tasks that exited between agent shutdown and restart are not automatically restarted during agent recovery.
Framework Configuration
A framework can control whether its executors will be recovered by setting
the checkpoint flag in its FrameworkInfo when registering with the master.
Enabling this feature results in increased I/O overhead at each agent that runs
tasks launched by the framework. By default, frameworks do not checkpoint
their state.
Agent Configuration
Four configuration flags control the recovery behavior of a Mesos agent:
-
strict: Whether to do agent recovery in strict mode [Default: true].- If strict=true, all recovery errors are considered fatal.
- If strict=false, any errors (e.g., corruption in checkpointed data) during recovery are ignored and as much state as possible is recovered.
-
reconfiguration_policy: Which kind of configuration changes are accepted when trying to recover [Default: equal].- If reconfiguration_policy=equal, no configuration changes are accepted.
- If reconfiguration_policy=additive, the agent will allow the new configuration to contain additional attributes, increased resourced or an additional fault domain. For a more detailed description, see this.
-
recover: Whether to recover status updates and reconnect with old executors [Default: reconnect]- If recover=reconnect, reconnect with any old live executors, provided the executor's framework enabled checkpointing.
- If recover=cleanup, kill any old live executors and exit. Use this option when doing an incompatible agent or executor upgrade! NOTE: If no checkpointing information exists, no recovery is performed and the agent registers with the master as a new agent.
-
recovery_timeout: Amount of time allotted for the agent to recover [Default: 15 mins].- If the agent takes longer than
recovery_timeoutto recover, any executors that are waiting to reconnect to the agent will self-terminate. NOTE: If none of the frameworks have enabled checkpointing, the executors and tasks running at an agent die when the agent dies and are not recovered.
- If the agent takes longer than
A restarted agent should reregister with master within a timeout (75 seconds
by default: see the --max_agent_ping_timeouts and --agent_ping_timeout
configuration flags). If the agent takes longer than this
timeout to reregister, the master shuts down the agent, which in turn will
shutdown any live executors/tasks.
Therefore, it is highly recommended to automate the process of restarting an
agent, e.g. using a process supervisor such as monit
or systemd.
Known issues with systemd and process lifetime
There is a known issue when using systemd to launch the mesos-agent. A
description of the problem can be found in MESOS-3425
and all relevant work can be tracked in the epic MESOS-3007.
This problem was fixed in Mesos 0.25.0 for the mesos containerizer when
cgroups isolation is enabled. Further fixes for the posix isolators and docker
containerizer are available in 0.25.1, 0.26.1, 0.27.1, and 0.28.0.
It is recommended that you use the default KillMode
for systemd processes, which is control-group, which kills all child processes
when the agent stops. This ensures that "side-car" processes such as the
fetcher and perf are terminated alongside the agent.
The systemd patches for Mesos explicitly move executors and their children into
a separate systemd slice, dissociating their lifetime from the agent. This
ensures the executors survive agent restarts.
The following excerpt of a systemd unit configuration file shows how to set
the flag explicitly:
[Service]
ExecStart=/usr/bin/mesos-agent
KillMode=control-cgroup
Framework Rate Limiting
Framework rate limiting is a feature introduced in Mesos 0.20.0.
What is Framework Rate Limiting
In a multi-framework environment, this feature aims to protect the throughput of high-SLA (e.g., production, service) frameworks by having the master throttle messages from other (e.g., development, batch) frameworks.
To throttle messages from a framework, the Mesos cluster operator sets a qps (queries per seconds) value for each framework identified by its principal (You can also throttle a group of frameworks together but we'll assume individual frameworks in this doc unless otherwise stated; see the RateLimits Protobuf definition and the configuration notes below). The master then promises not to process messages from that framework at a rate above qps. The outstanding messages are stored in memory on the master.
Rate Limits Configuration
The following is a sample config file (in JSON format) which could be specified with the --rate_limits master flag.
{
  "limits": [
    {
      "principal": "foo",
      "qps": 55.5
      "capacity": 100000
    },
    {
      "principal": "bar",
      "qps": 300
    },
    {
      "principal": "baz",
    }
  ],
  "aggregate_default_qps": 333,
  "aggregate_default_capacity": 1000000
}
In this example, framework foo is throttled at the configured qps and capacity, framework bar is given unlimited capacity and framework baz is not throttled at all. If there is a fourth framework qux or a framework without a principal connected to the master, it is throttled by the rules aggregate_default_qps and aggregate_default_capacity.
Configuration Notes
Below are the fields in the JSON configuration.
- principal: (Required) uniquely identifies the entity being throttled or given unlimited rate explicitly.
- It should match the framework's
FrameworkInfo.principal(See definition). - You can have multiple frameworks use the same principal (e.g., some Mesos frameworks launch a new framework instance for each job), in which case the combined traffic from all frameworks using the same principal are throttled at the specified QPS.
- It should match the framework's
- qps: (Optional) queries per second, i.e., the rate.
- Once set, the master guarantees that it does not process messages from this principal higher than this rate. However the master could be slower than this rate, especially if the specified rate is too high.
- To explicitly give a framework unlimited rate (i.e., not throttling it), add an entry to
limitswithout the qps.
- capacity: (Optional) The number of outstanding messages frameworks of this principal can put on the master. If not specified, this principal is given unlimited capacity. Note that it is possible the queued messages use too much memory and cause the master to OOM if the capacity is set too high or not set.
- NOTE: If
qpsis not specified,capacityis ignored.
- NOTE: If
- Use aggregate_default_qps and aggregate_default_capacity to safeguard the master from unspecified frameworks. All the frameworks not specified in
limitsget this default rate and capacity.- The rate and capacity are aggregate values for all of them, i.e., their combined traffic is throttled together.
- Same as above, if
aggregate_default_qpsis not specified,aggregate_default_capacityis ignored. - If these fields are not present, the unspecified frameworks are not throttled.
This is an implicit way of giving frameworks unlimited rate compared to the explicit way above (using an entry in
limitswith only the principal). We recommend using the explicit option especially when the master does not require authentication to prevent unexpected frameworks from overwhelming the master.
Using Framework Rate Limiting
Monitoring Framework Traffic
While a framework is registered with the master, the master exposes counters for all messages received and processed from that framework at its metrics endpoint: http://<master>/metrics/snapshot. For instance, framework foo has two message counters frameworks/foo/messages_received and frameworks/foo/messages_processed. Without framework rate limiting the two numbers should differ by little or none (because messages are processed ASAP) but when a framework is being throttled the difference indicates the outstanding messages as a result of the throttling.
By continuously monitoring the counters, you can derive the rate messages arrive and how fast the message queue length for the framework is growing (if it is throttled). This should depict the characteristics of the framework in terms of network traffic.
Configuring Rate Limits
Since the goal for framework rate limiting is to prevent low-SLA frameworks from using too much resources and not to model their traffic and behavior as precisely as possible, you can start by using large qps values to throttle them. The fact that they are throttled (regardless of the configured qps) is already effective in giving messages from high-SLA frameworks higher priority because they are processed ASAP.
To calculate how much capacity the master can handle, you need to know the memory limit for the master process, the amount of memory it typically uses to serve similar workload without rate limiting (e.g., use ps -o rss $MASTER_PID) and average sizes of the framework messages (queued messages are stored as serialized Protocol Buffers with a few additional fields) and you should sum up all capacity values in the config.
However since this kind of calculation is imprecise, you should start with small values that tolerate reasonable temporary framework burstiness but far from the memory limit to leave enough headroom for the master and frameworks that don't have limited capacity.
Handling "Capacity Exceeded" Error
When a framework exceeds the capacity, a FrameworkErrorMessage is sent back to the framework which will abort the scheduler driver and invoke the error() callback. It doesn't kill any tasks or the scheduler itself. The framework developer can choose to restart or failover the scheduler instance to remedy the consequences of dropped messages (unless your framework doesn't assume all messages sent to the master are processed).
After version 0.20.0 we are going to iterate on this feature by having the master send an early alert when the message queue for this framework starts to build up (MESOS-1664, consider it a "soft limit"). The scheduler can react by throttling itself (to avoid the error message) or ignoring this alert if it's a temporary burst by design.
Before the early alerting is implemented we don't recommend using the rate limiting feature to throttle production frameworks for now unless you are sure about the consequences of the error message. Of course it's OK to use it to protect production frameworks by throttling other frameworks and it doesn't have any effect on the master if it's not explicitly enabled.
Performing Node Maintenance in a Mesos Cluster
Operators regularly need to perform maintenance tasks on machines that comprise a Mesos cluster. Most Mesos upgrades can be done without affecting running tasks, but there are situations where maintenance may affect running tasks. For example:
- Hardware repair
- Kernel upgrades
- Agent upgrades (e.g., adjusting agent attributes or resources)
Before performing maintenance on an agent node in a Mesos cluster, it is typically desirable to gracefully migrate tasks away from the node beforehand in order to minimize service disruption when the machine is taken down. Mesos provides several ways to accomplish this migration:
- Automatic agent draining, which does not explicitly require cooperation from schedulers
- Manual node draining, which allows operators to exercise precise control over the task draining process
- Maintenance primitives, which permit complex coordination but do require that schedulers react to the maintenance-related messages that they receive
Automatic Node Draining
Node draining was added to provide a simple method for operators to drain tasks from nodes on which they plan to perform maintenance, without requiring that schedulers implement support for any maintenance-specific messages.
Initiating draining will cause all tasks on the target agent node to receive a kill event immediately, assuming the agent is currently reachable. If the agent is unreachable, initiation of the kill event will be delayed until the agent is reachable by the master again. When the tasks receive a kill event, a SIGTERM signal will be sent to the task to begin the killing process. Depending on the particular task's behavior, this signal may be sufficient to terminate it. Some tasks may use this signal to begin the process of graceful termination, which may take some time. After some delay, a SIGKILL signal will be sent to the task, which forcefully terminates the task if it is still running. The delay between the SIGTERM and SIGKILL signals is determined by the length of the task's kill grace period. If no grace period is set for the task, a default value of several seconds will be used.
Initiating Draining on a Node
To begin draining an agent, issue the operator API DRAIN_AGENT
call to the master:
$ curl -X POST -d '{"type": "DRAIN_AGENT", "drain_agent": {"agent_id": {"value": "<mesos-agent-id>"}}}' masterhost:5050/api/v1
This will immediately begin the process of killing all tasks on the agent. Once
draining has begun, it cannot be cancelled. To monitor the progress of the
draining process, you can inspect the state of the agent via the master operator
API GET_STATE or
GET_AGENTS calls:
$ curl -X POST -d '{"type": "GET_AGENTS"}' masterhost:5050/api/v1
Locate the relevant agent and inspect its drain_info.state field. While
draining, the state will be DRAINING. When all tasks on the agent have
terminated, all their terminal status updates have been acknowledged by the
schedulers, and all offer operations on the agent have finished, draining is
complete and the agent's drain state will transition to DRAINED. At this
point, the node may be taken down for maintenance.
Options for Automatic Node Draining
You may set an upper bound on the kill grace period of draining tasks by
specifying the max_grace_period option when draining:
$ curl -X POST -d '{"type": "DRAIN_AGENT", "drain_agent": {"agent_id": {"value": "<mesos-agent-id>"}, "max_grace_period": "10mins"}}' masterhost:5050/api/v1
In cases where you know that the node being drained will not return after
draining is complete, and you would like it to be automatically permanently
removed from the cluster, you may specify the mark_gone option:
$ curl -X POST -d '{"type": "DRAIN_AGENT", "drain_agent": {"agent_id": {"value": "<mesos-agent-id>"}, "mark_gone": true}}' masterhost:5050/api/v1
This can be useful, for example, in the case of autoscaled cloud instances,
where an instance is being scaled down and will never return. This is equivalent
to issuing the MARK_AGENT_GONE call on
the agent immediately after it finishes draining. WARNING: draining with the
mark_gone option is irreversible, and results in the loss of all local
persistent data on the agent node. Use this option with caution!
Reactivating a Node After Maintenance
Once maintenance on an agent is complete, it must be reactivated so that it can
reregister with the master and rejoin the cluster. You may use the master
operator API REACTIVATE_AGENT call to
accomplish this:
$ curl -X POST -d '{"type": "REACTIVATE_AGENT", "reactivate_agent": {"agent_id": {"value": "<mesos-agent-id>"}}}' masterhost:5050/api/v1
Manual Node Draining
If you require greater control over the draining process, you may be able to drain the agent manually using both the Mesos operator API as well as APIs exposed by the schedulers running tasks on the agent.
Deactivating an Agent
The first step in the manual draining process is agent deactivation, which prevents new tasks from launching on the target agent:
$ curl -X POST -d '{"type": "DEACTIVATE_AGENT", "deactivate_agent": {"agent_id": {"value": "<mesos-agent-id>"}}}' masterhost:5050/api/v1
If you receive a 200 OK response, then the agent has been deactivated. You can
confirm the deactivation state of any agent by inspecting its deactivated
field in the response of the master operator API
GET_STATE or
GET_AGENTS calls. Once the agent is
deactivated, you can use the APIs exposed by the schedulers responsible for the
tasks running on the agent to kill those tasks manually. To verify that all
tasks on the agent have terminated and their terminal status updates have been
acknowledged by the schedulers, ensure that the pending_tasks, queued_tasks,
and launched_tasks fields in the response to the
GET_TASKS agent operator API call are
empty:
$ curl -X POST -d '{"type": "GET_TASKS"}' agenthost:5051/api/v1
If you are making use of volumes backed by network storage on the target agent,
it's possible that there may be a long-running offer operation on the agent
which has not yet finished. To check if this is the case, issue the agent
operator API GET_OPERATIONS call to
the agent:
$ curl -X POST -d '{"type": "GET_OPERATIONS"}' agenthost:5051/api/v1
If any operations have a latest_status with a state of OPERATION_PENDING,
you should wait for them to finish before taking down the node. Unfortunately,
it is not possible to cancel or forcefully terminate such storage operations. If
such an operation becomes stuck in the pending state, you should inspect the
relevant storage backend for any issues.
Once all tasks on the agent have terminated and all offer operations are finished, the node may be taken down for maintenance. Once maintenance is complete, the procedure for reactivating the node is the same as that detailed in the section on automatic node draining.
Maintenance Primitives
Frameworks require visibility into any actions that disrupt cluster operation in order to meet Service Level Agreements or to ensure uninterrupted services for their end users. Therefore, to reconcile the requirements of frameworks and operators, frameworks must be aware of planned maintenance events and operators must be aware of frameworks' ability to adapt to maintenance. Maintenance primitives add a layer to facilitate communication between the frameworks and operator.
Terminology
For the purpose of this section, an "Operator" is a person, tool, or script that manages a Mesos cluster.
Maintenance primitives add several new concepts to Mesos. Those concepts are:
- Maintenance: An operation that makes resources on a machine unavailable, either temporarily or permanently.
- Maintenance window: A set of machines and an associated time interval during which some maintenance is planned on those machines.
- Maintenance schedule: A list of maintenance windows. A single machine may only appear in a schedule once.
- Unavailability: An operator-specified interval, defined by a start time and duration, during which an associated machine may become unavailable. In general, no assumptions should be made about the availability of the machine (or resources) after the unavailability.
- Drain: An interval between the scheduling of maintenance and when the machine(s) become unavailable. Offers sent with resources from draining machines will contain unavailability information. Frameworks running on draining machines will receive inverse offers (see next). Frameworks utilizing resources on affected machines are expected either to take preemptive steps to prepare for the unavailability; or to communicate the framework's inability to conform to the maintenance schedule.
- Inverse offer: A communication mechanism for the master to ask for resources back from a framework. This notifies frameworks about any unavailability and gives frameworks a mechanism to respond about their ability to comply. Inverse offers are similar to offers in that they can be accepted, declined, re-offered, and rescinded.
Note: Unavailability and inverse offers are not specific to maintenance. The same concepts can be used for non-maintenance goals, such as reallocating resources or resource preemption.
How does it work?
Maintenance primitives were introduced in Mesos 0.25.0. Several machine maintenance modes were also introduced. Those modes are illustrated below.
All mode transitions must be initiated by the operator. Mesos will not change the mode of any machine, regardless of the estimate provided in the maintenance schedule.
Scheduling maintenance
A machine is transitioned from Up mode to Draining mode as soon as it is scheduled for maintenance. To transition a machine into Draining mode, an operator constructs a maintenance schedule as a JSON document and posts it to the /maintenance/schedule HTTP endpoint on the Mesos master. Each Mesos cluster has a single maintenance schedule; posting a new schedule replaces the previous schedule, if any.
See the definition of a maintenance::Schedule and of Unavailability.
In a production environment, the schedule should be constructed to ensure that enough agents are operational at any given point in time to ensure uninterrupted service by the frameworks.
For example, in a cluster of three machines, the operator might schedule two machines for one hour of maintenance, followed by another hour for the last machine. The timestamps for unavailability are expressed in nanoseconds since the Unix epoch (note that making reliable use of maintenance primitives requires that the system clocks of all machines in the cluster are roughly synchronized).
The schedule might look like:
{
  "windows" : [
    {
      "machine_ids" : [
        { "hostname" : "machine1", "ip" : "10.0.0.1" },
        { "hostname" : "machine2", "ip" : "10.0.0.2" }
      ],
      "unavailability" : {
        "start" : { "nanoseconds" : 1443830400000000000 },
        "duration" : { "nanoseconds" : 3600000000000 }
      }
    }, {
      "machine_ids" : [
        { "hostname" : "machine3", "ip" : "10.0.0.3" }
      ],
      "unavailability" : {
        "start" : { "nanoseconds" : 1443834000000000000 },
        "duration" : { "nanoseconds" : 3600000000000 }
      }
    }
  ]
}
The operator can then post the schedule to the master's /maintenance/schedule endpoint:
curl http://localhost:5050/maintenance/schedule \
  -H "Content-type: application/json" \
  -X POST \
  -d @schedule.json
The machines in a maintenance schedule do not need to be registered with the Mesos master at the time when the schedule is set. The operator may add a machine to the maintenance schedule prior to launching an agent on the machine. For example, this can be useful to prevent a faulty machine from launching an agent on boot.
Note: Each machine in the maintenance schedule should have as
complete information as possible. In order for Mesos to recognize an agent
as coming from a particular machine, both the hostname and ip fields must
match. Any omitted data defaults to the empty string "". If there are
multiple hostnames or IPs for a machine, the machine's fields need to match
what the agent announces to the master. If there is any ambiguity in a
machine's configuration, the operator should use the --hostname and --ip
options when starting agents.
The master checks that a maintenance schedule has the following properties:
- Each maintenance window in the schedule must have at least one machine and a specified unavailability interval.
- Each machine must only appear in the schedule once.
- Each machine must have at least a hostname or IP included. The hostname is not case-sensitive.
- All machines that are in Down mode must be present in the schedule. This is required because this endpoint does not handle the transition from Down mode to Up mode.
If any of these properties are not met, the maintenance schedule is rejected with a corresponding error message and the master's state is not changed.
To update the maintenance schedule, the operator should first read the current
schedule, make any necessary changes, and then post the modified schedule. The
current maintenance schedule can be obtained by sending a GET request to the
master's /maintenance/schedule endpoint.
To cancel the maintenance schedule, the operator should post an empty schedule.
Draining mode
As soon as a schedule is posted to the Mesos master, the following things occur:
- The schedule is stored in the replicated log. This means the schedule is persisted in case of master failover.
- All machines in the schedule are immediately transitioned into Draining mode. The mode of each machine is also persisted in the replicated log.
- All frameworks using resources on affected agents are immediately notified. Existing offers from the affected agents are rescinded and re-sent with additional unavailability data. All frameworks using resources from the affected agents are given inverse offers.
- New offers from the affected agents will also include the additional unavailability data.
Frameworks should use this additional information to schedule tasks in a maintenance-aware fashion. Exactly how to do this depends on the design requirements of each scheduler, but tasks should typically be scheduled in a way that maximizes utilization but that also attempts to vacate machines before that machine's advertised unavailability period occurs. A scheduler might choose to place long-running tasks on machines with no unavailability, or failing that, on machines whose unavailability is the furthest away.
How a framework responds to an inverse offer indicates its ability to conform to the maintenance schedule. Accepting an inverse offer communicates that the framework is okay with the current maintenance schedule, given the current state of the framework's resources. The master and operator should interpret acceptance as a best-effort promise by the framework to free all the resources contained in the inverse offer before the start of the unavailability interval. Declining an inverse offer is an advisory notice to the operator that the framework is unable or unlikely to meet to the maintenance schedule.
For example:
- A data store may choose to start a new replica if one of its agents is scheduled for maintenance. The data store should accept an inverse offer if it can reasonably copy the data on the machine to a new host before the unavailability interval described in the inverse offer begins. Otherwise, the data store should decline the offer.
- A stateful task on an agent with an impending unavailability may be migrated to another available agent. If the framework has sufficient resources to do so, it would accept any inverse offers. Otherwise, it would decline them.
A framework can use a filter to control when it wants to be contacted again with an inverse offer. This is useful since future circumstances may change the viability of the maintenance schedule. The filter for inverse offers is identical to the existing mechanism for re-offering offers to frameworks.
Note: Accepting or declining an inverse offer does not result in immediate changes in the maintenance schedule or in the way Mesos acts. Inverse offers only represent extra information that frameworks may find useful. In the same manner, rejecting or accepting an inverse offer is a hint for an operator. The operator may or may not choose to take that hint into account.
Starting maintenance
The operator starts maintenance by posting a list of machines to the /machine/down HTTP endpoint. The list of machines is specified in JSON format; each element of the list is a MachineID.
For example, to start maintenance on two machines:
[
  { "hostname" : "machine1", "ip" : "10.0.0.1" },
  { "hostname" : "machine2", "ip" : "10.0.0.2" }
]
curl http://localhost:5050/machine/down \
  -H "Content-type: application/json" \
  -X POST \
  -d @machines.json
The master checks that a list of machines has the following properties:
- The list of machines must not be empty.
- Each machine must only appear once.
- Each machine must have at least a hostname or IP included. The hostname is not case-sensitive.
- If a machine's IP is included, it must be correctly formed.
- All listed machines must be present in the schedule.
If any of these properties are not met, the operation is rejected with a corresponding error message and the master's state is not changed.
The operator can start maintenance on any machine that is scheduled for maintenance. Machines that are not scheduled for maintenance cannot be directly transitioned from Up mode into Down mode. However, the operator may schedule a machine for maintenance with a timestamp equal to the current time or in the past, and then immediately start maintenance on that machine.
This endpoint can be used to start maintenance on machines that are not currently registered with the Mesos master. This can be useful if a machine has failed and the operator intends to remove it from the cluster; starting maintenance on the machine prevents the machine from being accidentally rebooted and rejoining the Mesos cluster.
The operator must explicitly transition a machine from Draining to Down mode. That is, Mesos will keep a machine in Draining mode even if the unavailability window arrives or passes. This means that the operation of the machine is not disrupted in any way and offers (with unavailability information) are still sent for this machine.
When maintenance is triggered by the operator, all agents on the machine are
told to shutdown. These agents are removed from the master, which means that a
TASK_LOST status update will be sent for every task running on each of those
agents. The scheduler driver's slaveLost callback will also be invoked for
each of the removed agents. Any agents on machines in maintenance are also
prevented from reregistering with the master in the future (until maintenance
is completed and the machine is brought back up).
Completing maintenance
When maintenance is complete or if maintenance needs to be cancelled, the operator can stop maintenance. The process is very similar to starting maintenance (same validation criteria as the previous section). The operator posts a list of machines to the master's /machine/up endpoint:
[
  { "hostname" : "machine1", "ip" : "10.0.0.1" },
  { "hostname" : "machine2", "ip" : "10.0.0.2" }
]
curl http://localhost:5050/machine/up \
  -H "Content-type: application/json" \
  -X POST \
  -d @machines.json
Note: The duration of the maintenance window, as indicated by the "unavailability" field in the maintenance schedule, is a best-effort guess made by the operator. Stopping maintenance before the end of the unavailability interval is allowed, as is stopping maintenance after the end of the unavailability interval. Machines are never automatically transitioned out of maintenance.
Frameworks are informed about the completion or cancellation of maintenance when offers from that machine start being sent. There is no explicit mechanism for notifying frameworks when maintenance has finished. After maintenance has finished, new offers are no longer tagged with unavailability and inverse offers are no longer sent. Also, agents running on the machine will be allowed to register with the Mesos master.
Viewing maintenance status
The current maintenance status (Up, Draining, or Down) of each machine in the cluster can be viewed by accessing the master's /maintenance/status HTTP endpoint. For each machine that is Draining, this endpoint also includes the frameworks' responses to inverse offers for resources on that machine. For more information, see the format of the ClusterStatus message.
NOTE: The format of the data returned by this endpoint may change in a future release of Mesos.
title: Apache Mesos - Upgrading Mesos layout: documentation
Upgrading Mesos
This document serves as a guide for users who wish to upgrade an existing Mesos cluster. Some versions require particular upgrade techniques when upgrading a running cluster. Some upgrades will have incompatible changes.
Overview
This section provides an overview of the changes for each version (in particular when upgrading from the next lower version). For more details please check the respective sections below.
We categorize the changes as follows:
A New feature/behavior
C Changed feature/behavior
D Deprecated feature/behavior
R Removed feature/behavior
| Version | Mesos Core | Flags | Framework API | Module API | Endpoints |
|---|---|---|---|---|---|
| 1.10.x |
|
||||
| 1.9.x |
|
||||
| 1.8.x |
|
|
|
||
| 1.7.x | |||||
| 1.6.x |
|
|
|||
| 1.5.x |
|
||||
| 1.4.x |
|
||||
| 1.3.x | |||||
| 1.2.x | |||||
| 1.1.x | |||||
| 1.0.x |
|
||||
| 0.28.x | |||||
| 0.27.x | |||||
| 0.26.x | |||||
| 0.25.x |
Upgrading from 1.9.x to 1.10.x
- The canonical name for the environment variable
LIBPROCESS_SSL_VERIFY_CERTwas changed toLIBPROCESS_SSL_VERIFY_SERVER_CERT. The canonical name for the environment variableLIBPROCESS_SSL_REQUIRE_CERTwas changed toLIBPROCESS_SSL_REQUIRE_CLIENT_CERT. The old names will continue to work as before, but operators are encouraged to update their configuration to reduce confusion.
- The Mesos agent's
cgroups_enable_cfsflag previously controlled whether or not CFS quota would be used for all tasks on the agent. Resource limits have been added to tasks, and when a CPU limit is specified on a task, the agent will now apply a CFS quota regardless of the value ofcgroups_enable_cfs.
- The Mesos agent now requires the new
TASK_RESOURCE_LIMITSfeature. This capability is set by default, but if the--agent_featuresflag is specified explicitly,TASK_RESOURCE_LIMITSmust be included.
- Authorizers now must implement a method
getApprover(...)(see the authorization documentation and MESOS-10056) that returnsObjectApprovers that are valid throughout their whole lifetime. Keeping the state of anObjectApproverup-to-date becomes a responsibility of the authorizer. This is a breaking change for authorizer modules.
- The field
pending_tasksinGetTasksmaster API call has been deprecated. From now on, this field will be empty. Moreover, the notion of tasks pending authorization no longer exists (see MESOS-10056).
- Allocator interface has been changed to supply allocator with information on
resources actually consumed by frameworks. A method
transitionOfferedToAllocated(...)has been added and the signature ofrecoverResources(...)has been extended. Note that allocators must implement these new/extended method signatures, but are free to ignore resource consumption data provided by master.
Upgrading from 1.8.x to 1.9.x
- A new
DRAININGstate has been added to Mesos agents. Once an agent is draining, all tasks running on that agent are gracefully killed and no offers for that agent are sent to schedulers, preventing the launching of new tasks. Operators can put an agent intoDRAININGstate by using theDRAIN_AGENToperator API call. Seedocs/maintenancefor details.
- The Mesos agent now requires the new
AGENT_DRAININGfeature. This capability is set by default, but if the--agent_featuresflag is specified explicitly,AGENT_DRAININGmust be included.
- A new
linux/nnpisolator has been added. The isolator supports setting of theno_new_privsbit in the container, preventing tasks from acquiring additional privileges.
- A new
--docker_ignore_runtimeflag has been added. This causes the agent to ignore any runtime configuration present in Docker images.
- A new libprocess TLS flag
--hostname_validation_schemealong with the corresponding environment variableLIBPROCESS_SSL_HOSTNAME_VALIDATION_SCHEMEhas been added. Using this flag, users can configure the way libprocess performs hostname validation for TLS connections. Seedocs/sslfor details.
- The semantics of the libprocess environment variables
LIBPROCESS_SSL_VERIFY_CERTandLIBPROCESS_SSL_REQUIRE_CERThave been slightly updated such that the former now only applies to client-mode and the latter only to server-mode connections. As part of this re-adjustment, the following two changes have been introduced that might require changes for operators running Mesos in unusual TLS configurations.- Anonymous ciphers can not be used anymore when
LIBPROCESS_SSL_VERIFY_CERTis set to true. This is because the use of anonymous ciphers enables a malicious attacker to bypass certificate verification by choosing a certificate-less cipher. Users that rely on anonymous ciphers being available should make sure thatLIBPROCESS_SSL_VERIFY_CERTis set to false. - For incoming connections, certificates are not verified unless
LIBPROCESS_SSL_REQUIRE_CERTis set to true. This is because verifying the certificate can lead to false negatives, where a connection is aborted even though presenting no certificate at all would have been successfull. Users that rely on incoming connection requests presenting valid TLS certificates should make sure that theLIBPROCESS_SSL_REQUIRE_CERToption is set to true.
- Anonymous ciphers can not be used anymore when
- The Mesos containerizer now supports configurable IPC namespace and /dev/shm. Container can be configured to have a private IPC namespace and /dev/shm or share them from its parent via the field
LinuxInfo.ipc_mode, and the size of its private /dev/shm is also configurable via the fieldLinuxInfo.shm_size. Operators can control whether it is allowed to share host's IPC namespace and /dev/shm with top level containers via the agent flag--disallow_sharing_agent_ipc_namespace, and specify the default size of the /dev/shm for the container which has a private /dev/shm via the agent flag--default_container_shm_size.
- The
SET_QUOTAandREMOVE QUOTAmaster calls are deprecated in favor of a newUPDATE_QUOTAmaster call.
- Prior to Mesos 1.9, the quota related APIs only exposed quota "guarantees" which ensured a minimum amount of resources would be available to a role. Setting guarantees also set implicit quota limits. In Mesos 1.9+, quota limits are now exposed directly.
- Quota guarantees are now deprecated in favor of using only quota limits. Enforcement of quota guarantees required that Mesos holds back enough resources to meet all of the unsatisfied quota guarantees. Since Mesos is moving towards an optimistic offer model (to improve multi-role / multi- scheduler scalability, see MESOS-1607), it will become no longer possible to enforce quota guarantees by holding back resources. In such a model, quota limits are simple to enforce, but quota guarantees would require a complex "effective limit" propagation model to leave space for unsatisfied guarantees.
- For these reasons, quota guarantees, while still functional in Mesos 1.9, are now deprecated. A combination of limits and priority based preemption will be simpler in an optimistic offer model.
Upgrading from 1.7.x to 1.8.x
- A new
linux/seccompisolator has been added. The isolator supports the following new agent flags:--seccomp_config_dirspecifies the directory path of the Seccomp profiles.--seccomp_profile_namespecifies the path of the default Seccomp profile relative to theseccomp_config_dir.
Upgrading from 1.6.x to 1.7.x
- A new
linux/devicesisolator has been added. This isolator automatically populates containers with devices that have been whitelisted with the--allowed_devicesagent flag.
- A new option
cgroups/allhas been added to the agent flag--isolation. This allows cgroups isolator to automatically load all the local enabled cgroups subsystems. If this option is specified in the agent flag--isolationalong with other cgroups related options (e.g.,cgroups/cpu), those options will be just ignored.
- Added container-specific cgroups mounts under
/sys/fs/cgroupto containers with image launched by Mesos containerizer.
- Previously the
HOST_PATH,SANDBOX_PATH,IMAGE,SECRET, andDOCKER_VOLUMEvolumes were always mounted for container in read-write mode, i.e., theVolume.modefield was not honored. Now we will mount these volumes based on theVolume.modefield so framework can choose to mount the volume for the container in either read-write mode or read-only mode.
- To simplify the API for CSI-backed disk resources, the following operations and corresponding ACLs have been introduced to replace the experimental
CREATE_VOLUME,CREATE_BLOCK,DESTROY_VOLUMEandDESTROY_BLOCKoperations:CREATE_DISKto create aMOUNTorBLOCKdisk resource from aRAWdisk resource. TheCreateMountDiskandCreateBlockDiskACLs control which principals are allowed to createMOUNTorBLOCKdisks for which roles.DESTROY_DISKto reclaim aMOUNTorBLOCKdisk resource back to aRAWdisk resource. TheDestroyMountDiskandDestroyBlockDiskACLs control which principals are allowed to reclaimMOUNTorBLOCKdisks for which roles.
- A new
ViewResourceProviderACL has been introduced to control which principals are allowed to call theGET_RESOURCE_PROVIDERSagent API.
- A new
--enforce_container_portsflag has been added to toggle whether thenetwork/portsisolator should enforce TCP ports usage limits.
- A new
--gc_non_executor_container_sandboxesagent flag has been added to garbage collect the sandboxes of nested containers, which includes the tasks groups launched by the default executor. We recommend enabling the flag if you have frameworks that launch multiple task groups on the same default executor instance.
- A new
--network_cni_root_dir_persistflag has been added to toggle whether thenetwork/cniisolator should persist the network information across reboots.
ContainerLoggermodule interface has been changed. Theprepare()method now takesContainerIDandContainerConfiginstead.
Isolator::recover()has been updated to take anstd::vectorinstead ofstd::listof container states.
- As a result of adapting rapidjson for performance improvement, all JSON endpoints serialize differently while still conforming to the ECMA-404 spec for JSON. This means that if a client has a JSON de-serializer that conforms to ECMA-404 they will see no change. Otherwise, they may break. As an example, Mesos would previously serialize '/' as '/', but the spec does not require the escaping and rapidjson does not escape '/'.
Upgrading from 1.5.x to 1.6.x
- gRPC version 1.10+ is required to build Mesos when enabling gRPC-related features. Please upgrade your gRPC library if you are using an unbundled one.
- CSI v0.2 is now supported as experimental. Due to the incompatibility between CSI v0.1 and v0.2, the experimental support for CSI v0.1 is removed, and the operator must remove all storage local resource providers within an agent before upgrading the agent. NOTE: This is a breaking change for storage local resource providers.
- A new agent flag
--fetcher_stall_timeouthas been added. This flag specifies the amount of time for the container image and artifact fetchers to wait before aborting a stalled download (i.e., the speed keeps below one byte per second). NOTE: This flag only applies when downloading data from the net and does not apply to HDFS.
- The disk profile adaptor module has been changed to support CSI v0.2, and its header file has been renamed to be consistent with other modules. See
disk_profile_adaptor.hppfor interface changes.
- A new agent flag
--xfs_kill_containershas been added. By setting this flag, thedisk/xfsisolator will now kill containers that exceed the disk limit.
Upgrading from 1.4.x to 1.5.x
- The built-in executors will now send a
TASK_STARTINGstatus update for every task they've successfully received and are about to start. The possibility of any executor sending this update has been documented since the beginning of Mesos, but prior to this version the built-in executors did not actually send it. This means that all schedulers using one of the built-in executors must be upgraded to expectTASK_STARTINGupdates before upgrading Mesos itself.
- A new field,
limitation, was added to theTaskStatusmessage. This field is aTaskResourceLimitationmessage that describes the resources that caused a task to fail with a resource limitation reason.
- A new
network/portsisolator has been added. The isolator supports the following new agent flags:--container_ports_watch_intervalspecifies the interval at which the isolator reconciles port assignments.--check_agent_port_range_onlyexcludes ports outside the agent's range from port reconciliation.
- Agent flag
--executor_secret_keyhas been deprecated. Operators should use--jwt_secret_keyinstead.
- The fields
Resource.disk.source.path.rootandResource.disk.source.mount.rootcan now be set to relative paths to an agent's work directory. The containerizers will interpret the paths based on the--work_dirflag on an agent.
- The agent operator API call
GET_CONTAINERShas been updated to support listing nested or standalone containers. One can specify the following fields in the request:show_nested: Whether to show nested containers.show_standalone: Whether to show standalone containers.
- A new agent flag
--reconfiguration_policyhas been added. By setting the value of this flag toadditive, operators can allow the agent to be restarted with increased resources without requiring the agent ID to be changed. Note that if this feature is used, the master version is required to be >= 1.5 as well.
- Protobuf version 3+ is required to build Mesos. Please upgrade your Protobuf library if you are using an unbundled one.
- A new
catchup()method has been added to the replicated log reader API. The method allows to catch-up positions missing in the local non-leading replica to allow safe eventually consistent reads from it. Note about backwards compatibility: In order for the feature to work correctly in presence of log truncations all log replicas need to be updated.
Upgrading from 1.3.x to 1.4.x
- If the
mesos-agentkernel supports ambient capabilities (Linux 4.3 or later), the capabilities specified in theLinuxInfo.effective_capabilitiesmessage will be made ambient in the container task.
- Explicitly setting the bounding capabilities of a task independently of the effective capabilities is now supported. Frameworks can specify the task bounding capabilities by using the
LinuxInfo.bounding_capabilitiesmessage. Operators can specify the default bounding capabilities using the agent--bounding_capabilitiesflag. This flag also specifies the maximum bounding set that a framework is allowed to specify.
- Agent is now allowed to recover its agent ID post a host reboot. This prevents the unnecessary discarding of agent ID by prior Mesos versions. Notes about backwards compatibility:
- In case the agent's recovery runs into agent info mismatch which may happen due to resource change associated with reboot, it'll fall back to recovering as a new agent (existing behavior).
- In other cases such as checkpointed resources (e.g. persistent volumes) being incompatible with the agent's resources the recovery will still fail (existing behavior).
- The
LinuxInfo.capabilitiesfield has been deprecated in favor ofLinuxInfo.effective_capabilities.
- Changes to capability-related agent flags:
- The agent
--effective_capabilitiesflag has been added to specify the default effective capability set for tasks. - The agent
--bounding_capabilitiesflag has been added to specify the default bounding capability set for tasks. - The agent
--allowed-capabilitiesflag has been deprecated in favor of--effective_capabilities.
- The agent
- The semantics of the optional resource argument passed in
Allocator::updateSlavewas change. While previously the passed value denoted a new amount of oversubscribed (revocable) resources on the agent, it now denotes the new amount of total resources on the agent. This requires custom allocator implementations to update their interpretation of the passed value.
- The XFS Disk Isolator now supports the
--no-enforce_container_disk_quotaoption to efficiently measure disk resource usage without enforcing any usage limits.
- The
Resourcesclass in the internal Mesos C++ library changed its behavior to only support post-RESERVATION_REFINEMENTformat. If a framework is using this internal utility, it is likely to break if theRESERVATION_REFINEMENTcapability is not enabled.
- To specify the
--type=containeroption for thedocker inspect <container_name>command, the minimal supported Docker version has been updated from 1.0.0 to 1.8.0 since Docker supported--type=containerfor thedocker inspectcommand starting from 1.8.0.
Upgrading from 1.2.x to 1.3.x
- The master will no longer allow 0.x agents to register. Interoperability between 1.1+ masters and 0.x agents has never been supported; however, it was not explicitly disallowed, either. Starting with this release of Mesos, registration attempts by 0.x agents will be ignored.
- Support for deprecated ACLs
set_quotasandremove_quotashas been removed from the local authorizer. Before upgrading the Mesos binaries, consolidate the ACLs used underset_quotasandremove_quotesunder their replacement ACLupdate_quotas. After consolidation of the ACLs, the binaries could be safely replaced.
- Support for deprecated ACL
shutdown_frameworkshas been removed from the local authorizer. Before upgrading the Mesos binaries, replace all instances of the ACLshutdown_frameworkswith the newer ACLteardown_frameworks. After updating the ACLs, the binaries can be safely replaced.
- Support for multi-role frameworks deprecates the
FrameworkInfo.rolefield in favor ofFrameworkInfo.rolesand theMULTI_ROLEcapability. Frameworks using the new field can continue to use a single role.
- Support for multi-role frameworks means that the framework
rolefield in the master and agent endpoints is deprecated in favor ofroles. Any tooling parsing endpoint information and relying on the role field needs to be updated before multi-role frameworks can be safely run in the cluster.
- Implementors of allocator modules have to provide new implementation functionality to satisfy the
MULTI_ROLEframework capability. Also, the interface has changed.
- New Agent flags
authenticate_http_executorsandexecutor_secret_key: Used to enable required HTTP executor authentication and set the key file used for generation and authentication of HTTP executor tokens. Note that enabling these flags after upgrade is disruptive to HTTP executors that were launched before the upgrade. For more information on the recommended upgrade procedure when enabling these flags, see the authentication documentation.
In order to upgrade a running cluster:
- Rebuild and install any modules so that upgraded masters/agents/schedulers can use them.
- Install the new master binaries and restart the masters.
- Install the new agent binaries and restart the agents.
- Upgrade the schedulers by linking the latest native library / jar / egg (if necessary).
- Restart the schedulers.
- Upgrade the executors by linking the latest native library / jar / egg (if necessary).
Upgrading from 1.1.x to 1.2.x
- In Mesos 1.2.1, the master will no longer allow 0.x agents to register. Interoperability between 1.1+ masters and 0.x agents has never been supported; however, it was not explicitly disallowed, either. Starting with Mesos 1.2.1, registration attempts by 0.x agents will be ignored. NOTE: This applies only when upgrading to Mesos 1.2.1. Mesos 1.2.0 does not implement this behavior.
- New Agent flag http_heartbeat_interval: This flag sets a heartbeat interval for messages to be sent over persistent connections made against the agent HTTP API. Currently, this only applies to the LAUNCH_NESTED_CONTAINER_SESSION and ATTACH_CONTAINER_OUTPUT calls. (default: 30secs)
- New Agent flag image_provisioner_backend: Strategy for provisioning container rootfs from images, e.g., aufs, bind, copy, overlay.
- New Master flag max_unreachable_tasks_per_framework: Maximum number of unreachable tasks per framework to store in memory. (default: 1000)
- New Revive and Suppress v1 scheduler Calls: Revive or Suppress offers for a specified role. If role is unset, the call will revive/suppress offers for all of the roles the framework is subscribed to. (Especially for multi-role frameworks.)
- Mesos 1.2 modifies the
ContainerLogger'sprepare()method. The method now takes an additional argument for theuserthe logger should run a subprocess as. Please see MESOS-5856 for more information.
- Allocator module changes to support inactive frameworks, multi-role frameworks, and suppress/revive. See
allocator.hppfor interface changes.
- New Authorizer module actions: LAUNCH_NESTED_CONTAINER, KILL_NESTED_CONTAINER, WAIT_NESTED_CONTAINER, LAUNCH_NESTED_CONTAINER_SESSION, ATTACH_CONTAINER_INPUT, ATTACH_CONTAINER_OUTPUT, VIEW_CONTAINER, and SET_LOG_LEVEL. See
authorizer.protofor module interface changes, andacls.protofor corresponding LocalAuthorizer ACL changes.
- Renamed Authorizer module actions (and deprecated old aliases): REGISTER_FRAMEWORK, TEARDOWN_FRAMEWORK, RESERVE_RESOURCES, UNRESERVE_RESOURCES, CREATE_VOLUME, DESTROY_VOLUME, UPDATE_WEIGHT, GET_QUOTA. See
authorizer.protofor interface changes.
- Removed slavePreLaunchDockerEnvironmentDecorator and slavePreLaunchDockerHook in favor of slavePreLaunchDockerTaskExecutorDecorator.
- New Agent v1 operator API calls: LAUNCH_NESTED_CONTAINER_SESSION, ATTACH_CONTAINER_INPUT, ATTACH_CONTAINER_OUTPUT for debugging into running containers (Mesos containerizer only).
- Deprecated
recovered_frameworksin v1 GetFrameworks call. Now it will be empty.
- Deprecated
orphan_executorsin v1 GetExecutors call. Now it will be empty.
- Deprecated
orphan_tasksin v1 GetTasks call. Now it will be empty.
In order to upgrade a running cluster:
- Rebuild and install any modules so that upgraded masters/agents/schedulers can use them.
- Install the new master binaries and restart the masters.
- Install the new agent binaries and restart the agents.
- Upgrade the schedulers by linking the latest native library / jar / egg (if necessary).
- Restart the schedulers.
- Upgrade the executors by linking the latest native library / jar / egg (if necessary).
Upgrading from 1.0.x to 1.1.x
- Mesos 1.1 removes the
ContainerLogger'srecover()method. TheContainerLoggerhad an incomplete interface for a stateful implementation. This removes the incomplete parts to avoid adding tech debt in the containerizer. Please see MESOS-6371 for more information.
- Mesos 1.1 adds an
offeredResourcesargument to theAllocator::updateAllocation()method. It is used to indicate the resources that the operations passed toupdateAllocation()are applied to. MESOS-4431 (particularly /r/45961/) has more details on the motivation.
Upgrading from 0.28.x to 1.0.x
- Prior to Mesos 1.0, environment variables prefixed by
SSL_are used to control libprocess SSL support. However, it was found that those environment variables may collide with some libraries or programs (e.g., openssl, curl). From Mesos 1.0,SSL_*environment variables are deprecated in favor of the correspondingLIBPROCESS_SSL_*variables.
- Prior to Mesos 1.0, Mesos agent recursively changes the ownership of the persistent volumes every time they are mounted to a container. From Mesos 1.0, this behavior has been changed. Mesos agent will do a non-recursive change of ownership of the persistent volumes.
- Mesos 1.0 removed the camel cased protobuf fields in
ContainerConfig(seeinclude/mesos/slave/isolator.proto):required ExecutorInfo executorInfo = 1;optional TaskInfo taskInfo = 2;
- By default, executors will no longer inherit environment variables from the agent. The operator can still use the
--executor_environment_variablesflag on the agent to explicitly specify what environment variables the executors will get. Mesos generated environment variables (i.e.,$MESOS_,$LIBPROCESS_) will not be affected. If$PATHis not specified for an executor, a default value/usr/local/sbin:/usr/local/bin:/usr/sbin:/usr/bin:/sbin:/binwill be used.
- The allocator metric named
allocator/event_queue_dispatchesis now deprecated. The new name isallocator/mesos/event_queue_dispatchesto better support metrics for alternative allocator implementations.
- The
--docker_stop_timeoutagent flag is deprecated.
- The ExecutorInfo.source field is deprecated in favor of ExecutorInfo.labels.
- Mesos 1.0 deprecates the 'slave' keyword in favor of 'agent' in a number of places
- Deprecated flags with keyword 'slave' in favor of 'agent'.
- Deprecated sandbox links with 'slave' keyword in the WebUI.
- Deprecated
slavesubcommand for mesos-cli.
- Mesos 1.0 removes the default value for the agent's
work_dircommand-line flag. This flag is now required; the agent will exit immediately if it is not provided.
- Mesos 1.0 disables support for the master's
registry_strictcommand-line flag. If this flag is specified, the master will exit immediately. Note that this flag was previously marked as experimental and not recommended for production use.
- Mesos 1.0 deprecates the use of plain text credential files in favor of JSON-formatted credential files.
- When a persistent volume is destroyed, Mesos will now remove any data that was stored on the volume from the filesystem of the appropriate agent. In prior versions of Mesos, destroying a volume would not delete data (this was a known missing feature that has now been implemented).
- Mesos 1.0 changes the HTTP status code of the following endpoints from
200 OKto202 Accepted:/reserve/unreserve/create-volumes/destroy-volumes
- Added
output_filefield to CommandInfo.URI in Scheduler API and v1 Scheduler HTTP API.
- Changed Call and Event Type enums in scheduler.proto from required to optional for the purpose of backwards compatibility.
- Changed Call and Event Type enums in executor.proto from required to optional for the purpose of backwards compatibility.
- Added non-terminal task metadata to the container resource usage information.
- Deleted the /observe HTTP endpoint.
- The
SetQuotaandRemoveQuotaACLs have been deprecated. To replace these, a new ACLUpdateQuotahave been introduced. In addition, a new ACLGetQuotahave been added; these control which principals are allowed to query quota information for which roles. These changes affect the--aclsflag for the local authorizer in the following ways:- The
update_quotasACL cannot be used in combination with either theset_quotasorremove_quotasACL. The local authorizer will produce an error in such a case; - When upgrading a Mesos cluster that uses the
set_quotasorremove_quotasACLs, the operator should first upgrade the Mesos binaries. At this point, the deprecated ACLs will still be enforced. After the upgrade has been verified, the operator should replace deprecated values forset_quotasandremove_quotaswith equivalent values forupdate_quotas; - If desired, the operator can use the
get_quotasACL after the upgrade to control which principals are allowed to query quota information.
- The
- Mesos 1.0 contains a number of authorizer changes that particularly effect custom authorizer modules:
- The authorizer interface has been refactored in order to decouple the ACL definition language from the interface. It additionally includes the option of retrieving
ObjectApprover. AnObjectApprovercan be used to synchronously check authorizations for a given object and is hence useful when authorizing a large number of objects and/or large objects (which need to be copied using request-based authorization). NOTE: This is a breaking change for authorizer modules. - Authorization-based HTTP endpoint filtering enables operators to restrict which parts of the cluster state a user is authorized to see. Consider for example the
/statemaster endpoint: an operator can now authorize users to only see a subset of the running frameworks, tasks, or executors. - The
subjectandobjectfields in the authorization::Request protobuf message have been changed to be optional. If these fields are not set, the request should only be allowed for ACLs withANYsemantics. NOTE: This is a semantic change for authorizer modules.
- The authorizer interface has been refactored in order to decouple the ACL definition language from the interface. It additionally includes the option of retrieving
- Namespace and header file of
Allocatorhas been moved to be consistent with other packages.
- When a task is run as a particular user, the fetcher now fetches files as that user also. Note, this means that filesystem permissions for that user will be enforced when fetching local files.
- The
--authenticate_httpflag has been deprecated in favor of--authenticate_http_readwrite. Setting--authenticate_http_readwritewill now enable authentication for all endpoints which previously had authentication support. These happen to be the endpoints which allow modification of the cluster state, or "read-write" endpoints. Note that/logging/toggle,/profiler/start,/profiler/stop,/maintenance/schedule,/machine/up, and/machine/downpreviously did not have authentication support, but in 1.0 if either--authenticate_httpor--authenticate_http_readwriteis set, those endpoints will now require authentication. A new flag has also been introduced,--authenticate_http_readonly, which enables authentication for endpoints which support authentication and do not allow modification of the state of the cluster, like/stateor/flags.
-
Mesos 1.0 introduces authorization support for several HTTP endpoints. Note that some of these endpoints are used by the web UI, and thus using the web UI in a cluster with authorization enabled will require that ACLs be set appropriately. Please refer to the authorization documentation for details.
-
The endpoints with coarse-grained authorization enabled are:
/files/debug/logging/toggle/metrics/snapshot/slave(id)/containers/slave(id)/monitor/statistics
-
If the defined ACLs used
permissive: false, the listed HTTP endpoints will stop working unless ACLs for theget_endpointsactions are defined.
In order to upgrade a running cluster:
- Rebuild and install any modules so that upgraded masters/agents can use them.
- Install the new master binaries and restart the masters.
- Install the new agent binaries and restart the agents.
- Upgrade the schedulers by linking the latest native library / jar / egg (if necessary).
- Restart the schedulers.
- Upgrade the executors by linking the latest native library / jar / egg (if necessary).
Upgrading from 0.27.x to 0.28.x
- Mesos 0.28 only supports three decimal digits of precision for scalar resource values. For example, frameworks can reserve "0.001" CPUs but more fine-grained reservations (e.g., "0.0001" CPUs) are no longer supported (although they did not work reliably in prior versions of Mesos anyway). Internally, resource math is now done using a fixed-point format that supports three decimal digits of precision, and then converted to/from floating point for input and output, respectively. Frameworks that do their own resource math and manipulate fractional resources may observe differences in roundoff error and numerical precision.
- Mesos 0.28 changes the definitions of two ACLs used for authorization. The objects of the
ReserveResourcesandCreateVolumeACLs have been changed toroles. In both cases, principals can now be authorized to perform these operations for particular roles. This means that by default, a framework or operator can reserve resources/create volumes for any role. To restrict this behavior, ACLs can be added to the master which authorize principals to reserve resources/create volumes for specified roles only. Previously, frameworks could only reserve resources for their own role; this behavior can be preserved by configuring theReserveResourcesACLs such that the framework's principal is only authorized to reserve for the framework's role. NOTE This renders existingReserveResourcesandCreateVolumeACL definitions obsolete; if you are authorizing these operations, your ACL definitions should be updated.
In order to upgrade a running cluster:
- Rebuild and install any modules so that upgraded masters/agents can use them.
- Install the new master binaries and restart the masters.
- Install the new agent binaries and restart the agents.
- Upgrade the schedulers by linking the latest native library / jar / egg (if necessary).
- Restart the schedulers.
- Upgrade the executors by linking the latest native library / jar / egg (if necessary).
Upgrading from 0.26.x to 0.27.x
- Mesos 0.27 introduces the concept of implicit roles. In previous releases, configuring roles required specifying a static whitelist of valid role names on master startup (via the
--rolesflag). In Mesos 0.27, if--rolesis omitted, any role name can be used; controlling which principals are allowed to register as which roles should be done using ACLs. The role whitelist functionality is still supported but is deprecated.
- The Allocator API has changed due to the introduction of implicit roles. Custom allocator implementations will need to be updated. See MESOS-4000 for more information.
- The
executorLostcallback in the Scheduler interface will now be called whenever the agent detects termination of a custom executor. This callback was never called in previous versions, so please make sure any framework schedulers can now safely handle this callback. Note that this callback may not be reliably delivered.
- The isolator
prepareinterface has been changed slightly. Instead of keeping adding parameters to theprepareinterface, we decide to use a protobuf (ContainerConfig). Also, we renamedContainerPrepareInfotoContainerLaunchInfoto better capture the purpose of this struct. See MESOS-4240 and MESOS-4282 for more information. If you are an isolator module writer, you will have to adjust your isolator module according to the new interface and re-compile with 0.27.
-
ACLs.shutdown_frameworks has been deprecated in favor of the new ACLs.teardown_frameworks. This affects the
--aclsmaster flag for the local authorizer. -
Reserved resources are now accounted for in the DRF role sorter. Previously unaccounted reservations will influence the weighted DRF sorter. If role weights were explicitly set, they may need to be adjusted in order to account for the reserved resources in the cluster.
In order to upgrade a running cluster:
- Rebuild and install any modules so that upgraded masters/agents can use them.
- Install the new master binaries and restart the masters.
- Install the new agent binaries and restart the agents.
- Upgrade the schedulers by linking the latest native library / jar / egg (if necessary).
- Restart the schedulers.
- Upgrade the executors by linking the latest native library / jar / egg (if necessary).
Upgrading from 0.25.x to 0.26.x
-
The names of some TaskStatus::Reason enums have been changed. But the tag numbers remain unchanged, so it is backwards compatible. Frameworks using the new version might need to do some compile time adjustments:
- REASON_MEM_LIMIT -> REASON_CONTAINER_LIMITATION_MEMORY
- REASON_EXECUTOR_PREEMPTED -> REASON_CONTAINER_PREEMPTED
- The
Credentialprotobuf has been changed.Credentialfieldsecretis now a string, it used to be bytes. This will affect framework developers and language bindings ought to update their generated protobuf with the new version. This fixes JSON based credentials file support.
- The
/stateendpoints on master and agent will no longer includedatafields as part of the JSON models forExecutorInfoandTaskInfoout of consideration for memory scalability (see MESOS-3794 and this email thread).- On master, the affected
datafield was originally found viaframeworks[*].executors[*].data. - On agents, the affected
datafield was originally found viaexecutors[*].tasks[*].data.
- On master, the affected
- The
NetworkInfoprotobuf has been changed. The fieldsprotocolandip_addressare now deprecated. The new fieldip_addressessubsumes the information provided by them.
In order to upgrade a running cluster:
- Rebuild and install any modules so that upgraded masters/agents can use them.
- Install the new master binaries and restart the masters.
- Install the new agent binaries and restart the agents.
- Upgrade the schedulers by linking the latest native library / jar / egg (if necessary).
- Restart the schedulers.
- Upgrade the executors by linking the latest native library / jar / egg (if necessary).
Upgrading from 0.24.x to 0.25.x
-
The following endpoints will be deprecated in favor of new endpoints. Both versions will be available in 0.25 but the deprecated endpoints will be removed in a subsequent release.
For master endpoints:
- /state.json becomes /state
- /tasks.json becomes /tasks
For agent endpoints:
- /state.json becomes /state
- /monitor/statistics.json becomes /monitor/statistics
For both master and agent:
- /files/browse.json becomes /files/browse
- /files/debug.json becomes /files/debug
- /files/download.json becomes /files/download
- /files/read.json becomes /files/read
- The C++/Java/Python scheduler bindings have been updated. In particular, the driver can make a suppressOffers() call to stop receiving offers (until reviveOffers() is called).
In order to upgrade a running cluster:
- Rebuild and install any modules so that upgraded masters/agents can use them.
- Install the new master binaries and restart the masters.
- Install the new agent binaries and restart the agents.
- Upgrade the schedulers by linking the latest native library / jar / egg (if necessary).
- Restart the schedulers.
- Upgrade the executors by linking the latest native library / jar / egg (if necessary).
Upgrading from 0.23.x to 0.24.x
-
Support for live upgrading a driver based scheduler to HTTP based (experimental) scheduler has been added.
-
Master now publishes its information in ZooKeeper in JSON (instead of protobuf). Make sure schedulers are linked against >= 0.23.0 libmesos before upgrading the master.
In order to upgrade a running cluster:
- Rebuild and install any modules so that upgraded masters/agents can use them.
- Install the new master binaries and restart the masters.
- Install the new agent binaries and restart the agents.
- Upgrade the schedulers by linking the latest native library / jar / egg (if necessary).
- Restart the schedulers.
- Upgrade the executors by linking the latest native library / jar / egg (if necessary).
Upgrading from 0.22.x to 0.23.x
-
The 'stats.json' endpoints for masters and agents have been removed. Please use the 'metrics/snapshot' endpoints instead.
-
The '/master/shutdown' endpoint is deprecated in favor of the new '/master/teardown' endpoint.
-
In order to enable decorator modules to remove metadata (environment variables or labels), we changed the meaning of the return value for decorator hooks in Mesos 0.23.0. Please refer to the modules documentation for more details.
-
Agent ping timeouts are now configurable on the master via
--slave_ping_timeoutand--max_slave_ping_timeouts. Agents should be upgraded to 0.23.x before changing these flags. -
A new scheduler driver API,
acceptOffers, has been introduced. This is a more general version of thelaunchTasksAPI, which allows the scheduler to accept an offer and specify a list of operations (Offer.Operation) to perform using the resources in the offer. Currently, the supported operations include LAUNCH (launching tasks), RESERVE (making dynamic reservations), UNRESERVE (releasing dynamic reservations), CREATE (creating persistent volumes) and DESTROY (releasing persistent volumes). Similar to thelaunchTasksAPI, any unused resources will be considered declined, and the specified filters will be applied on all unused resources. -
The Resource protobuf has been extended to include more metadata for supporting persistence (DiskInfo), dynamic reservations (ReservationInfo) and oversubscription (RevocableInfo). You must not combine two Resource objects if they have different metadata.
In order to upgrade a running cluster:
- Rebuild and install any modules so that upgraded masters/agents can use them.
- Install the new master binaries and restart the masters.
- Install the new agent binaries and restart the agents.
- Upgrade the schedulers by linking the latest native library / jar / egg (if necessary).
- Restart the schedulers.
- Upgrade the executors by linking the latest native library / jar / egg (if necessary).
Upgrading from 0.21.x to 0.22.x
-
Agent checkpoint flag has been removed as it will be enabled for all agents. Frameworks must still enable checkpointing during registration to take advantage of checkpointing their tasks.
-
The stats.json endpoints for masters and agents have been deprecated. Please refer to the metrics/snapshot endpoint.
-
The C++/Java/Python scheduler bindings have been updated. In particular, the driver can be constructed with an additional argument that specifies whether to use implicit driver acknowledgements. In
statusUpdate, theTaskStatusnow includes a UUID to make explicit acknowledgements possible. -
The Authentication API has changed slightly in this release to support additional authentication mechanisms. The change from 'string' to 'bytes' for AuthenticationStartMessage.data has no impact on C++ or the over-the-wire representation, so it only impacts pure language bindings for languages like Java and Python that use different types for UTF-8 strings vs. byte arrays.
message AuthenticationStartMessage { required string mechanism = 1; optional bytes data = 2; }
-
All Mesos arguments can now be passed using file:// to read them out of a file (either an absolute or relative path). The --credentials, --whitelist, and any flags that expect JSON backed arguments (such as --modules) behave as before, although support for just passing an absolute path for any JSON flags rather than file:// has been deprecated and will produce a warning (and the absolute path behavior will be removed in a future release).
In order to upgrade a running cluster:
- Install the new master binaries and restart the masters.
- Install the new agent binaries and restart the agents.
- Upgrade the schedulers:
- For Java schedulers, link the new native library against the new JAR. The JAR contains API above changes. A 0.21.0 JAR will work with a 0.22.0 libmesos. A 0.22.0 JAR will work with a 0.21.0 libmesos if explicit acks are not being used. 0.22.0 and 0.21.0 are inter-operable at the protocol level between the master and the scheduler.
- For Python schedulers, upgrade to use a 0.22.0 egg. If constructing
MesosSchedulerDriverImplwithCredentials, your code must be updated to pass theimplicitAcknowledgementsargument beforeCredentials. You may run a 0.21.0 Python scheduler against a 0.22.0 master, and vice versa.
- Restart the schedulers.
- Upgrade the executors by linking the latest native library / jar / egg.
Upgrading from 0.20.x to 0.21.x
- Disabling agent checkpointing has been deprecated; the agent --checkpoint flag has been deprecated and will be removed in a future release.
In order to upgrade a running cluster:
- Install the new master binaries and restart the masters.
- Install the new agent binaries and restart the agents.
- Upgrade the schedulers by linking the latest native library (mesos jar upgrade not necessary).
- Restart the schedulers.
- Upgrade the executors by linking the latest native library and mesos jar (if necessary).
Upgrading from 0.19.x to 0.20.x.
-
The Mesos API has been changed slightly in this release. The CommandInfo has been changed (see below), which makes launching a command more flexible. The 'value' field has been changed from required to optional. However, it will not cause any issue during the upgrade (since the existing schedulers always set this field).
message CommandInfo { ... // There are two ways to specify the command: // 1) If 'shell == true', the command will be launched via shell // (i.e., /bin/sh -c 'value'). The 'value' specified will be // treated as the shell command. The 'arguments' will be ignored. // 2) If 'shell == false', the command will be launched by passing // arguments to an executable. The 'value' specified will be // treated as the filename of the executable. The 'arguments' // will be treated as the arguments to the executable. This is // similar to how POSIX exec families launch processes (i.e., // execlp(value, arguments(0), arguments(1), ...)). optional bool shell = 6 [default = true]; optional string value = 3; repeated string arguments = 7; ... } -
The Python bindings are also changing in this release. There are now sub-modules which allow you to use either the interfaces and/or the native driver.
import mesos.nativefor the native driversimport mesos.interfacefor the stub implementations and protobufs
To ensure a smooth upgrade, we recommend to upgrade your python framework and executor first. You will be able to either import using the new configuration or the old. Replace the existing imports with something like the following:
try: from mesos.native import MesosExecutorDriver, MesosSchedulerDriver from mesos.interface import Executor, Scheduler from mesos.interface import mesos_pb2 except ImportError: from mesos import Executor, MesosExecutorDriver, MesosSchedulerDriver, Scheduler import mesos_pb2
-
If you're using a pure language binding, please ensure that it sends status update acknowledgements through the master before upgrading.
In order to upgrade a running cluster:
- Install the new master binaries and restart the masters.
- Install the new agent binaries and restart the agents.
- Upgrade the schedulers by linking the latest native library (install the latest mesos jar and python egg if necessary).
- Restart the schedulers.
- Upgrade the executors by linking the latest native library (install the latest mesos jar and python egg if necessary).
Upgrading from 0.18.x to 0.19.x.
-
There are new required flags on the master (
--work_dirand--quorum) to support the Registrar feature, which adds replicated state on the masters. -
No required upgrade ordering across components.
In order to upgrade a running cluster:
- Install the new master binaries and restart the masters.
- Install the new agent binaries and restart the agents.
- Upgrade the schedulers by linking the latest native library (mesos jar upgrade not necessary).
- Restart the schedulers.
- Upgrade the executors by linking the latest native library and mesos jar (if necessary).
Upgrading from 0.17.0 to 0.18.x.
- This upgrade requires a system reboot for agents that use Linux cgroups for isolation.
In order to upgrade a running cluster:
- Install the new master binaries and restart the masters.
- Upgrade the schedulers by linking the latest native library and mesos jar (if necessary).
- Restart the schedulers.
- Install the new agent binaries then perform one of the following two steps, depending on if cgroups isolation is used:
- [no cgroups]
- Restart the agents. The "--isolation" flag has changed and "process" has been deprecated in favor of "posix/cpu,posix/mem".
- [cgroups]
- Change from a single mountpoint for all controllers to separate mountpoints for each controller, e.g., /sys/fs/cgroup/memory/ and /sys/fs/cgroup/cpu/.
- The suggested configuration is to mount a tmpfs filesystem to /sys/fs/cgroup and to let the agent mount the required controllers. However, the agent will also use previously mounted controllers if they are appropriately mounted under "--cgroups_hierarchy".
- It has been observed that unmounting and remounting of cgroups from the single to separate configuration is unreliable and a reboot into the new configuration is strongly advised. Restart the agents after reboot.
- The "--cgroups_hierarchy" now defaults to "/sys/fs/cgroup". The "--cgroups_root" flag default remains "mesos".
- The "--isolation" flag has changed and "cgroups" has been deprecated in favor of "cgroups/cpu,cgroups/mem".
- The "--cgroup_subsystems" flag is no longer required and will be ignored.
- Upgrade the executors by linking the latest native library and mesos jar (if necessary).
Upgrading from 0.16.0 to 0.17.0.
In order to upgrade a running cluster:
- Install the new master binaries and restart the masters.
- Upgrade the schedulers by linking the latest native library and mesos jar (if necessary).
- Restart the schedulers.
- Install the new agent binaries and restart the agents.
- Upgrade the executors by linking the latest native library and mesos jar (if necessary).
Upgrading from 0.15.0 to 0.16.0.
In order to upgrade a running cluster:
- Install the new master binaries and restart the masters.
- Upgrade the schedulers by linking the latest native library and mesos jar (if necessary).
- Restart the schedulers.
- Install the new agent binaries and restart the agents.
- Upgrade the executors by linking the latest native library and mesos jar (if necessary).
Upgrading from 0.14.0 to 0.15.0.
- Schedulers should implement the new
reconcileTasksdriver method. - Schedulers should call the new
MesosSchedulerDriverconstructor that takesCredentialto authenticate. - --authentication=false (default) allows both authenticated and unauthenticated frameworks to register.
In order to upgrade a running cluster:
- Install the new master binaries.
- Restart the masters with --credentials pointing to credentials of the framework(s).
- Install the new agent binaries and restart the agents.
- Upgrade the executors by linking the latest native library and mesos jar (if necessary).
- Upgrade the schedulers by linking the latest native library and mesos jar (if necessary).
- Restart the schedulers. Restart the masters with --authentication=true.
NOTE: After the restart unauthenticated frameworks will not be allowed to register.
Upgrading from 0.13.0 to 0.14.0.
- /vars endpoint has been removed.
In order to upgrade a running cluster:
- Install the new master binaries and restart the masters.
- Upgrade the executors by linking the latest native library and mesos jar (if necessary).
- Install the new agent binaries.
- Restart the agents after adding --checkpoint flag to enable checkpointing.
- Upgrade the schedulers by linking the latest native library and mesos jar (if necessary).
- Set FrameworkInfo.checkpoint in the scheduler if checkpointing is desired (recommended).
- Restart the schedulers.
- Restart the masters (to get rid of the cached FrameworkInfo).
- Restart the agents (to get rid of the cached FrameworkInfo).
Upgrading from 0.12.0 to 0.13.0.
- cgroups_hierarchy_root agent flag is renamed as cgroups_hierarchy
In order to upgrade a running cluster:
- Install the new master binaries and restart the masters.
- Upgrade the schedulers by linking the latest native library and mesos jar (if necessary).
- Restart the schedulers.
- Install the new agent binaries.
- Restart the agents.
- Upgrade the executors by linking the latest native library and mesos jar (if necessary).
Upgrading from 0.11.0 to 0.12.0.
- If you are a framework developer, you will want to examine the new 'source' field in the ExecutorInfo protobuf. This will allow you to take further advantage of the resource monitoring.
In order to upgrade a running cluster:
- Install the new agent binaries and restart the agents.
- Install the new master binaries and restart the masters.
Downgrade Mesos
This document serves as a guide for users who wish to downgrade from an existing Mesos cluster to a previous version. This usually happens when rolling back from problematic upgrades. Mesos provides compatibility between any 1.x and 1.y versions of masters/agents as long as new features are not used. Since Mesos 1.8, we introduced a check for minimum capabilities on the master. If a backwards incompatible feature is used, a corresponding minimum capability entry will be persisted to the registry. If an old master (that does not possess the capability) tries to recover from the registry (e.g. when rolling back), an error message will be printed containing the missing capabilities. This document lists the detailed information regarding these minimum capabilities and remediation for downgrade errors.
List of Master Minimum Capabilities
| Capability | Description |
|---|---|
AGENT_DRAINING
|
This capability is required when any agent is marked for draining
or deactivated. These states were added in Mesos 1.9 and are
triggered by using the DRAIN_AGENT or
DEACTIVATE_AGENT operator APIs.
To remove this minimum capability requirement:
|
QUOTA_V2
|
This capability is required when quota is configured in Mesos 1.9 or
higher. When that happens, the newly configured quota will be persisted
in the quota_configs field in the registry which requires this
capability to decode.
To remove this minimum capability requirement:
|
Logging
Mesos handles the logs of each Mesos component differently depending on the degree of control Mesos has over the source code of the component.
Roughly, these categories are:
- Internal - Master and Agent.
- Containers - Executors and Tasks.
- External - Components launched outside of Mesos, like Frameworks and ZooKeeper. These are expected to implement their own logging solution.
Internal
The Mesos Master and Agent use the Google's logging library. For information regarding the command-line options used to configure this library, see the configuration documentation. Google logging options that are not explicitly mentioned there can be configured via environment variables.
Both Master and Agent also expose a /logging/toggle HTTP endpoint which temporarily toggles verbose logging:
POST <ip:port>/logging/toggle?level=[1|2|3]&duration=VALUE
The effect is analogous to setting the GLOG_v environment variable prior
to starting the Master/Agent, except the logging level will revert to the
original level after the given duration.
Containers
For background, see the containerizer documentation.
Mesos does not assume any structured logging for entities running inside containers. Instead, Mesos will store the stdout and stderr of containers into plain files ("stdout" and "stderr") located inside the sandbox.
In some cases, the default Container logger behavior of Mesos is not ideal:
- Logging may not be standardized across containers.
- Logs are not easily aggregated.
- Log file sizes are not managed. Given enough time, the "stdout" and "stderr" files can fill up the Agent's disk.
ContainerLogger Module
The ContainerLogger module was introduced in Mesos 0.27.0 and aims to address
the shortcomings of the default logging behavior for containers. The module
can be used to change how Mesos redirects the stdout and stderr of containers.
The interface for a ContainerLogger can be found here.
Mesos comes with two ContainerLogger modules:
- The
SandboxContainerLoggerimplements the existing logging behavior as aContainerLogger. This is the default behavior. - The
LogrotateContainerLoggeraddresses the problem of unbounded log file sizes.
LogrotateContainerLogger
The LogrotateContainerLogger constrains the total size of a container's
stdout and stderr files. The module does this by rotating log files based
on the parameters to the module. When a log file reaches its specified
maximum size, it is renamed by appending a .N to the end of the filename,
where N increments each rotation. Older log files are deleted when the
specified maximum number of files is reached.
Invoking the module
The LogrotateContainerLogger can be loaded by specifying the library
liblogrotate_container_logger.so in the
--modules flag when starting the Agent and by
setting the --container_logger Agent flag to
org_apache_mesos_LogrotateContainerLogger.
Module parameters
| Key | Explanation |
|---|---|
max_stdout_size/max_stderr_size
|
Maximum size, in bytes, of a single stdout/stderr log file.
When the size is reached, the file will be rotated.
|
logrotate_stdout_options/
logrotate_stderr_options
|
Additional config options to pass into logrotate for stdout.
This string will be inserted into a logrotate configuration
file. i.e. For "stdout":
/path/to/stdout {
  [logrotate_stdout_options]
  size [max_stdout_size]
}
NOTE: The size option will be overridden by this module.
|
environment_variable_prefix
|
Prefix for environment variables meant to modify the behavior of
the logrotate logger for the specific container being launched.
The logger will look for four prefixed environment variables in the
container's CommandInfo's Environment:
|
launcher_dir
|
Directory path of Mesos binaries.
The LogrotateContainerLogger will find the
mesos-logrotate-logger binary under this directory.
|
logrotate_path
|
If specified, the LogrotateContainerLogger will use the
specified logrotate instead of the system's
logrotate. If logrotate is not found, then
the module will exit with an error.
|
How it works
- Every time a container starts up, the
LogrotateContainerLoggerstarts up companion subprocesses of themesos-logrotate-loggerbinary. - The module instructs Mesos to redirect the container's stdout/stderr
to the
mesos-logrotate-logger. - As the container outputs to stdout/stderr,
mesos-logrotate-loggerwill pipe the output into the "stdout"/"stderr" files. As the files grow,mesos-logrotate-loggerwill calllogrotateto keep the files strictly under the configured maximum size. - When the container exits,
mesos-logrotate-loggerwill finish logging before exiting as well.
The LogrotateContainerLogger is designed to be resilient across Agent
failover. If the Agent process dies, any instances of mesos-logrotate-logger
will continue to run.
Writing a Custom ContainerLogger
For basics on module writing, see the modules documentation.
There are several caveats to consider when designing a new ContainerLogger:
- Logging by the
ContainerLoggershould be resilient to Agent failover. If the Agent process dies (which includes theContainerLoggermodule), logging should continue. This is usually achieved by using subprocesses. - When containers shut down, the
ContainerLoggeris not explicitly notified. Instead, encounteringEOFin the container's stdout/stderr signifies that the container has exited. This provides a stronger guarantee that theContainerLoggerhas seen all the logs before exiting itself. - The
ContainerLoggershould not assume that containers have been launched with any specificContainerLogger. The Agent may be restarted with a differentContainerLogger. - Each containerizer running on an Agent uses its own
instance of the
ContainerLogger. This means more than oneContainerLoggermay be running in a single Agent. However, each Agent will only run a single type ofContainerLogger.
Mesos Observability Metrics
This document describes the observability metrics provided by Mesos master and agent nodes. This document also provides some initial guidance on which metrics you should monitor to detect abnormal situations in your cluster.
Overview
Mesos master and agent nodes report a set of statistics and metrics that enable cluster operators to monitor resource usage and detect abnormal situations early. The information reported by Mesos includes details about available resources, used resources, registered frameworks, active agents, and task state. You can use this information to create automated alerts and to plot different metrics over time inside a monitoring dashboard.
Metric information is not persisted to disk at either master or agent nodes, which means that metrics will be reset when masters and agents are restarted. Similarly, if the current leading master fails and a new leading master is elected, metrics at the new master will be reset.
Metric Types
Mesos provides two different kinds of metrics: counters and gauges.
Counters keep track of discrete events and are monotonically increasing. The value of a metric of this type is always a natural number. Examples include the number of failed tasks and the number of agent registrations. For some metrics of this type, the rate of change is often more useful than the value itself.
Gauges represent an instantaneous sample of some magnitude. Examples include the amount of used memory in the cluster and the number of connected agents. For some metrics of this type, it is often useful to determine whether the value is above or below a threshold for a sustained period of time.
The tables in this document indicate the type of each available metric.
Master Nodes
Metrics from each master node are available via the /metrics/snapshot master endpoint. The response is a JSON object that contains metrics names and values as key-value pairs.
Observability metrics
This section lists all available metrics from Mesos master nodes grouped by category.
Resources
The following metrics provide information about the total resources available in the cluster and their current usage. High resource usage for sustained periods of time may indicate that you need to add capacity to your cluster or that a framework is misbehaving.
| Metric | Description | Type |
|---|---|---|
master/cpus_percent
|
Percentage of allocated CPUs | Gauge |
master/cpus_used
|
Number of allocated CPUs | Gauge |
master/cpus_total
|
Number of CPUs | Gauge |
master/cpus_revocable_percent
|
Percentage of allocated revocable CPUs | Gauge |
master/cpus_revocable_total
|
Number of revocable CPUs | Gauge |
master/cpus_revocable_used
|
Number of allocated revocable CPUs | Gauge |
master/disk_percent
|
Percentage of allocated disk space | Gauge |
master/disk_used
|
Allocated disk space in MB | Gauge |
master/disk_total
|
Disk space in MB | Gauge |
master/disk_revocable_percent
|
Percentage of allocated revocable disk space | Gauge |
master/disk_revocable_total
|
Revocable disk space in MB | Gauge |
master/disk_revocable_used
|
Allocated revocable disk space in MB | Gauge |
master/gpus_percent
|
Percentage of allocated GPUs | Gauge |
master/gpus_used
|
Number of allocated GPUs | Gauge |
master/gpus_total
|
Number of GPUs | Gauge |
master/gpus_revocable_percent
|
Percentage of allocated revocable GPUs | Gauge |
master/gpus_revocable_total
|
Number of revocable GPUs | Gauge |
master/gpus_revocable_used
|
Number of allocated revocable GPUs | Gauge |
master/mem_percent
|
Percentage of allocated memory | Gauge |
master/mem_used
|
Allocated memory in MB | Gauge |
master/mem_total
|
Memory in MB | Gauge |
master/mem_revocable_percent
|
Percentage of allocated revocable memory | Gauge |
master/mem_revocable_total
|
Revocable memory in MB | Gauge |
master/mem_revocable_used
|
Allocated revocable memory in MB | Gauge |
Master
The following metrics provide information about whether a master is currently elected and how long it has been running. A cluster with no elected master for sustained periods of time indicates a malfunctioning cluster. This points to either leadership election issues (so check the connection to ZooKeeper) or a flapping Master process. A low uptime value indicates that the master has restarted recently.
| Metric | Description | Type |
|---|---|---|
master/elected
|
Whether this is the elected master | Gauge |
master/uptime_secs
|
Uptime in seconds | Gauge |
System
The following metrics provide information about the resources available on this master node and their current usage. High resource usage in a master node for sustained periods of time may degrade the performance of the cluster.
| Metric | Description | Type |
|---|---|---|
system/cpus_total
|
Number of CPUs available in this master node | Gauge |
system/load_15min
|
Load average for the past 15 minutes | Gauge |
system/load_5min
|
Load average for the past 5 minutes | Gauge |
system/load_1min
|
Load average for the past minute | Gauge |
system/mem_free_bytes
|
Free memory in bytes | Gauge |
system/mem_total_bytes
|
Total memory in bytes | Gauge |
Agents
The following metrics provide information about agent events, agent counts, and agent states. A low number of active agents may indicate that agents are unhealthy or that they are not able to connect to the elected master.
| Metric | Description | Type |
|---|---|---|
master/slave_registrations
|
Number of agents that were able to cleanly re-join the cluster and connect back to the master after the master is disconnected. | Counter |
master/slave_removals
|
Number of agent removed for various reasons, including maintenance | Counter |
master/slave_reregistrations
|
Number of agent re-registrations | Counter |
master/slave_unreachable_scheduled
|
Number of agents which have failed their health check and are scheduled
to be marked unreachable. They will not be marked unreachable immediately due to the Agent
Removal Rate-Limit, but master/slave_unreachable_completed
will start increasing as they do get removed. |
Counter |
master/slave_unreachable_canceled
|
Number of times that an agent was due to be marked unreachable but this
transition was cancelled. This happens when the agent removal rate limit
is enabled and the agent sends a PONG response message to the
master before the rate limit allows the agent to be marked unreachable. |
Counter |
master/slave_unreachable_completed
|
Number of agents that were marked as unreachable because they failed health checks. These are agents which were not heard from despite the agent-removal rate limit, and have been marked as unreachable in the master's agent registry. | Counter |
master/slaves_active
|
Number of active agents | Gauge |
master/slaves_connected
|
Number of connected agents | Gauge |
master/slaves_disconnected
|
Number of disconnected agents | Gauge |
master/slaves_inactive
|
Number of inactive agents | Gauge |
master/slaves_unreachable
|
Number of unreachable agents. Unreachable agents are periodically garbage collected from the registry, which will cause this value to decrease. | Gauge |
Frameworks
The following metrics provide information about the registered frameworks in the cluster. No active or connected frameworks may indicate that a scheduler is not registered or that it is misbehaving.
| Metric | Description | Type |
|---|---|---|
master/frameworks_active
|
Number of active frameworks | Gauge |
master/frameworks_connected
|
Number of connected frameworks | Gauge |
master/frameworks_disconnected
|
Number of disconnected frameworks | Gauge |
master/frameworks_inactive
|
Number of inactive frameworks | Gauge |
master/outstanding_offers
|
Number of outstanding resource offers | Gauge |
The following metrics are added for each framework which registers with the master, in order to provide detailed information about the behavior of the framework. The framework name is percent-encoded before creating these metrics; the actual name can be recovered by percent-decoding.
| Metric | Description | Type |
|---|---|---|
master/frameworks/<ENCODED_FRAMEWORK_NAME>/<FRAMEWORK_ID>/subscribed
|
Whether or not this framework is currently subscribed | Gauge |
master/frameworks/<ENCODED_FRAMEWORK_NAME>/<FRAMEWORK_ID>/calls
|
Total number of calls sent by this framework | Counter |
master/frameworks/<ENCODED_FRAMEWORK_NAME>/<FRAMEWORK_ID>/calls/<CALL_TYPE>
|
Number of each type of call sent by this framework | Counter |
master/frameworks/<ENCODED_FRAMEWORK_NAME>/<FRAMEWORK_ID>/events
|
Total number of events sent to this framework | Counter |
master/frameworks/<ENCODED_FRAMEWORK_NAME>/<FRAMEWORK_ID>/events/<EVENT_TYPE>
|
Number of each type of event sent to this framework | Counter |
master/frameworks/<ENCODED_FRAMEWORK_NAME>/<FRAMEWORK_ID>/operations
|
Total number of offer operations performed by this framework | Counter |
master/frameworks/<ENCODED_FRAMEWORK_NAME>/<FRAMEWORK_ID>/operations/<OPERATION_TYPE>
|
Number of each type of offer operation performed by this framework | Counter |
master/frameworks/<ENCODED_FRAMEWORK_NAME>/<FRAMEWORK_ID>/tasks/active/<TASK_STATE>
|
Number of this framework's tasks currently in each active task state | Gauge |
master/frameworks/<ENCODED_FRAMEWORK_NAME>/<FRAMEWORK_ID>/tasks/terminal/<TASK_STATE>
|
Number of this framework's tasks which have transitioned into each terminal task state | Counter |
master/frameworks/<ENCODED_FRAMEWORK_NAME>/<FRAMEWORK_ID>/offers/sent
|
Number of offers sent to this framework | Counter |
master/frameworks/<ENCODED_FRAMEWORK_NAME>/<FRAMEWORK_ID>/offers/accepted
|
Number of offers accepted by this framework | Counter |
master/frameworks/<ENCODED_FRAMEWORK_NAME>/<FRAMEWORK_ID>/offers/declined
|
Number of offers explicitly declined by this framework | Counter |
master/frameworks/<ENCODED_FRAMEWORK_NAME>/<FRAMEWORK_ID>/offers/rescinded
|
Number of offers sent to this framework which were subsequently rescinded | Counter |
master/frameworks/<ENCODED_FRAMEWORK_NAME>/<FRAMEWORK_ID>/roles/<ROLE_NAME>/suppressed
|
For each of the framework's subscribed roles, whether or not offers for that role are currently suppressed | Gauge |
Tasks
The following metrics provide information about active and terminated tasks. A high rate of lost tasks may indicate that there is a problem with the cluster. The task states listed here match those of the task state machine.
| Metric | Description | Type |
|---|---|---|
master/tasks_error
|
Number of tasks that were invalid | Counter |
master/tasks_failed
|
Number of failed tasks | Counter |
master/tasks_finished
|
Number of finished tasks | Counter |
master/tasks_killed
|
Number of killed tasks | Counter |
master/tasks_killing
|
Number of tasks currently being killed | Gauge |
master/tasks_lost
|
Number of lost tasks | Counter |
master/tasks_running
|
Number of running tasks | Gauge |
master/tasks_staging
|
Number of staging tasks | Gauge |
master/tasks_starting
|
Number of starting tasks | Gauge |
master/tasks_unreachable
|
Number of unreachable tasks | Gauge |
Operations
The following metrics provide information about offer operations on the master.
Below, OPERATION_TYPE refers to any one of reserve, unreserve, create,
destroy, grow_volume, shrink_volume, create_disk or destroy_disk.
NOTE: The counter for terminal operation states can over-count over time. In
particular if an agent contained unacknowledged terminal status updates when
it was marked gone or marked unreachable, these operations will be double-counted
as both their original state and OPERATION_GONE/OPERATION_UNREACHABLE.
| Metric | Description | Type |
|---|---|---|
master/operations/total
|
Total number of operations known to this master | Gauge |
master/operations/<OPERATION_STATE>
|
Number of operations in the given non-terminal state (`pending`, `recovering` or `unreachable`) | Gauge |
master/operations/<OPERATION_STATE>
|
Number of operations in the given terminal state (`finished`, `error`, `dropped` or `gone_by_operator`) | Counter |
master/operations/<OPERATION_TYPE>/total
|
Total number of operations with the given type known to this master | Gauge |
master/operations/<OPERATION_TYPE>/<OPERATION_STATE>
|
Number of operations with the given type in the given non-terminal state (`pending`, `recovering` or `unreachable`) | Gauge |
master/operations/<OPERATION_TYPE>/<OPERATION_STATE>
|
Number of operations with the given type in the given state (`finished`, `error`, `dropped` or `gone_by_operator`) | Counter |
Messages
The following metrics provide information about messages between the master and the agents and between the framework and the executors. A high rate of dropped messages may indicate that there is a problem with the network.
| Metric | Description | Type |
|---|---|---|
master/invalid_executor_to_framework_messages
|
Number of invalid executor to framework messages | Counter |
master/invalid_framework_to_executor_messages
|
Number of invalid framework to executor messages | Counter |
master/invalid_operation_status_update_acknowledgements
|
Number of invalid operation status update acknowledgements | Counter |
master/invalid_status_update_acknowledgements
|
Number of invalid status update acknowledgements | Counter |
master/invalid_status_updates
|
Number of invalid status updates | Counter |
master/dropped_messages
|
Number of dropped messages | Counter |
master/messages_authenticate
|
Number of authentication messages | Counter |
master/messages_deactivate_framework
|
Number of framework deactivation messages | Counter |
master/messages_decline_offers
|
Number of offers declined | Counter |
master/messages_executor_to_framework
|
Number of executor to framework messages | Counter |
master/messages_exited_executor
|
Number of terminated executor messages | Counter |
master/messages_framework_to_executor
|
Number of messages from a framework to an executor | Counter |
master/messages_kill_task
|
Number of kill task messages | Counter |
master/messages_launch_tasks
|
Number of launch task messages | Counter |
master/messages_operation_status_update_acknowledgement
|
Number of operation status update acknowledgement messages | Counter |
master/messages_reconcile_operations
|
Number of reconcile operations messages | Counter |
master/messages_reconcile_tasks
|
Number of reconcile task messages | Counter |
master/messages_register_framework
|
Number of framework registration messages | Counter |
master/messages_register_slave
|
Number of agent registration messages | Counter |
master/messages_reregister_framework
|
Number of framework re-registration messages | Counter |
master/messages_reregister_slave
|
Number of agent re-registration messages | Counter |
master/messages_resource_request
|
Number of resource request messages | Counter |
master/messages_revive_offers
|
Number of offer revival messages | Counter |
master/messages_status_update
|
Number of status update messages | Counter |
master/messages_status_update_acknowledgement
|
Number of status update acknowledgement messages | Counter |
master/messages_unregister_framework
|
Number of framework unregistration messages | Counter |
master/messages_unregister_slave
|
Number of agent unregistration messages | Counter |
master/messages_update_slave
|
Number of update agent messages | Counter |
master/recovery_slave_removals
|
Number of agents not reregistered during master failover | Counter |
master/slave_removals/reason_registered
|
Number of agents removed when new agents registered at the same address | Counter |
master/slave_removals/reason_unhealthy
|
Number of agents failed due to failed health checks | Counter |
master/slave_removals/reason_unregistered
|
Number of agents unregistered | Counter |
master/valid_framework_to_executor_messages
|
Number of valid framework to executor messages | Counter |
master/valid_operation_status_update_acknowledgements
|
Number of valid operation status update acknowledgement messages | Counter |
master/valid_status_update_acknowledgements
|
Number of valid status update acknowledgement messages | Counter |
master/valid_status_updates
|
Number of valid status update messages | Counter |
master/task_lost/source_master/reason_invalid_offers
|
Number of tasks lost due to invalid offers | Counter |
master/task_lost/source_master/reason_slave_removed
|
Number of tasks lost due to agent removal | Counter |
master/task_lost/source_slave/reason_executor_terminated
|
Number of tasks lost due to executor termination | Counter |
master/valid_executor_to_framework_messages
|
Number of valid executor to framework messages | Counter |
Event queue
The following metrics provide information about different types of events in the event queue.
| Metric | Description | Type |
|---|---|---|
master/event_queue_dispatches
|
Number of dispatches in the event queue | Gauge |
master/event_queue_http_requests
|
Number of HTTP requests in the event queue | Gauge |
master/event_queue_messages
|
Number of messages in the event queue | Gauge |
master/operator_event_stream_subscribers
|
Number of subscribers to the operator event stream | Gauge |
Registrar
The following metrics provide information about read and write latency to the agent registrar.
| Metric | Description | Type |
|---|---|---|
registrar/state_fetch_ms
|
Registry read latency in ms | Gauge |
registrar/state_store_ms
|
Registry write latency in ms | Gauge |
registrar/state_store_ms/max
|
Maximum registry write latency in ms | Gauge |
registrar/state_store_ms/min
|
Minimum registry write latency in ms | Gauge |
registrar/state_store_ms/p50
|
Median registry write latency in ms | Gauge |
registrar/state_store_ms/p90
|
90th percentile registry write latency in ms | Gauge |
registrar/state_store_ms/p95
|
95th percentile registry write latency in ms | Gauge |
registrar/state_store_ms/p99
|
99th percentile registry write latency in ms | Gauge |
registrar/state_store_ms/p999
|
99.9th percentile registry write latency in ms | Gauge |
registrar/state_store_ms/p9999
|
99.99th percentile registry write latency in ms | Gauge |
Replicated log
The following metrics provide information about the replicated log underneath the registrar, which is the persistent store for masters.
| Metric | Description | Type |
|---|---|---|
registrar/log/recovered
|
Whether the replicated log for the registrar has caught up with the other masters in the cluster. A cluster is operational as long as a quorum of "recovered" masters is available in the cluster. | Gauge |
registrar/log/ensemble_size
|
The number of masters in the ensemble (cluster) that the current master communicates with (including itself) to form the replicated log quorum. It's imperative that this number is always less than `--quorum * 2` to prevent split-brain. It's also important that it should be greater than or equal to `--quorum` to maintain availability. | Gauge |
Allocator
The following metrics provide information about performance and resource allocations in the allocator.
| Metric | Description | Type |
|---|---|---|
allocator/mesos/allocation_run_ms
|
Time spent in allocation algorithm in ms | Gauge |
allocator/mesos/allocation_run_ms/count
|
Number of allocation algorithm time measurements in the window | Gauge |
allocator/mesos/allocation_run_ms/max
|
Maximum time spent in allocation algorithm in ms | Gauge |
allocator/mesos/allocation_run_ms/min
|
Minimum time spent in allocation algorithm in ms | Gauge |
allocator/mesos/allocation_run_ms/p50
|
Median time spent in allocation algorithm in ms | Gauge |
allocator/mesos/allocation_run_ms/p90
|
90th percentile of time spent in allocation algorithm in ms | Gauge |
allocator/mesos/allocation_run_ms/p95
|
95th percentile of time spent in allocation algorithm in ms | Gauge |
allocator/mesos/allocation_run_ms/p99
|
99th percentile of time spent in allocation algorithm in ms | Gauge |
allocator/mesos/allocation_run_ms/p999
|
99.9th percentile of time spent in allocation algorithm in ms | Gauge |
allocator/mesos/allocation_run_ms/p9999
|
99.99th percentile of time spent in allocation algorithm in ms | Gauge |
allocator/mesos/allocation_runs
|
Number of times the allocation algorithm has run | Counter |
allocator/mesos/allocation_run_latency_ms
|
Allocation batch latency in ms | Gauge |
allocator/mesos/allocation_run_latency_ms/count
|
Number of allocation batch latency measurements in the window | Gauge |
allocator/mesos/allocation_run_latency_ms/max
|
Maximum allocation batch latency in ms | Gauge |
allocator/mesos/allocation_run_latency_ms/min
|
Minimum allocation batch latency in ms | Gauge |
allocator/mesos/allocation_run_latency_ms/p50
|
Median allocation batch latency in ms | Gauge |
allocator/mesos/allocation_run_latency_ms/p90
|
90th percentile allocation batch latency in ms | Gauge |
allocator/mesos/allocation_run_latency_ms/p95
|
95th percentile allocation batch latency in ms | Gauge |
allocator/mesos/allocation_run_latency_ms/p99
|
99th percentile allocation batch latency in ms | Gauge |
allocator/mesos/allocation_run_latency_ms/p999
|
99.9th percentile allocation batch latency in ms | Gauge |
allocator/mesos/allocation_run_latency_ms/p9999
|
99.99th percentile allocation batch latency in ms | Gauge |
allocator/mesos/roles/<role>/shares/dominant
|
Dominant resource share for the role, exposed as a percentage (0.0-1.0) | Gauge |
allocator/mesos/event_queue_dispatches
|
Number of dispatch events in the event queue | Gauge |
allocator/mesos/offer_filters/roles/<role>/active
|
Number of active offer filters for all frameworks within the role | Gauge |
allocator/mesos/quota/roles/<role>/resources/<resource>/offered_or_allocated
|
Amount of resources considered offered or allocated towards a role's quota guarantee | Gauge |
allocator/mesos/quota/roles/<role>/resources/<resource>/guarantee
|
Amount of resources guaranteed for a role via quota | Gauge |
allocator/mesos/resources/cpus/offered_or_allocated
|
Number of CPUs offered or allocated | Gauge |
allocator/mesos/resources/cpus/total
|
Number of CPUs | Gauge |
allocator/mesos/resources/disk/offered_or_allocated
|
Allocated or offered disk space in MB | Gauge |
allocator/mesos/resources/disk/total
|
Total disk space in MB | Gauge |
allocator/mesos/resources/mem/offered_or_allocated
|
Allocated or offered memory in MB | Gauge |
allocator/mesos/resources/mem/total
|
Total memory in MB | Gauge |
Basic Alerts
This section lists some examples of basic alerts that you can use to detect abnormal situations in a cluster.
master/uptime_secs is low
The master has restarted.
master/uptime_secs < 60 for sustained periods of time
The cluster has a flapping master node.
master/tasks_lost is increasing rapidly
Tasks in the cluster are disappearing. Possible causes include hardware failures, bugs in one of the frameworks, or bugs in Mesos.
master/slaves_active is low
Agents are having trouble connecting to the master.
master/cpus_percent > 0.9 for sustained periods of time
Cluster CPU utilization is close to capacity.
master/mem_percent > 0.9 for sustained periods of time
Cluster memory utilization is close to capacity.
master/elected is 0 for sustained periods of time
No master is currently elected.
Agent Nodes
Metrics from each agent node are available via the /metrics/snapshot agent endpoint. The response is a JSON object that contains metrics names and values as key-value pairs.
Observability Metrics
This section lists all available metrics from Mesos agent nodes grouped by category.
Resources
The following metrics provide information about the total resources available in the agent and their current usage.
| Metric | Description | Type |
|---|---|---|
containerizer/fetcher/cache_size_total_bytes
|
The configured maximum size of the fetcher cache in bytes. This value is constant for the life of the Mesos agent. | Gauge |
containerizer/fetcher/cache_size_used_bytes
|
The current amount of data stored in the fetcher cache in bytes. | Gauge |
gc/path_removals_failed
|
Number of times the agent garbage collection process has failed to remove a sandbox path. | Counter |
gc/path_removals_pending
|
Number of sandbox paths that are currently pending agent garbage collection. | Gauge |
gc/path_removals_succeeded
|
Number of sandbox paths the agent successfully removed. | Counter |
slave/cpus_percent
|
Percentage of allocated CPUs | Gauge |
slave/cpus_used
|
Number of allocated CPUs | Gauge |
slave/cpus_total
|
Number of CPUs | Gauge |
slave/cpus_revocable_percent
|
Percentage of allocated revocable CPUs | Gauge |
slave/cpus_revocable_total
|
Number of revocable CPUs | Gauge |
slave/cpus_revocable_used
|
Number of allocated revocable CPUs | Gauge |
slave/disk_percent
|
Percentage of allocated disk space | Gauge |
slave/disk_used
|
Allocated disk space in MB | Gauge |
slave/disk_total
|
Disk space in MB | Gauge |
slave/gpus_percent
|
Percentage of allocated GPUs | Gauge |
slave/gpus_used
|
Number of allocated GPUs | Gauge |
slave/gpus_total
|
Number of GPUs | Gauge |
slave/gpus_revocable_percent
|
Percentage of allocated revocable GPUs | Gauge |
slave/gpus_revocable_total
|
Number of revocable GPUs | Gauge |
slave/gpus_revocable_used
|
Number of allocated revocable GPUs | Gauge |
slave/mem_percent
|
Percentage of allocated memory | Gauge |
slave/disk_revocable_percent
|
Percentage of allocated revocable disk space | Gauge |
slave/disk_revocable_total
|
Revocable disk space in MB | Gauge |
slave/disk_revocable_used
|
Allocated revocable disk space in MB | Gauge |
slave/mem_used
|
Allocated memory in MB | Gauge |
slave/mem_total
|
Memory in MB | Gauge |
slave/mem_revocable_percent
|
Percentage of allocated revocable memory | Gauge |
slave/mem_revocable_total
|
Revocable memory in MB | Gauge |
slave/mem_revocable_used
|
Allocated revocable memory in MB | Gauge |
volume_gid_manager/volume_gids_total
|
Number of gids configured for volume gid manager | Gauge |
volume_gid_manager/volume_gids_free
|
Number of free gids available for volume gid manager | Gauge |
Agent
The following metrics provide information about whether an agent is currently registered with a master and for how long it has been running.
| Metric | Description | Type |
|---|---|---|
slave/registered
|
Whether this agent is registered with a master | Gauge |
slave/uptime_secs
|
Uptime in seconds | Gauge |
System
The following metrics provide information about the agent system.
| Metric | Description | Type |
|---|---|---|
system/cpus_total
|
Number of CPUs available | Gauge |
system/load_15min
|
Load average for the past 15 minutes | Gauge |
system/load_5min
|
Load average for the past 5 minutes | Gauge |
system/load_1min
|
Load average for the past minute | Gauge |
system/mem_free_bytes
|
Free memory in bytes | Gauge |
system/mem_total_bytes
|
Total memory in bytes | Gauge |
Executors
The following metrics provide information about the executor instances running on the agent.
| Metric | Description | Type |
|---|---|---|
containerizer/mesos/container_destroy_errors
|
Number of containers destroyed due to launch errors | Counter |
containerizer/fetcher/task_fetches_succeeded
|
Total number of times the Mesos fetcher successfully fetched all the URIs for a task. | Counter |
containerizer/fetcher/task_fetches_failed
|
Number of times the Mesos fetcher failed to fetch all the URIs for a task. | Counter |
slave/container_launch_errors
|
Number of container launch errors | Counter |
slave/executors_preempted
|
Number of executors destroyed due to preemption | Counter |
slave/frameworks_active
|
Number of active frameworks | Gauge |
slave/executor_directory_max_allowed_age_secs
|
Maximum allowed age in seconds to delete executor directory | Gauge |
slave/executors_registering
|
Number of executors registering | Gauge |
slave/executors_running
|
Number of executors running | Gauge |
slave/executors_terminated
|
Number of terminated executors | Counter |
slave/executors_terminating
|
Number of terminating executors | Gauge |
slave/recovery_errors
|
Number of errors encountered during agent recovery | Gauge |
slave/recovery_time_secs
|
Agent recovery time in seconds. This value is only available after agent recovery succeeded and remains constant for the life of the Mesos agent. | Gauge |
Tasks
The following metrics provide information about active and terminated tasks.
| Metric | Description | Type |
|---|---|---|
slave/tasks_failed
|
Number of failed tasks | Counter |
slave/tasks_finished
|
Number of finished tasks | Counter |
slave/tasks_killed
|
Number of killed tasks | Counter |
slave/tasks_lost
|
Number of lost tasks | Counter |
slave/tasks_running
|
Number of running tasks | Gauge |
slave/tasks_staging
|
Number of staging tasks | Gauge |
slave/tasks_starting
|
Number of starting tasks | Gauge |
Messages
The following metrics provide information about messages between the agents and the master it is registered with.
| Metric | Description | Type |
|---|---|---|
slave/invalid_framework_messages
|
Number of invalid framework messages | Counter |
slave/invalid_status_updates
|
Number of invalid status updates | Counter |
slave/valid_framework_messages
|
Number of valid framework messages | Counter |
slave/valid_status_updates
|
Number of valid status updates | Counter |
Containerizers
The following metrics provide information about both Mesos and Docker containerizers.
| Metric | Description | Type |
|---|---|---|
containerizer/docker/image_pull_ms
|
Docker containerizer image pull latency in ms | Gauge |
containerizer/docker/image_pull_ms/count
|
Number of Docker containerizer image pulls | Gauge |
containerizer/docker/image_pull_ms/max
|
Maximum Docker containerizer image pull latency in ms | Gauge |
containerizer/docker/image_pull_ms/min
|
Minimum Docker containerizer image pull latency in ms | Gauge |
containerizer/docker/image_pull_ms/p50
|
Median Docker containerizer image pull latency in ms | Gauge |
containerizer/docker/image_pull_ms/p90
|
90th percentile Docker containerizer image pull latency in ms | Gauge |
containerizer/docker/image_pull_ms/p95
|
95th percentile Docker containerizer image pull latency in ms | Gauge |
containerizer/docker/image_pull_ms/p99
|
99th percentile Docker containerizer image pull latency in ms | Gauge |
containerizer/docker/image_pull_ms/p999
|
99.9th percentile Docker containerizer image pull latency in ms | Gauge |
containerizer/docker/image_pull_ms/p9999
|
99.99th percentile Docker containerizer image pull latency in ms | Gauge |
containerizer/mesos/disk/project_ids_free
|
Number of free project IDs available to the XFS Disk isolator | Gauge |
containerizer/mesos/disk/project_ids_total
|
Number of project IDs configured for the XFS Disk isolator | Gauge |
containerizer/mesos/provisioner/docker_store/image_pull_ms
|
Mesos containerizer docker image pull latency in ms | Gauge |
containerizer/mesos/provisioner/docker_store/image_pull_ms/count
|
Number of Mesos containerizer docker image pulls | Gauge |
containerizer/mesos/provisioner/docker_store/image_pull_ms/max
|
Maximum Mesos containerizer docker image pull latency in ms | Gauge |
containerizer/mesos/provisioner/docker_store/image_pull_ms/min
|
Minimum Mesos containerizer docker image pull latency in ms | Gauge |
containerizer/mesos/provisioner/docker_store/image_pull_ms/p50
|
Median Mesos containerizer docker image pull latency in ms | Gauge |
containerizer/mesos/provisioner/docker_store/image_pull_ms/p90
|
90th percentile Mesos containerizer docker image pull latency in ms | Gauge |
containerizer/mesos/provisioner/docker_store/image_pull_ms/p95
|
95th percentile Mesos containerizer docker image pull latency in ms | Gauge |
containerizer/mesos/provisioner/docker_store/image_pull_ms/p99
|
99th percentile Mesos containerizer docker image pull latency in ms | Gauge |
containerizer/mesos/provisioner/docker_store/image_pull_ms/p999
|
99.9th percentile Mesos containerizer docker image pull latency in ms | Gauge |
containerizer/mesos/provisioner/docker_store/image_pull_ms/p9999
|
99.99th percentile Mesos containerizer docker image pull latency in ms | Gauge |
Resource Providers
The following metrics provide information about ongoing and completed operations that apply to resources provided by a resource provider with the given type and name. In the following metrics, the operation placeholder refers to the name of a particular operation type, which is described in the list of supported operation types.
| Metric | Description | Type |
|---|---|---|
resource_providers/<type>.<name>/operations/<operation>/pending
|
Number of ongoing operations | Gauge |
resource_providers/<type>.<name>/operations/<operation>/finished
|
Number of finished operations | Counter |
resource_providers/<type>.<name>/operations/<operation>/failed
|
Number of failed operations | Counter |
resource_providers/<type>.<name>/operations/<operation>/dropped
|
Number of dropped operations | Counter |
Supported Operation Types
Since the supported operation types may vary among different resource providers, the following is a comprehensive list of operation types and the corresponding resource providers that support them. Note that the name column is for the operation placeholder in the above metrics.
| Type | Name | Supported Resource Provider Types |
|---|---|---|
RESERVE |
reserve |
All |
UNRESERVE |
unreserve |
All |
CREATE |
create |
org.apache.mesos.rp.local.storage |
DESTROY |
destroy |
org.apache.mesos.rp.local.storage |
CREATE_DISK |
create_disk |
org.apache.mesos.rp.local.storage |
DESTROY_DISK |
destroy_disk |
org.apache.mesos.rp.local.storage |
For example, cluster operators can monitor the number of successful
CREATE_VOLUME operations that are applied to the resource provider with type
org.apache.mesos.rp.local.storage and name lvm through the
resource_providers/org.apache.mesos.rp.local.storage.lvm/operations/create_disk/finished
metric.
CSI Plugins
Storage resource providers in Mesos are backed by CSI plugins running in standalone containers. To monitor the health of these CSI plugins for a storage resource provider with type and name, the following metrics provide information about plugin terminations and ongoing and completed CSI calls made to the plugin.
| Metric | Description | Type |
|---|---|---|
resource_providers/<type>.<name>/csi_plugin/container_terminations
|
Number of terminated CSI plugin containers | Counter |
resource_providers/<type>.<name>/csi_plugin/rpcs_pending
|
Number of ongoing CSI calls | Gauge |
resource_providers/<type>.<name>/csi_plugin/rpcs_finished
|
Number of successful CSI calls | Counter |
resource_providers/<type>.<name>/csi_plugin/rpcs_failed
|
Number of failed CSI calls | Counter |
resource_providers/<type>.<name>/csi_plugin/rpcs_cancelled
|
Number of cancelled CSI calls | Counter |
The new CLI
The new Mesos Command Line Interface provides one executable Python 3 script to run all default commands and additional custom plugins.
Two of the subcommands available allow you to debug running containers:
mesos task exec, to run a command in a running task's container.mesos task attach, to attach your local terminal to a running task and stream its input/output.
Building the CLI
For now, the Mesos CLI is still under development and not built as part of a standard Mesos distribution.
However, the CLI can be built using Autotools and Cmake options. If necessary, check the options described in the linked pages to set Python 3 before starting a build.
The result of this build will be a mesos binary that can be executed.
Using the CLI
Using the CLI without building Mesos is also possible. To do so, activate the CLI virtual environment by following the steps described below:
$ cd src/python/cli_new/
$ PYTHON=python3 ./bootstrap
$ source activate
$ mesos
Calling mesos will then run the CLI and calling mesos-cli-tests will
run the integration tests.
Configuring the CLI
The CLI uses a configuration file to know where the masters of the cluster are as well as list any plugins that should be used in addition to the default ones provided.
The configuation file, located by default at ~/.mesos/config.toml, looks
like this:
# The `plugins` array lists the absolute paths of the
# plugins you want to add to the CLI.
plugins = [
  "</absolute/path/to/plugin-1/directory>",
  "</absolute/path/to/plugin-2/directory>"
]

# The `master` field is either composed of an `address` field
# or a `zookeeper` field, but not both. For example:
[master]
  address = "10.10.0.30:5050"
  # The `zookeeper` field has an `addresses` array and a `path` field.
  # [master.zookeeper]
  #   addresses = [
  #     "10.10.0.31:5050",
  #     "10.10.0.32:5050",
  #     "10.10.0.33:5050"
  #   ]
  #   path = "/mesos"
Operational Guide
Using a process supervisor
Mesos uses a "fail-fast" approach to error handling: if a serious error occurs, Mesos will typically exit rather than trying to continue running in a possibly erroneous state. For example, when Mesos is configured for high availability, the leading master will abort itself when it discovers it has been partitioned away from the Zookeeper quorum. This is a safety precaution to ensure the previous leader doesn't continue communicating in an unsafe state.
To ensure that such failures are handled appropriately, production deployments of Mesos typically use a process supervisor (such as systemd or supervisord) to detect when Mesos processes exit. The supervisor can be configured to restart the failed process automatically and/or to notify the cluster operator to investigate the situation.
Changing the master quorum
The master leverages a Paxos-based replicated log as its storage backend (--registry=replicated_log is the only storage backend currently supported). Each master participates in the ensemble as a log replica. The --quorum flag determines a majority of the masters.
The following table shows the tolerance to master failures for each quorum size:
| Masters | Quorum Size | Failure Tolerance |
|---|---|---|
| 1 | 1 | 0 |
| 3 | 2 | 1 |
| 5 | 3 | 2 |
| ... | ... | ... |
| 2N - 1 | N | N - 1 |
It is recommended to run with 3 or 5 masters, when desiring high availability.
NOTE
When configuring the quorum, it is essential to ensure that there are only so many masters running as specified in the table above. If additional masters are running, this violates the quorum and the log may be corrupted! As a result, it is recommended to gate the running of the master process with something that enforces a static whitelist of the master hosts. See MESOS-1546 for adding a safety whitelist within Mesos itself.
For online reconfiguration of the log, see: MESOS-683.
Increasing the quorum size
As the size of a cluster grows, it may be desired to increase the quorum size for additional fault tolerance.
The following steps indicate how to increment the quorum size, using 3 -> 5 masters as an example (quorum size 2 -> 3):
- Initially, 3 masters are running with
--quorum=2 - Restart the original 3 masters with
--quorum=3 - Start 2 additional masters with
--quorum=3
To increase the quorum by N, repeat this process to increment the quorum size N times.
NOTE: Currently, moving out of a single master setup requires wiping the replicated log state and starting fresh. This will wipe all persistent data (e.g., agents, maintenance information, quota information, etc). To move from 1 master to 3 masters:
- Stop the standalone master.
- Remove the replicated log data (
replicated_logunder the--work_dir). - Start the original master and two new masters with
--quorum=2
Decreasing the quorum size
The following steps indicate how to decrement the quorum size, using 5 -> 3 masters as an example (quorum size 3 -> 2):
- Initially, 5 masters are running with
--quorum=3 - Remove 2 masters from the cluster, ensure they will not be restarted (see NOTE section above). Now 3 masters are running with
--quorum=3 - Restart the 3 masters with
--quorum=2
To decrease the quorum by N, repeat this process to decrement the quorum size N times.
Replacing a master
Please see the NOTE section above. So long as the failed master is guaranteed to not re-join the ensemble, it is safe to start a new master with an empty log and allow it to catch up.
External access for Mesos master
If the default IP (or the command line arg --ip) is an internal IP, then external entities such as framework schedulers will be unable to reach the master. To address that scenario, an externally accessible IP:port can be setup via the --advertise_ip and --advertise_port command line arguments of mesos-master. If configured, external entities such as framework schedulers interact with the advertise_ip:advertise_port from where the request needs to be proxied to the internal IP:port on which the Mesos master is listening.
HTTP requests to non-leading master
HTTP requests to some master endpoints (e.g., /state, /machine/down) can only be answered by the leading master. Such requests made to a non-leading master will result in either a 307 Temporary Redirect (with the location of the leading master) or 503 Service Unavailable (if the master does not know who the current leader is).
Mesos Fetcher
Mesos 0.23.0 introduced experimental support for the Mesos fetcher cache.
In this context we loosely regard the term "downloading" as to include copying from local file systems.
What is the Mesos fetcher?
The Mesos fetcher is a mechanism to download resources into the sandbox
directory of a task in preparation of running
the task. As part of a TaskInfo message, the framework ordering the task's
execution provides a list of CommandInfo::URI protobuf values, which becomes
the input to the Mesos fetcher.
The Mesos fetcher can copy files from a local filesytem and it also natively supports the HTTP, HTTPS, FTP and FTPS protocols. If the requested URI is based on some other protocol, then the fetcher tries to utilise a local Hadoop client and hence supports any protocol supported by the Hadoop client, e.g., HDFS, S3. See the agent configuration documentation for how to configure the agent with a path to the Hadoop client.
By default, each requested URI is downloaded directly into the sandbox directory and repeated requests for the same URI leads to downloading another copy of the same resource. Alternatively, the fetcher can be instructed to cache URI downloads in a dedicated directory for reuse by subsequent downloads.
The Mesos fetcher mechanism comprises of these two parts:
-
The agent-internal Fetcher Process (in terms of libprocess) that controls and coordinates all fetch actions. Every agent instance has exactly one internal fetcher instance that is used by every kind of containerizer.
-
The external program
mesos-fetcherthat is invoked by the former. It performs all network and disk operations except file deletions and file size queries for cache-internal bookkeeping. It is run as an external OS process in order to shield the agent process from I/O-related hazards. It takes instructions in form of an environment variable containing a JSON object with detailed fetch action descriptions.
The fetch procedure
Frameworks launch tasks by calling the scheduler driver method launchTasks(),
passing CommandInfo protobuf structures as arguments. This type of structure
specifies (among other things) a command and a list of URIs that need to be
"fetched" into the sandbox directory on the agent node as a precondition for
task execution. Hence, when the agent receives a request to launch a task, it
calls upon its fetcher, first, to provision the specified resources into the
sandbox directory. If fetching fails, the task is not started and the reported
task status is TASK_FAILED.
All URIs requested for a given task are fetched sequentially in a single invocation of mesos-fetcher. Here, avoiding download concurrency reduces the risk of bandwidth issues somewhat. However, multiple fetch operations can be active concurrently due to multiple task launch requests.
The URI protobuf structure
Before mesos-fetcher is started, the specific fetch actions to be performed for
each URI are determined based on the following protobuf structure. (See
include/mesos/mesos.proto for more details.)
message CommandInfo {
  message URI {
    required string value = 1;
    optional bool executable = 2;
    optional bool extract = 3 [default = true];
    optional bool cache = 4;
    optional string output_file = 5;
  }
  ...
  optional string user = 5;
}
The field "value" contains the URI.
If the "executable" field is "true", the "extract" field is ignored and has no effect.
If the "cache" field is true, the fetcher cache is to be used for the URI.
If the "output_file" field is set, the fetcher will use that name for the copy stored in the sandbox directory. "output_file" may contain a directory component, in which case the path described must be a relative path.
Specifying a user name
The framework may pass along a user name that becomes a fetch parameter. This causes its executors and tasks to run under a specific user. However, if the "user" field in the CommandInfo structure is specified, it takes precedence for the affected task.
If a user name is specified either way, the fetcher first validates that it is
in fact a valid user name on the agent. If it is not, fetching fails right here.
Otherwise, the sandbox directory is assigned to the specified user as owner
(using chown) at the end of the fetch procedure, before task execution begins.
The user name in play has an important effect on caching. Caching is managed on a per-user base, i.e. the combination of user name and "uri" uniquely identifies a cacheable fetch result. If no user name has been specified, this counts for the cache as a separate user, too. Thus cache files for each valid user are segregated from all others, including those without a specified user.
This means that the exact same URI will be downloaded and cached multiple times if different users are indicated.
Executable fetch results
By default, fetched files are not executable.
If the field "executable" is set to "true", the fetch result will be changed to be executable (by "chmod") for every user. This happens at the end of the fetch procedure, in the sandbox directory only. It does not affect any cache file.
Archive extraction
If the "extract" field is "true", which is the default, then files with a recognized extension that hints at packed or compressed archives are unpacked in the sandbox directory. These file extensions are recognized:
- .tar, .tar.gz, .tar.bz2, .tar.xz
- .gz, .tgz, .tbz2, .txz, .zip
In case the cache is bypassed, both the archive and the unpacked results will be found together in the sandbox. In case a cache file is unpacked, only the extraction result will be found in the sandbox.
The "output_file" field is useful here for cases where the URI ends with query parameters, since these will otherwise end up in the file copied to the sandbox and will subsequently fail to be recognized as archives.
Bypassing the cache
By default, the URI field "cache" is not present. If this is the case or its value is "false" the fetcher downloads directly into the sandbox directory.
The same also happens dynamically as a fallback strategy if anything goes wrong when preparing a fetch operation that involves the cache. In this case, a warning message is logged. Possible fallback conditions are:
- The server offering the URI does not respond or reports an error.
- The URI's download size could not be determined.
- There is not enough space in the cache, even after attempting to evict files.
Fetching through the cache
If the URI's "cache" field has the value "true", then the fetcher cache is in effect. If a URI is encountered for the first time (for the same user), it is first downloaded into the cache, then copied to the sandbox directory from there. If the same URI is encountered again, and a corresponding cache file is resident in the cache or still en route into the cache, then downloading is omitted and the fetcher proceeds directly to copying from the cache. Competing requests for the same URI simply wait upon completion of the first request that occurs. Thus every URI is downloaded at most once (per user) as long as it is cached.
Every cache file stays resident for an unspecified amount of time and can be removed at the fetcher's discretion at any moment, except while it is in direct use:
- It is still being downloaded by this fetch procedure.
- It is still being downloaded by a concurrent fetch procedure for a different task.
- It is being copied or extracted from the cache.
Once a cache file has been removed, the related URI will thereafter be treated as described above for the first encounter.
Unfortunately, there is no mechanism to refresh a cache entry in the current experimental version of the fetcher cache. A future feature may force updates based on checksum queries to the URI.
Recommended practice for now:
The framework should start using a fresh unique URI whenever the resource's content has changed.
Determining resource sizes
Before downloading a resource to the cache, the fetcher first determines the size of the expected resource. It uses these methods depending on the nature of the URI.
- Local file sizes are probed with systems calls (that follow symbolic links).
- HTTP/HTTPS URIs are queried for the "content-length" field in the header. This
is performed by
curl. The reported asset size must be greater than zero or the URI is deemed invalid. - FTP/FTPS is not supported at the time of writing.
- Everything else is queried by the local HDFS client.
If any of this reports an error, the fetcher then falls back on bypassing the cache as described above.
WARNING: Only URIs for which download sizes can be queried up front and for which accurate sizes are reported reliably are eligible for any fetcher cache involvement. If actual cache file sizes exceed the physical capacity of the cache directory in any way, all further agent behavior is completely unspecified. Do not use any cache feature with any URI for which you have any doubts!
To mitigate this problem, cache files that have been found to be larger than expected are deleted immediately after downloading and delivering the requested content to the sandbox. Thus exceeding total capacity at least does not accumulate over subsequent fetcher runs.
If you know for sure that size aberrations are within certain limits you can specify a cache directory size that is sufficiently smaller than your actual physical volume and fetching should work.
In case of cache files that are smaller then expected, the cache will dynamically adjust its own bookkeeping according to actual sizes.
Cache eviction
After determining the prospective size of a cache file and before downloading it, the cache attempts to ensure that at least as much space as is needed for this file is available and can be written into. If this is immediately the case, the requested amount of space is simply marked as reserved. Otherwise, missing space is freed up by "cache eviction". This means that the cache removes files at its own discretion until the given space target is met or exceeded.
The eviction process fails if too many files are in use and therefore not evictable or if the cache is simply too small. Either way, the fetcher then falls back on bypassing the cache for the given URI as described above.
If multiple evictions happen concurrently, each of them is pursuing its own separate space goals. However, leftover freed up space from one effort is automatically awarded to others.
HTTP and SOCKS proxy settings
Sometimes it is desirable to use a proxy to download the file. The Mesos fetcher uses libcurl internally for downloading content from HTTP/HTTPS/FTP/FTPS servers, and libcurl can use a proxy automatically if certain environment variables are set.
The respective environment variable name is [protocol]_proxy, where
protocol can be one of socks4, socks5, http, https.
For example, the value of the http_proxy environment variable would be used
as the proxy for fetching http contents, while https_proxy would be used for
fetching https contents. Pay attention that these variable names must be
entirely in lower case.
The value of the proxy variable is of the format
[protocol://][user:password@]machine[:port], where protocol can be one of
socks4, socks5, http, https.
FTP/FTPS requests with a proxy also make use of an HTTP/HTTPS proxy. Even though in general this constrains the available FTP protocol operations, everything the fetcher uses is supported.
Your proxy settings can be placed in /etc/default/mesos-slave. Here is an
example:
export http_proxy=https://proxy.example.com:3128
export https_proxy=https://proxy.example.com:3128
The fetcher will pick up these environment variable settings since the utility
program mesos-fetcher which it employs is a child of mesos-agent.
For more details, please check the libcurl manual.
Agent flags
It is highly recommended to set these flags explicitly to values other than their defaults or to not use the fetcher cache in production.
- "fetcher_cache_size", default value: enough for testing.
- "fetcher_cache_dir", default value: somewhere inside the directory specified by the "work_dir" flag, which is OK for testing.
Recommended practice:
- Use a separate volume as fetcher cache. Do not specify a directory as fetcher cache directory that competes with any other contributor for the underlying volume's space.
- Set the cache directory size flag of the agent to less than your actual cache volume's physical size. Use a safety margin, especially if you do not know for sure if all frameworks are going to be compliant.
Ultimate remedy:
You can disable the fetcher cache entirely on each agent by setting its "fetcher_cache_size" flag to zero bytes.
Future Features
The following features would be relatively easy to implement additionally.
- Perform cache updates based on resource check sums. For example, query the md5 field in HTTP headers to determine when a resource at a URL has changed.
- Respect HTTP cache-control directives.
- Enable caching for ftp/ftps.
- Use symbolic links or bind mounts to project cached resources into the sandbox, read-only.
- Have a choice whether to copy the extracted archive into the sandbox.
- Have a choice whether to delete the archive after extraction bypassing the cache.
- Make the segregation of cache files by user optional.
- Extract content while downloading when bypassing the cache.
- Prefetch resources for subsequent tasks. This can happen concurrently with running the present task, right after fetching its own resources.
Implementation Details
The Mesos Fetcher Cache Internals describes how the fetcher cache is implemented.
title: Apache Mesos - Domains and Regions layout: documentation
Regions and Fault Domains
Starting with Mesos 1.5, it is possible to place Mesos masters and agents into domains, which are logical groups of machines that share some characteristics.
Currently, fault domains are the only supported type of domains, which are groups of machines with similar failure characteristics.
A fault domain is a 2 level hierarchy of regions and zones. The mapping from fault domains to physical infrastructure is up to the operator to configure, although it is recommended that machines in the same zones have low latency to each other.
In cloud environments, regions and zones can be mapped to the "region" and "availability zone" concepts exposed by most cloud providers, respectively. In on-premise deployments, regions and zones can be mapped to data centers and racks, respectively.
Schedulers may prefer to place network-intensive workloads in the same domain, as this may improve performance. Conversely, a single failure that affects a host in a domain may be more likely to affect other hosts in the same domain; hence, schedulers may prefer to place workloads that require high availability in multiple domains. For example, all the hosts in a single rack might lose power or network connectivity simultaneously.
The --domain flag can be used to specify the fault domain of a master or
agent node. The value of this flag must be a file path or a JSON dictionary
with the key fault_domain and subkeys region and zone mapping to
arbitrary strings:
mesos-master --domain='{"fault_domain": {"region": {"name":"eu"}, "zone": { "name":"rack1"}}}'

mesos-agent  --domain='{"fault_domain": {"region": {"name":"eu"}, "zone": {"name":"rack2"}}}'
Frameworks can learn about the domain of an agent by inspecting the domain
field in the received offer, which contains a DomainInfo that has the
same structure as the JSON dictionary above.
Constraints
When configuring fault domains for the masters and agents, the following constraints must be obeyed:
-
If a mesos master is not configured with a domain, it will reject connection attempts from agents with a domain.
This is done because the master is not able to determine whether or not the agent would be remote in this case.
-
Agents with no configured domain are assumed to be in the same domain as the master.
If this behaviour isn't desired, the
--require_agent_domainflag on the master can be used to enforce that domains are configured on all agents by having the master reject all registration attempts by agents without a configured domain. -
If one master is configured with a domain, all other masters must be in the same "region" to avoid cross-region quorum writes. It is recommended to put them in different zones within that region for high availability.
-
The default DRF resource allocator will only offer resources from agents in the same region as the master. To receive offers from all regions, a framework must set the
REGION_AWAREcapability bit in its FrameworkInfo.
Example
A short example will serve to illustrate these concepts. WayForward Technologies runs a successful website that allows users to purchase things that they want to have.
To do this, it owns a data center in San Francisco, in which it runs a number of
custom Mesos frameworks. All agents within the data center are configured with
the same region sf, and the individual racks inside the data center are used
as zones.
The three mesos masters are placed in different server racks in the data center, which gives them enough isolation to withstand events like a whole rack losing power or network connectivity but still have low-enough latency for quorum writes.
One of the provided services is a real-time view of the company's inventory. The framework providing this service is placing all of its tasks in the same zone as the database server, to take advantage of the high-speed, low-latency link so it can always display the latest results.
During peak hours, it might happen that the computing power required to operate
the website exceeds the capacity of the data center. To avoid unnecessary
hardware purchases, WayForward Technologies contracted with a third-party cloud
provider TPC. The machines from this provider are placed in a different
region tpc, and the zones are configured to correspond to the availability
zones provided by TPC. All relevant frameworks are updated with the
REGION_AWARE bit in their FrameworkInfo and their scheduling logic is
updated so that they can schedule tasks in the cloud if required.
Non-region aware frameworks will now only receive offers from agents within the data center, where the master nodes reside. Region-aware frameworks are supposed to know when and if they should place their tasks in the data center or with the cloud provider.
Performance Profiling
This document over time will be home to various guides on how to use various profiling tools to do performance analysis of Mesos.
Flamescope
Flamescope is a visualization tool for exploring different time ranges as flamegraphs. In order to use the tool, you first need to obtain stack traces, here's how to obtain a 60 second recording of the mesos master process at 100 hertz using Linux perf:
$ sudo perf record --freq=100 --no-inherit --call-graph dwarf -p <mesos-master-pid> -- sleep 60
$ sudo perf script --header | c++filt > mesos-master.stacks
$ gzip mesos-master.stacks
If you'd like to solicit help in analyzing the performance data, upload the mesos-master.stacks.gz to a publicly accessible location and file with dev@mesos.apache.org for analysis, or send the file over slack to the #performance channel.
Alternatively, to do the analysis yourself, place mesos-master.stacks into the examples folder of a flamescope git checkout.
Memory Profiling with Mesos and Jemalloc
On Linux systems, Mesos is able to leverage the memory-profiling capabilities of the jemalloc general-purpose allocator to provide powerful debugging tools for investigating memory-related issues.
These include detailed real-time statistics of the current memory usage, as well as information about the location and frequency of individual allocations.
This generally works by having libprocess detect at runtime whether the current process is using jemalloc as its memory allocator, and if so enable a number of HTTP endpoints described below that allow operators to generate the desired data at runtime.
Requirements
A prerequisite for memory profiling is a suitable allocator. Currently only jemalloc is supported, which can be connected via one of the following ways.
The recommended method is to specify the --enable-jemalloc-allocator
compile-time flag, which causes the mesos-master and mesos-agent binaries
to be statically linked against a bundled version of jemalloc that will be
compiled with the correct compile-time flags.
Alternatively and analogous to other bundled dependencies of Mesos, it is of
course also possible to use a suitable custom version of jemalloc with the
--with-jemalloc=</path-to-jemalloc> flag.
NOTE: Suitable here means that jemalloc should have been built with the
--enable-stats and --enable-prof flags, and that the string
prof:true;prof_active:false is part of the malloc configuration. The latter
condition can be satisfied either at configuration or at run-time, see the
section on MALLOC_CONF below.
The third way is to use the LD_PRELOAD mechanism to preload a libjemalloc.so
shared library that is present on the system at runtime. The MemoryProfiler
class in libprocess will automatically detect this and enable its memory
profiling support.
The generated profile dumps will be written to a random directory under TMPDIR
if set, otherwise in a subdirectory of /tmp.
Finally, note that since jemalloc was designed to be used in highly concurrent allocation scenarios, it can improve performance over the default system allocator. In this case, it can be beneficial to build Mesos with jemalloc even if there is no intention to use the memory profiling functionality.
Usage
There are two independent sets of data that can be collected from jemalloc: memory statistics and heap profiling information.
Using any of the endpoints described below
requires the jemalloc allocator and starting the mesos-agent
or mesos-master binary with the option --memory_profiling=true (or setting
the environment variable LIBPROCESS_MEMORY_PROFILING=true for other binaries
using libprocess).
Memory Statistics
The /statistics endpoint returns exact statistics about the memory usage in
JSON format, for example the number of bytes currently allocated and the size
distribution of these allocations.
It takes no parameters and will return the results in JSON format:
http://example.org:5050/memory-profiler/statistics
Be aware that the returned JSON is quite large, so when accessing this endpoint from a terminal, it is advisable to redirect the results into a file.
Heap Profiling
The profiling done by jemalloc works by sampling from the calls to malloc()
according to a configured probability distribution, and storing stack traces for
the sampled calls in a separate memory area. These can then be dumped into files
on the filesystem, so-called heap profiles.
To start a profiling run one would access the /start endpoint:
http://example.org:5050/memory-profiler/start?duration=5mins
followed by downloading one of the generated files described below after the
duration has elapsed. The remaining time of the current profiling run can be
verified via the /state endpoint:
http://example.org:5050/memory-profiler/state
Since profiling information is stored process-global by jemalloc, only a single concurrent profiling run is allowed. Additionally, only the results of the most recently finished run are stored on disk.
The profile collection can also be stopped early with the /stop endpoint:
http://example.org:5050/memory-profiler/stop
To analyze the generated profiling data, the results are offered in three different formats.
Raw profile
http://example.org:5050/memory-profiler/download/raw
This returns a file in a plain text format containing the raw backtraces
collected, i.e., lists of memory addresses. It can be interactively analyzed
and rendered using the jeprof tool provided by the jemalloc project. For more
information on this file format, check out the official jemalloc
documentation.
Symbolized profile
http://example.org:5050/memory-profiler/download/text
This is similar to the raw format above, except that jeprof is called on the
host machine to attempt to read symbol information from the current binary and
replace raw memory addresses in the profile by human-readable symbol names.
Usage of this endpoint requires that jeprof is present on the host machine
and on the PATH, and no useful information will be generated unless the binary
contains symbol information.
Call graph
http://example.org:5050/memory-profiler/download/graph
This endpoint returns an image in SVG format that shows a graphical representation of the samples backtraces.
Usage of this endpoint requires that jeprof and dot are present on the host
machine and on the PATH of mesos, and no useful information will be generated
unless the binary contains symbol information.
Overview
Which of these is needed will depend on the circumstances of the application deployment and of the bug that is investigated.
For example, the call graph presents information in a visual, immediately useful form, but is difficult to filter and post-process if non-default output options are desired.
On the other hand, in many debian-like environments symbol information is by default stripped from binaries to save space and shipped in separate packages. In such an environment, if it is not permitted to install additional packages on the host running Mesos, one would store the raw profiles and enrich them with symbol information locally.
Jeprof Installation
As described above, the /download/text and /download/graph endpoints require
the jeprof program installed on the host system. Where possible, it is
recommended to install jeprof through the system package manager, where it is
usually packaged alongside with jemalloc itself.
Alternatively, a copy of the script can be found under
3rdparty/jemalloc-5.0.1/bin/jeprof in the build directory, or can be
downloaded directly from the internet using a command like:
$ curl https://raw.githubusercontent.com/jemalloc/jemalloc/dev/bin/jeprof.in | sed s/@jemalloc_version@/5.0.1/ >jeprof
Note that jeprof is just a perl script that post-processes the raw profiles.
It has no connection to the jemalloc library besides being distributed in the
same package. In particular, it is generally not required to have matching
versions of jemalloc and jeprof.
If jeprof is installed manually, one also needs to take care to install the
necessary dependencies. In particular, this include the perl interpreter to
execute the script itself and the dot binary to generate graph files.
Command-line Usage
In some circumstances, it might be desired to automate the downloading of heap profiles by writing a simple script. A simple example for how this might look like this:
#!/bin/bash

SECONDS=600
HOST=example.org:5050

curl ${HOST}/memory-profiler/start?duration=${SECONDS}
sleep $((${SECONDS} + 1))
wget ${HOST}/memory-profiler/download/raw
A more sophisticated script would additionally store the id value returned by
the call to /start and pass it as a paremter to /download, to ensure that a
new run was not started in the meantime.
Using the MALLOC_CONF Interface
The jemalloc allocator provides a native interface to control the memory
profiling behaviour. The usual way to provide settings through this interface is
by setting the environment variable MALLOC_CONF.
NOTE: If libprocess detects that memory profiling was started through
MALLOC_CONF, it will reject starting a profiling run of its own to avoid
interference.
The MALLOC_CONF interface provides a number of options that are not exposed by
libprocess, like generating heap profiles automatically after a certain amount
of memory has been allocated, or whenever memory usage reaches a new high-water
mark. The full list of settings is described on the
jemalloc man page.
On the other hand, features like starting and stopping the profiling at runtime
or getting the information provided by the /statistics endpoint can not be
achieved through the MALLOC_CONF interface.
For example, to create a dump automatically for every 1 GiB worth of recorded allocations, one might use the configuration:
MALLOC_CONF="prof:true,prof_prefix:/path/to/folder,lg_prof_interval=20"
To debug memory allocations during early startup, profiling can be activated
before accessing the /start endpoint:
MALLOC_CONF="prof:true,prof_active:true"
Mesos Attributes & Resources
Mesos has two basic methods to describe the agents that comprise a cluster. One of these is managed by the Mesos master, the other is simply passed onwards to the frameworks using the cluster.
Types
The types of values that are supported by Attributes and Resources in Mesos are scalar, ranges, sets and text.
The following are the definitions of these types:
scalar : floatValue

floatValue : ( intValue ( "." intValue )? ) | ...

intValue : [0-9]+

range : "[" rangeValue ( "," rangeValue )* "]"

rangeValue : scalar "-" scalar

set : "{" text ( "," text )* "}"

text : [a-zA-Z0-9_/.-]
Attributes
Attributes are key-value pairs (where value is optional) that Mesos passes along when it sends offers to frameworks. An attribute value supports three different types: scalar, range or text.
attributes : attribute ( ";" attribute )*

attribute : text ":" ( scalar | range | text )
Note that setting multiple attributes corresponding to the same key is highly discouraged (and might be disallowed in future), as this complicates attribute- based filtering of offers, both on schedulers side and on the Mesos side.
Resources
Mesos can manage three different types of resources: scalars, ranges, and sets. These are used to represent the different resources that a Mesos agent has to offer. For example, a scalar resource type could be used to represent the amount of memory on an agent. Scalar resources are represented using floating point numbers to allow fractional values to be specified (e.g., "1.5 CPUs"). Mesos only supports three decimal digits of precision for scalar resources (e.g., reserving "1.5123 CPUs" is considered equivalent to reserving "1.512 CPUs"). For GPUs, Mesos only supports whole number values.
Resources can be specified either with a JSON array or a semicolon-delimited string of key-value pairs. If, after examining the examples below, you have questions about the format of the JSON, inspect the Resource protobuf message definition in include/mesos/mesos.proto.
As JSON:
[
  {
    "name": "<resource_name>",
    "type": "SCALAR",
    "scalar": {
      "value": <resource_value>
    }
  },
  {
    "name": "<resource_name>",
    "type": "RANGES",
    "ranges": {
      "range": [
        {
          "begin": <range_beginning>,
          "end": <range_ending>
        },
        ...
      ]
    }
  },
  {
    "name": "<resource_name>",
    "type": "SET",
    "set": {
      "item": [
        "<first_item>",
        ...
      ]
    },
    "role": "<role_name>"
  },
  ...
]
As a list of key-value pairs:
resources : resource ( ";" resource )*

resource : key ":" ( scalar | range | set )

key : text ( "(" resourceRole ")" )?

resourceRole : text | "*"
Note that resourceRole must be a valid role name; see the roles documentation for details.
Predefined Uses & Conventions
There are several kinds of resources that have predefined behavior:
cpusgpusdiskmemports
Note that disk and mem resources are specified in megabytes. The master's user interface will convert resource values into a more human-readable format: for example, the value 15000 will be displayed as 14.65GB.
An agent without cpus and mem resources will not have its resources advertised to any frameworks.
Examples
By default, Mesos will try to autodetect the resources available at the local machine when mesos-agent starts up. Alternatively, you can explicitly configure which resources an agent should make available.
Here are some examples of how to configure the resources at a Mesos agent:
--resources='cpus:24;gpus:2;mem:24576;disk:409600;ports:[21000-24000,30000-34000];bugs(debug_role):{a,b,c}'

--resources='[{"name":"cpus","type":"SCALAR","scalar":{"value":24}},{"name":"gpus","type":"SCALAR","scalar":{"value":2}},{"name":"mem","type":"SCALAR","scalar":{"value":24576}},{"name":"disk","type":"SCALAR","scalar":{"value":409600}},{"name":"ports","type":"RANGES","ranges":{"range":[{"begin":21000,"end":24000},{"begin":30000,"end":34000}]}},{"name":"bugs","type":"SET","set":{"item":["a","b","c"]},"role":"debug_role"}]'
Or given a file resources.txt containing the following:
[
  {
    "name": "cpus",
    "type": "SCALAR",
    "scalar": {
      "value": 24
    }
  },
  {
    "name": "gpus",
    "type": "SCALAR",
    "scalar": {
      "value": 2
    }
  },
  {
    "name": "mem",
    "type": "SCALAR",
    "scalar": {
      "value": 24576
    }
  },
  {
    "name": "disk",
    "type": "SCALAR",
    "scalar": {
      "value": 409600
    }
  },
  {
    "name": "ports",
    "type": "RANGES",
    "ranges": {
      "range": [
        {
          "begin": 21000,
          "end": 24000
        },
        {
          "begin": 30000,
          "end": 34000
        }
      ]
    }
  },
  {
    "name": "bugs",
    "type": "SET",
    "set": {
      "item": [
        "a",
        "b",
        "c"
      ]
    },
    "role": "debug_role"
  }
]
You can do:
$ path/to/mesos-agent --resources=file:///path/to/resources.txt ...
In this case, we have five resources of three different types: scalars, a range, and a set. There are scalars called cpus, gpus, mem and disk, a range called ports, and a set called bugs. bugs is assigned to the role debug_role, while the other resources do not specify a role and are thus assigned to the default role.
Note: the "default role" can be set by the --default_role flag.
- scalar called
cpus, with the value24 - scalar called
gpus, with the value2 - scalar called
mem, with the value24576 - scalar called
disk, with the value409600 - range called
ports, with values21000through24000and30000through34000(inclusive) - set called
bugs, with the valuesa,bandc, assigned to the roledebug_role
To configure the attributes of a Mesos agent, you can use the --attributes command-line flag of mesos-agent:
--attributes='rack:abc;zone:west;os:centos5;level:10;keys:[1000-1500]'
That will result in configuring the following five attributes:
rackwith text valueabczonewith text valuewestoswith text valuecentos5levelwith scalar value 10keyswith range value1000through1500(inclusive)
title: Apache Mesos - Roles layout: documentation
Roles
Many modern host-level operating systems (e.g. Linux, BSDs, etc) support multiple users. Similarly, Mesos is a multi-user cluster management system, with the expectation of a single Mesos cluster managing an organization's resources and servicing the organization's users.
As such, Mesos has to address a number of requirements related to resource management:
- Fair sharing of the resources amongst users
- Providing resource guarantees to users (e.g. quota, priorities, isolation)
- Providing accurate resource accounting
- How many resources are allocated / utilized / etc?
- Per-user accounting
In Mesos, we refer to these "users" as roles. More precisely, a role within Mesos refers to a resource consumer within the cluster. This resource consumer could represent a user within an organization, but it could also represent a team, a group, a service, a framework, etc.
Schedulers subscribe to one or more roles in order to receive resources and schedule work on behalf of the resource consumer(s) they are servicing.
Some examples of resource allocation guarantees that Mesos provides:
- Guaranteeing that a role is allocated a specified amount of resources (via quota).
- Ensuring that some (or all) of the resources on a particular agent are allocated to a particular role (via reservations).
- Ensuring that resources are fairly shared between roles (via DRF).
- Expressing that some roles should receive a higher relative share of the cluster (via weights).
Roles and access control
There are two ways to control which roles a framework is allowed to subscribe to. First, ACLs can be used to specify which framework principals can subscribe to which roles. For more information, see the authorization documentation.
Second, a role whitelist can be configured by passing the --roles flag to
the Mesos master at startup. This flag specifies a comma-separated list of role
names. If the whitelist is specified, only roles that appear in the whitelist
can be used. To change the whitelist, the Mesos master must be restarted. Note
that in a high-availability deployment of Mesos, you should take care to ensure
that all Mesos masters are configured with the same whitelist.
In Mesos 0.26 and earlier, you should typically configure both ACLs and the whitelist, because in these versions of Mesos, any role that does not appear in the whitelist cannot be used.
In Mesos 0.27, this behavior has changed: if --roles is not specified, the
whitelist permits any role name to be used. Hence, in Mesos 0.27, the
recommended practice is to only use ACLs to define which roles can be used; the
--roles command-line flag is deprecated.
Associating frameworks with roles
A framework specifies which roles it would like to subscribe to when it
subscribes with the master. This is done via the roles field in
FrameworkInfo. A framework can also change which roles it is
subscribed to by reregistering with an updated FrameworkInfo.
As a user, you can typically specify which role(s) a framework will
subscribe to when you start the framework. How to do this depends on the
user interface of the framework you're using. For example, a single user
scheduler might take a --mesos_role command-line flag and a multi-user
scheduler might take a --mesos-roles command-line flag or sync with
the organization's LDAP system to automatically adjust which roles it is
subscribed to as the organization's structure changes.
Subscribing to multiple roles
As noted above, a framework can subscribe to multiple roles
simultaneously. Frameworks that want to do this must opt-in to the
MULTI_ROLE capability.
When a framework is offered resources, those resources are associated
with exactly one of the roles it has subscribed to; the framework can
determine which role an offer is for by consulting the
allocation_info.role field in the Offer or the
allocation_info.role field in each offered Resource (in the current
implementation, all the resources in a single Offer will be allocated
to the same role).
Multiple frameworks in the same role
Multiple frameworks can be subscribed to the same role. This can be useful: for example, one framework can create a persistent volume and write data to it. Once the task that writes data to the persistent volume has finished, the volume will be offered to other frameworks subscribed to the same role; this might give a second ("consumer") framework the opportunity to launch a task that reads the data produced by the first ("producer") framework.
However, configuring multiple frameworks to use the same role should be done with caution, because all the frameworks will have access to any resources that have been reserved for that role. For example, if a framework stores sensitive information on a persistent volume, that volume might be offered to a different framework subscribed to the same role. Similarly, if one framework creates a persistent volume, another framework subscribed to the same role might "steal" the volume and use it to launch a task of its own. In general, multiple frameworks sharing the same role should be prepared to collaborate with one another to ensure that role-specific resources are used appropriately.
Associating resources with roles
A resource is assigned to a role using a reservation. Resources can either be reserved statically (when the agent that hosts the resource is started) or dynamically: frameworks and operators can specify that a certain resource should subsequently be reserved for use by a given role. For more information, see the reservation documentation.
Default role
The role named * is special. Unreserved resources are currently represented
as having the special * role (the idea being that * matches any role). By
default, all the resources at an agent node are unreserved (this can be changed
via the --default_role command-line flag when starting the agent).
In addition, when a framework registers without providing a
FrameworkInfo.role, it is assigned to the * role. In Mesos 1.3, frameworks
should use the FrameworkInfo.roles field, which does not assign a default of
*, but frameworks can still specify * explicitly if desired. Frameworks
and operators cannot make reservations to the * role.
Invalid role names
A role name must be a valid directory name, so it cannot:
- Be an empty string
- Be
.or.. - Start with
- - Contain any slash, backspace, or whitespace character
Roles and resource allocation
By default, the Mesos master uses weighted Dominant Resource Fairness (wDRF) to allocate resources. In particular, this implementation of wDRF first identifies which role is furthest below its fair share of the role's dominant resource. Each of the frameworks subscribed to that role are then offered additional resources in turn.
The resource allocation process can be customized by assigning
weights to roles: a role with a weight of 2 will be allocated
twice the fair share of a role with a weight of 1. By default, every role has a
weight of 1. Weights can be configured using the
/weights operator endpoint, or else using the
deprecated --weights command-line flag when starting the Mesos master.
Roles and quota
In order to guarantee that a role is allocated a specific amount of resources, quota can be specified via the /quota endpoint.
The resource allocator will first attempt to satisfy the quota requirements, before fairly sharing the remaining resources. For more information, see the quota documentation.
Role vs. Principal
A principal identifies an entity that interacts with Mesos; principals are similar to user names. For example, frameworks supply a principal when they register with the Mesos master, and operators provide a principal when using the operator HTTP endpoints. An entity may be required to authenticate with its principal in order to prove its identity, and the principal may be used to authorize actions performed by an entity, such as resource reservation and persistent volume creation/destruction.
Roles, on the other hand, are used exclusively for resource allocation, as covered above.
title: Apache Mesos - Weights layout: documentation
Weights
In Mesos, weights can be used to control the relative share of cluster resources that is offered to different roles.
In Mesos 0.28 and earlier, weights can only be configured by specifying
the --weights command-line flag when starting the Mesos master. If a
role does not have a weight specified in the --weights flag, then the default
value (1.0) will be used. Weights cannot be changed without updating the flag
and restarting all Mesos masters.
Mesos 1.0 contains a /weights operator endpoint
that allows weights to be changed at runtime. The --weights command-line flag
is deprecated.
Operator HTTP Endpoint
The master /weights HTTP endpoint enables operators to configure weights. The
endpoint currently offers a REST-like interface and supports the following operations:
The endpoint can optionally use authentication and authorization. See the authentication guide for details.
Update
The operator can update the weights by sending an HTTP PUT request to the /weights
endpoint.
An example request to the /weights endpoint could look like this (using the
JSON file below):
$ curl -d @weights.json -X PUT http://<master-ip>:<port>/weights
For example, to set a weight of 2.0 for role1 and set a weight of 3.5
for role2, the operator can use the following weights.json:
    [
      {
        "role": "role1",
        "weight": 2.0
      },
      {
        "role": "role2",
        "weight": 3.5
      }
    ]
If the master is configured with an explicit role whitelist, the request is only valid if all specified roles exist in the role whitelist.
Weights are now persisted in the registry on cluster bootstrap and after any
updates. Once the weights are persisted in the registry, any Mesos master that
subsequently starts with --weights still specified will emit a warning and use
the registry value instead.
The operator will receive one of the following HTTP response codes:
200 OK: Success (the update request was successful).400 BadRequest: Invalid arguments (e.g., invalid JSON, non-positive weights).401 Unauthorized: Unauthenticated request.403 Forbidden: Unauthorized request.
Query
The operator can query the configured weights by sending an HTTP GET request
to the /weights endpoint.
$ curl -X GET http://<master-ip>:<port>/weights
The response message body includes a JSON representation of the current configured weights, for example:
    [
      {
        "role": "role2",
        "weight": 3.5
      },
      {
        "role": "role1",
        "weight": 2.0
      }
    ]
The operator will receive one of the following HTTP response codes:
200 OK: Success.401 Unauthorized: Unauthenticated request.
title: Apache Mesos - Quota layout: documentation
Quota
When multiple users are sharing a cluster, the operator may want to set limits on how many resources each user can use. Quota addresses this need and allows operators to set these limits on a per-role basis.
Supported Resources
The following resources have quota support:
cpusmemdiskgpus- any custom resource of type
SCALAR
The following resources do not have quota support:
ports- any custom resource of type
RANGESorSET
Updating Quotas
By default, every role has no resource limits. To modify the resource limits
for one or more roles, the v1 API UPDATE_QUOTA call is used. Note that this
call applies the update in an all-or-nothing manner, so that if one of the
role's quota updates is invalid or unauthorized, the entire request will not
go through.
Example:
curl --request POST \
     --url http://<master-ip>:<master-port>/api/v1/ \
     --header 'Content-Type: application/json' \
     --data '{
               "type": "UPDATE_QUOTA",
               "update_quota": {
                 "force": false,
                 "quota_configs": [
                   {
                     "role": "dev",
                     "limits": {
                       "cpus": { "value": 10 },
                       "mem":  { "value": 2048 },
                       "disk": { "value": 4096 }
                     }
                   },
                   {
                     "role": "test",
                     "limits": {
                       "cpus": { "value": 1 },
                       "mem":  { "value": 256 },
                       "disk": { "value": 512 }
                     }
                   }
                 ]
               }
             }'
- Note that the request will be denied if the current quota consumption is above
the provided limit. This check can be overriden by setting
forcetotrue. - Note that the master will attempt to rescind a sufficient number of offers to ensure that the role cannot exceed its limits.
Viewing Quotas
Web UI
The 'Roles' tab in the web ui displays resource accounting information for all known roles. This includes the configured quota and the quota consumption.
API
There are several endpoints for viewing quota related information.
The v1 API GET_QUOTA call will return the quota configuration:
$ curl --request POST \
     --url http://<master-ip>:<master-port>/api/v1/ \
     --header 'Content-Type: application/json' \
     --header 'Accept: application/json' \
     --data '{ "type": "GET_QUOTA" }'
Response:
{
  "type": "GET_QUOTA",
  "get_quota": {
    "status": {
      "infos": [
        {
          "configs" : [
            {
              "role": "dev",
              "limits": {
                "cpus": { "value": 10.0 },
                "mem":  { "value": 2048.0 },
                "disk": { "value": 4096.0 }
              }
            },
            {
              "role": "test",
              "limits": {
                "cpus": { "value": 1.0 },
                "mem":  { "value": 256.0 },
                "disk": { "value": 512.0 }
              }
            }
          ]
        }
      ]
    }
  }
}
To also view the quota consumption, use the /roles endpoint:
$ curl http://<master-ip>:<master-port>/roles
Response
{
  "roles": [
    {
      "name": "dev",
      "weight": 1.0,
      "quota":
      {
        "role": "dev",
        "limit": {
          "cpus": 10.0,
          "mem":  2048.0,
          "disk": 4096.0
        },
        "consumed": {
          "cpus": 2.0,
          "mem":  1024.0,
          "disk": 2048.0
        }
      },
      "allocated": {
        "cpus": 2.0,
        "mem":  1024.0,
        "disk": 2048.0
      },
      "offered": {},
      "reserved": {
        "cpus": 2.0,
        "mem":  1024.0,
        "disk": 2048.0
      },
      "frameworks": []
    }
  ]
}
Quota Consumption
A role's quota consumption consists of its allocations and reservations. In other words, even if reservations are not allocated, they are included in the quota consumption. Offered resources are not charged against quota.
Metrics
The following metric keys are exposed for quota:
allocator/mesos/quota/roles/<role>/resources/<resource>/guaranteeallocator/mesos/quota/roles/<role>/resources/<resource>/limit- A quota consumption metric will be added via MESOS-9123.
Deprecated: Quota Guarantees
Prior to Mesos 1.9, the quota related APIs only exposed quota "guarantees" which ensured a minimum amount of resources would be available to a role. Setting guarantees also set implicit quota limits. In Mesos 1.9+, quota limits are now exposed directly per the above documentation.
Quota guarantees are now deprecated in favor of using only quota limits. Enforcement of quota guarantees required that Mesos holds back enough resources to meet all of the unsatisfied quota guarantees. Since Mesos is moving towards an optimistic offer model (to improve multi-role / multi- scheduler scalability, see MESOS-1607), it will become no longer possible to enforce quota guarantees by holding back resources. In such a model, quota limits are simple to enforce, but quota guarantees would require a complex "effective limit" propagation model to leave space for unsatisfied guarantees.
For these reasons, quota guarantees, while still functional in Mesos 1.9, are now deprecated. A combination of limits and priority based preemption will be simpler in an optimistic offer model.
For documentation on quota guarantees, please see the previous documentation: https://github.com/apache/mesos/blob/1.8.0/docs/quota.md
Implementation Notes
- Quota is not supported on nested roles (e.g.
eng/prod). - During failover, in order to correctly enforce limits, the allocator will be paused and will not issue offers until at least 80% agents re-register or 10 minutes elapses. These parameters will be made configurable: MESOS-4073
- Quota is SUPPORTED for the default
*role now MESOS-3938.
title: Apache Mesos - Reservation layout: documentation
Reservation
Mesos provides mechanisms to reserve resources in specific slaves. The concept was first introduced with static reservation in 0.14.0 which enabled operators to specify the reserved resources on slave startup. This was extended with dynamic reservation in 0.23.0 which enabled operators and authorized frameworks to dynamically reserve resources in the cluster.
In both types of reservations, resources are reserved for a role.
Static Reservation
An operator can configure a slave with resources reserved for a role.
The reserved resources are specified via the --resources flag.
For example, suppose we have 12 CPUs and 6144 MB of RAM available on a slave and
that we want to reserve 8 CPUs and 4096 MB of RAM for the ads role.
We start the slave like so:
    $ mesos-slave \
      --master=<ip>:<port> \
      --resources="cpus:4;mem:2048;cpus(ads):8;mem(ads):4096"
We now have 8 CPUs and 4096 MB of RAM reserved for ads on this slave.
CAVEAT: In order to modify a static reservation, the operator must drain and
restart the slave with the new configuration specified in the
--resources flag.
It's often more convenient to specify the total resources available on
the slave as unreserved via the --resources flag and manage reservations
dynamically (see below) via the master HTTP endpoints. However static
reservation provides a way for the operator to more deterministically control
the reservations (roles, amount, principals) before the agent is exposed to the
master and frameworks. One use case is for the operator to dedicate entire
agents for specific roles.
Dynamic Reservation
As mentioned in Static Reservation, specifying
the reserved resources via the --resources flag makes the reservation static.
That is, statically reserved resources cannot be reserved for another role nor
be unreserved. Dynamic reservation enables operators and authorized frameworks
to reserve and unreserve resources after slave-startup.
Offer::Operation::ReserveandOffer::Operation::Unreservemessages are available for frameworks to send back via theacceptOffersAPI as a response to a resource offer./reserveand/unreserveHTTP endpoints allow operators to manage dynamic reservations through the master.
In the following sections, we will walk through examples of each of the interfaces described above.
If two dynamic reservations are made for the same role at a single slave (using the same labels, if any; see below), the reservations will be combined by adding together the resources reserved by each request. This will result in a single reserved resource at the slave. Similarly, "partial" unreserve operations are allowed: an unreserve operation can release some but not all of the resources at a slave that have been reserved for a role. In this case, the unreserved resources will be subtracted from the previous reservation and any remaining resources will still be reserved.
Dynamic reservations cannot be unreserved if they are still being used by a running task or if a persistent volume has been created using the reserved resources. In the latter case, the volume should be destroyed before unreserving the resources.
Authorization
By default, frameworks and operators are authorized to reserve resources for
any role and to unreserve dynamically reserved resources.
Authorization allows this behavior to be limited so that
resources can only be reserved for particular roles, and only particular
resources can be unreserved. For these operations to be authorized, the
framework or operator should provide a principal to identify itself. To use
authorization with reserve/unreserve operations, the Mesos master must be
configured with the appropriate ACLs. For more information, see the
authorization documentation.
Similarly, agents by default can register with the master with resources that
are statically reserved for arbitrary roles.
With authorization,
the master can be configured to use the reserve_resources ACL to check that
the agent's principal is allowed to statically reserve resources for specific
roles.
Reservation Labels
Dynamic reservations can optionally include a list of labels, which are arbitrary key-value pairs. Labels can be used to associate arbitrary metadata with a resource reservation. For example, frameworks can use labels to identify the intended purpose for a portion of the resources that have been reserved at a given slave. Note that two reservations with different labels will not be combined together into a single reservation, even if the reservations are at the same slave and use the same role.
Reservation Refinement
Hierarhical roles such as eng/backend enable the delegation of resources
down a hierarchy, and reservation refinement is the mechanism with which
reservations are delegated down the hierarchy. For example, a reservation
(static or dynamic) for eng can be refined to eng/backend. When such
a reservation is unreserved, they are returned to the previous owner. In this
case it would be returned to eng. Reservation refinements can also "skip"
levels. For example, eng can be refined directly to eng/backend/db.
Again, unreserving such a reservation is returned to its previous owner eng.
NOTE: Frameworks need to enable the RESERVATION_REFINEMENT capability
in order to be offered, and to create refined reservations
Listing Reservations
Information about the reserved resources at each slave in the cluster can be
found by querying the /slaves master endpoint
(under the reserved_resources_full key).
The same information can also be found in the /state
endpoint on the agent (under the reserved_resources_full key). The agent
endpoint is useful to confirm if a reservation has been propagated to the
agent (which can fail in the event of network partition or master/agent
restarts).
Examples
Framework Scheduler API
Offer::Operation::Reserve (without RESERVATION_REFINEMENT)
A framework can reserve resources through the resource offer cycle. The
reservation role must match the offer's allocation role. Suppose we
receive a resource offer with 12 CPUs and 6144 MB of RAM unreserved, allocated
to role "engineering".
    {
      "allocation_info": { "role": "engineering" },
      "id": <offer_id>,
      "framework_id": <framework_id>,
      "slave_id": <slave_id>,
      "hostname": <hostname>,
      "resources": [
        {
          "allocation_info": { "role": "engineering" },
          "name": "cpus",
          "type": "SCALAR",
          "scalar": { "value": 12 },
          "role": "*",
        },
        {
          "allocation_info": { "role": "engineering" },
          "name": "mem",
          "type": "SCALAR",
          "scalar": { "value": 6144 },
          "role": "*",
        }
      ]
    }
We can reserve 8 CPUs and 4096 MB of RAM by sending the following
Offer::Operation message. Offer::Operation::Reserve has a resources field
which we specify with the resources to be reserved. We must explicitly set the
resources' role field to the offer's allocation role. The required value of
the principal field depends on whether or not the framework provided a
principal when it registered with the master. If a principal was provided, then
the resources' principal field must be equal to the framework's principal.
If no principal was provided during registration, then the resources'
principal field can take any value, or can be left unset. Note that the
principal field determines the "reserver principal" when
authorization is enabled, even if authentication is
disabled.
    {
      "type": Offer::Operation::RESERVE,
      "reserve": {
        "resources": [
          {
            "allocation_info": { "role": "engineering" },
            "name": "cpus",
            "type": "SCALAR",
            "scalar": { "value": 8 },
            "role": "engineering",
            "reservation": {
              "principal": <framework_principal>
            }
          },
          {
            "allocation_info": { "role": "engineering" },
            "name": "mem",
            "type": "SCALAR",
            "scalar": { "value": 4096 },
            "role": "engineering",
            "reservation": {
              "principal": <framework_principal>
            }
          }
        ]
      }
    }
If the reservation is successful, a subsequent resource offer will contain the following reserved resources:
    {
      "allocation_info": { "role": "engineering" },
      "id": <offer_id>,
      "framework_id": <framework_id>,
      "slave_id": <slave_id>,
      "hostname": <hostname>,
      "resources": [
        {
          "allocation_info": { "role": "engineering" },
          "name": "cpus",
          "type": "SCALAR",
          "scalar": { "value": 8 },
          "role": "engineering",
          "reservation": {
            "principal": <framework_principal>
          }
        },
        {
          "allocation_info": { "role": "engineering" },
          "name": "mem",
          "type": "SCALAR",
          "scalar": { "value": 4096 },
          "role": "engineering",
          "reservation": {
            "principal": <framework_principal>
          }
        },
      ]
    }
Offer::Operation::Unreserve (without RESERVATION_REFINEMENT)
A framework can unreserve resources through the resource offer cycle.
In Offer::Operation::Reserve, we reserved 8 CPUs
and 4096 MB of RAM on a particular slave for one of our subscribed roles
(e.g. "engineering"). The master will continue to only offer these reserved
resources to the reservation's role. Suppose we would like to unreserve
these resources. First, we receive a resource offer (copy/pasted from above):
    {
      "allocation_info": { "role": "engineering" },
      "id": <offer_id>,
      "framework_id": <framework_id>,
      "slave_id": <slave_id>,
      "hostname": <hostname>,
      "resources": [
        {
          "allocation_info": { "role": "engineering" },
          "name": "cpus",
          "type": "SCALAR",
          "scalar": { "value": 8 },
          "role": "engineering",
          "reservation": {
            "principal": <framework_principal>
          }
        },
        {
          "allocation_info": { "role": "engineering" },
          "name": "mem",
          "type": "SCALAR",
          "scalar": { "value": 4096 },
          "role": "engineering",
          "reservation": {
            "principal": <framework_principal>
          }
        },
      ]
    }
We can unreserve the 8 CPUs and 4096 MB of RAM by sending the following
Offer::Operation message. Offer::Operation::Unreserve has a resources
field which we can use to specify the resources to be unreserved.
    {
      "type": Offer::Operation::UNRESERVE,
      "unreserve": {
        "resources": [
          {
            "allocation_info": { "role": "engineering" },
            "name": "cpus",
            "type": "SCALAR",
            "scalar": { "value": 8 },
            "role": "engineering",
            "reservation": {
              "principal": <framework_principal>
            }
          },
          {
            "allocation_info": { "role": "engineering" },
            "name": "mem",
            "type": "SCALAR",
            "scalar": { "value": 4096 },
            "role": "engineering",
            "reservation": {
              "principal": <framework_principal>
            }
          }
        ]
      }
    }
The unreserved resources may now be offered to other frameworks.
Offer::Operation::Reserve (with RESERVATION_REFINEMENT)
A framework that wants to create a refined reservation needs to enable
the RESERVATION_REFINEMENT capability. Doing so will allow the framework
to use the reservations field in the Resource message in order to
push a refined reservation.
Since reserved resources are offered to any of the child roles under the role
for which they are reserved for, they can get allocated to say,
"engineering/backend" while being reserved for "engineering".
It can then be refined to be reserved for "engineering/backend".
Note that the refined reservation role must match the offer's allocation role.
Suppose we receive a resource offer with 12 CPUs and 6144 MB of RAM reserved to
"engineering", allocated to role "engineering/backend".
    {
      "allocation_info": { "role": "engineering/backend" },
      "id": <offer_id>,
      "framework_id": <framework_id>,
      "slave_id": <slave_id>,
      "hostname": <hostname>,
      "resources": [
        {
          "allocation_info": { "role": "engineering/backend" },
          "name": "cpus",
          "type": "SCALAR",
          "scalar": { "value": 12 },
          "reservations": [
            {
              "type": "DYNAMIC",
              "role": "engineering",
              "principal": <principal>,
            }
          ]
        },
        {
          "allocation_info": { "role": "engineering/backend" },
          "name": "mem",
          "type": "SCALAR",
          "scalar": { "value": 6144 },
          "reservations": [
            {
              "type": "DYNAMIC",
              "role": "engineering",
              "principal": <principal>,
            }
          ]
        }
      ]
    }
Take note of the fact that role and reservation are not set, and that there
is a new field called reservations which represents the reservation state.
With RESERVATION_REFINEMENT enabled, the framework receives resources in this
new format where solely the reservations field is used for the reservation
state, rather than role/reservation pair from pre-RESERVATION_REFINEMENT.
We can reserve 8 CPUs and 4096 MB of RAM to "engineering/backend" by sending
the following Offer::Operation message. Offer::Operation::Reserve has
a resources field which we specify with the resources to be reserved.
We must push a new ReservationInfo message onto the back of
the reservations field. We must explicitly set the reservation's' role field
to the offer's allocation role. The optional value of the principal field
depends on whether or not the framework provided a principal when it registered
with the master. If a principal was provided, then the resources' principal
field must be equal to the framework's principal. If no principal was provided
during registration, then the resources' principal field can take any value,
or can be left unset. Note that the principal field determines
the "reserver principal" when authorization is enabled, even
if authentication is disabled.
    {
      "type": Offer::Operation::RESERVE,
      "reserve": {
        "resources": [
          {
            "allocation_info": { "role": "engineering/backend" },
            "name": "cpus",
            "type": "SCALAR",
            "scalar": { "value": 8 },
            "reservations": [
              {
                "type": "DYNAMIC",
                "role": "engineering",
                "principal": <principal>,
              },
              {
                "type": "DYNAMIC",
                "role": "engineering/backend",
                "principal": <framework_principal>,
              }
            ]
          },
          {
            "allocation_info": { "role": "engineering/backend" },
            "name": "mem",
            "type": "SCALAR",
            "scalar": { "value": 4096 },
            "reservations": [
              {
                "type": "DYNAMIC",
                "role": "engineering",
                "principal": <principal>,
              },
              {
                "type": "DYNAMIC",
                "role": "engineering/backend",
                "principal": <framework_principal>,
              }
            ]
          }
        ]
      }
    }
If the reservation is successful, a subsequent resource offer will contain the following reserved resources:
    {
      "allocation_info": { "role": "engineering/backend" },
      "id": <offer_id>,
      "framework_id": <framework_id>,
      "slave_id": <slave_id>,
      "hostname": <hostname>,
      "resources": [
        {
          "allocation_info": { "role": "engineering/backend" },
          "name": "cpus",
          "type": "SCALAR",
          "scalar": { "value": 8 },
          "reservations": [
            {
              "type": "DYNAMIC",
              "role": "engineering",
              "principal": <principal>,
            },
            {
              "type": "DYNAMIC",
              "role": "engineering/backend",
              "principal": <framework_principal>,
            }
          ]
        },
        {
          "allocation_info": { "role": "engineering/backend" },
          "name": "mem",
          "type": "SCALAR",
          "scalar": { "value": 4096 },
          "reservations": [
            {
              "type": "DYNAMIC",
              "role": "engineering",
              "principal": <principal>,
            },
            {
              "type": "DYNAMIC",
              "role": "engineering/backend",
              "principal": <framework_principal>,
            }
          ]
        },
      ]
    }
Offer::Operation::Unreserve (with RESERVATION_REFINEMENT)
A framework can unreserve resources through the resource offer cycle.
In Offer::Operation::Reserve,
we reserved 8 CPUs and 4096 MB of RAM on a particular slave for one of our
subscribed roles (i.e. "engineering/backend"), previously reserved for
"engineering". When we unreserve these resources, they are returned to
"engineering", by the last ReservationInfo added to
the reservations field being popped. First, we receive a resource offer
(copy/pasted from above):
    {
      "allocation_info": { "role": "engineering/backend" },
      "id": <offer_id>,
      "framework_id": <framework_id>,
      "slave_id": <slave_id>,
      "hostname": <hostname>,
      "resources": [
        {
          "allocation_info": { "role": "engineering/backend" },
          "name": "cpus",
          "type": "SCALAR",
          "scalar": { "value": 8 },
          "reservations": [
            {
              "type": "DYNAMIC",
              "role": "engineering",
              "principal": <principal>,
            },
            {
              "type": "DYNAMIC",
              "role": "engineering/backend",
              "principal": <framework_principal>,
            }
          ]
        },
        {
          "allocation_info": { "role": "engineering/backend" },
          "name": "mem",
          "type": "SCALAR",
          "scalar": { "value": 4096 },
          "reservations": [
            {
              "type": "DYNAMIC",
              "role": "engineering",
              "principal": <principal>,
            },
            {
              "type": "DYNAMIC",
              "role": "engineering/backend",
              "principal": <framework_principal>,
            }
          ]
        },
      ]
    }
We can unreserve the 8 CPUs and 4096 MB of RAM by sending the following
Offer::Operation message. Offer::Operation::Unreserve has a resources
field which we can use to specify the resources to be unreserved.
    {
      "type": Offer::Operation::UNRESERVE,
      "unreserve": {
        "resources": [
          {
            "allocation_info": { "role": "engineering/backend" },
            "name": "cpus",
            "type": "SCALAR",
            "scalar": { "value": 8 },
            "reservations": [
              {
                "type": "DYNAMIC",
                "role": "engineering",
                "principal": <principal>,
              },
              {
                "type": "DYNAMIC",
                "role": "engineering/backend",
                "principal": <framework_principal>,
              }
            ]
          },
          {
            "allocation_info": { "role": "engineering/backend" },
            "name": "mem",
            "type": "SCALAR",
            "scalar": { "value": 4096 },
            "reservations": [
              {
                "type": "DYNAMIC",
                "role": "engineering",
                "principal": <principal>,
              },
              {
                "type": "DYNAMIC",
                "role": "engineering/backend",
                "principal": <framework_principal>,
              }
            ]
          },
        ]
      }
    }
The resources will now be reserved for "engineering" again, and may now be
offered to "engineering" role itself, or other roles under "engineering".
Operator HTTP Endpoints
As described above, dynamic reservations can be made by a framework scheduler,
typically in response to a resource offer. However, dynamic reservations can
also be created and deleted by sending HTTP requests to the /reserve and
/unreserve endpoints, respectively. This capability is intended for use by
operators and administrative tools.
/reserve (since 0.25.0)
Suppose we want to reserve 8 CPUs and 4096 MB of RAM for the ads role on a
slave with id=<slave_id> (note that it is up to the user to find the ID of the
slave that hosts the desired resources; the request will fail if sufficient
unreserved resources cannot be found on the slave). In this case, the principal
that must be included in the reservation field of the reserved resources
depends on the status of HTTP authentication on the master. If HTTP
authentication is enabled, then the principal in the reservation should match
the authenticated principal provided in the request's HTTP headers. If HTTP
authentication is disabled, then the principal in the reservation can take any
value, or can be left unset. Note that the principal field determines the
"reserver principal" when authorization is enabled, even if
HTTP authentication is disabled.
We send an HTTP POST request to the master's /reserve endpoint like so:
    $ curl -i \
      -u <operator_principal>:<password> \
      -d slaveId=<slave_id> \
      -d resources='[
        {
          "name": "cpus",
          "type": "SCALAR",
          "scalar": { "value": 8 },
          "reservations": [
            {
              "type": "DYNAMIC",
              "role": "ads",
              "principal": <operator_principal>,
            }
          ]
        },
        {
          "name": "mem",
          "type": "SCALAR",
          "scalar": { "value": 4096 },
          "reservations": [
            {
              "type": "DYNAMIC",
              "role": "ads",
              "principal": <operator_principal>,
            }
          ]
        }
      ]' \
      -X POST http://<ip>:<port>/master/reserve
The user receives one of the following HTTP responses:
202 Accepted: Request accepted (see below).400 BadRequest: Invalid arguments (e.g., missing parameters).401 Unauthorized: Unauthenticated request.403 Forbidden: Unauthorized request.409 Conflict: Insufficient resources to satisfy the reserve operation.
This endpoint returns the 202 ACCEPTED HTTP status code, which indicates that the reserve operation has been validated successfully by the master. The request is then forwarded asynchronously to the Mesos slave where the reserved resources are located. That asynchronous message may not be delivered or reserving resources at the slave might fail, in which case no resources will be reserved. To determine if a reserve operation has succeeded, the user can examine the state of the appropriate Mesos slave (e.g., via the slave's /state HTTP endpoint).
/unreserve (since 0.25.0)
Suppose we want to unreserve the resources that we dynamically reserved above. We can send an HTTP POST request to the master's /unreserve endpoint like so:
    $ curl -i \
      -u <operator_principal>:<password> \
      -d slaveId=<slave_id> \
      -d resources='[
        {
          "name": "cpus",
          "type": "SCALAR",
          "scalar": { "value": 8 },
          "reservations": [
            {
              "type": "DYNAMIC",
              "role": "ads",
              "principal": <reserver_principal>,
            }
          ]
        },
        {
          "name": "mem",
          "type": "SCALAR",
          "scalar": { "value": 4096 },
          "reservations": [
            {
              "type": "DYNAMIC",
              "role": "ads",
              "principal": <reserver_principal>,
            }
          ]
        }
      ]' \
      -X POST http://<ip>:<port>/master/unreserve
Note that reserver_principal is the principal that was used to make the
reservation, while operator_principal is the principal that is attempting to
perform the unreserve operation---in some cases, these principals might be the
same. The operator_principal must be authorized to
unreserve reservations made by reserver_principal.
The user receives one of the following HTTP responses:
202 Accepted: Request accepted (see below).400 BadRequest: Invalid arguments (e.g., missing parameters).401 Unauthorized: Unauthenticated request.403 Forbidden: Unauthorized request.409 Conflict: Insufficient resources to satisfy the unreserve operation.
This endpoint returns the 202 ACCEPTED HTTP status code, which indicates that the unreserve operation has been validated successfully by the master. The request is then forwarded asynchronously to the Mesos slave where the reserved resources are located. That asynchronous message may not be delivered or unreserving resources at the slave might fail, in which case no resources will be unreserved. To determine if an unreserve operation has succeeded, the user can examine the state of the appropriate Mesos slave (e.g., via the slave's /state HTTP endpoint).
title: Apache Mesos - Shared Persistent Volumes layout: documentation
Shared Persistent Volumes
Overview
By default, persistent volumes provide exclusive access: once a task is launched using a persistent volume, no other tasks can use that volume, and the volume will not appear in any resource offers until the task that is using it has finished.
In some cases, it can be useful to share a volume between multiple tasks running on the same agent. For example, this could be used to efficiently share a large data set between multiple data analysis tasks.
Creating Shared Volumes
Shared persistent volumes are created using the same workflow as normal
persistent volumes: by starting with a
reserved resource and applying a CREATE operation,
either via the framework scheduler API or the
/create-volumes HTTP endpoint. To
create a shared volume, set the shared field during volume creation.
For example, suppose a framework subscribed to the "engineering" role
receives a resource offer containing 2048MB of dynamically reserved disk:
{
  "allocation_info": { "role": "engineering" },
  "id" : <offer_id>,
  "framework_id" : <framework_id>,
  "slave_id" : <slave_id>,
  "hostname" : <hostname>,
  "resources" : [
    {
      "allocation_info": { "role": "engineering" },
      "name" : "disk",
      "type" : "SCALAR",
      "scalar" : { "value" : 2048 },
      "role" : "engineering",
      "reservation" : {
        "principal" : <framework_principal>
      }
    }
  ]
}
The framework can create a shared persistent volume using this disk resource via the following offer operation:
{
  "type" : Offer::Operation::CREATE,
  "create": {
    "volumes" : [
      {
        "allocation_info": { "role": "engineering" },
        "name" : "disk",
        "type" : "SCALAR",
        "scalar" : { "value" : 2048 },
        "role" : "engineering",
        "reservation" : {
          "principal" : <framework_principal>
        },
        "disk": {
          "persistence": {
            "id" : <persistent_volume_id>
          },
          "volume" : {
            "container_path" : <container_path>,
            "mode" : <mode>
          }
        },
        "shared" : {
        }
      }
    ]
  }
}
Note that the shared field has been set (to an empty JSON object),
which indicates that the CREATE operation will create a shared volume.
Using Shared Volumes
To be eligible to receive resource offers that contain shared volumes, a
framework must enable the SHARED_RESOURCES capability in the
FrameworkInfo it provides when it registers with the master.
Frameworks that do not enable this capability will not be offered
shared resources.
When a framework receives a resource offer, it can determine whether a
volume is shared by checking if the shared field has been set. Unlike
normal persistent volumes, a shared volume that is in use by a task will
continue to be offered to the frameworks subscribed to the volume's role;
this gives those frameworks the opportunity to launch additional tasks
that can access the volume. A framework can also launch multiple tasks
that access the volume using a single ACCEPT call.
Note that Mesos does not provide any isolation or concurrency control
between the tasks that are sharing a volume. Framework developers should
ensure that tasks that access the same volume do not conflict with one
another. This can be done via careful application-level concurrency
control, or by ensuring that the tasks access the volume in a read-only
manner. Mesos provides support for read-only access to volumes: as
described in the persistent volume
documentation, tasks that are launched on a volume can specify a mode
of "RO" to use the volume in read-only mode.
Destroying Shared Volumes
A persistent volume, whether shared or not, can only be destroyed if no running or pending tasks have been launched using the volume. For non-shared volumes, it is usually easy to determine when it is safe to delete a volume. For shared volumes, the framework(s) that have launched tasks using the volume typically need to coordinate to ensure (e.g., via reference counting) that a volume is no longer being used before it is destroyed.
Resource Allocation
TODO: how do shared volumes influence resource allocation?
References
-
MESOS-3421 contains additional information about the implementation of this feature.
-
Talk at MesosCon Europe 2016 on August 31, 2016 entitled "Practical Persistent Volumes".
title: Apache Mesos - Oversubscription layout: documentation
Oversubscription
High-priority user-facing services are typically provisioned on large clusters for peak load and unexpected load spikes. Hence, for most of time, the provisioned resources remain underutilized. Oversubscription takes advantage of temporarily unused resources to execute best-effort tasks such as background analytics, video/image processing, chip simulations, and other low priority jobs.
How does it work?
Oversubscription was introduced in Mesos 0.23.0 and adds two new agent components: a Resource Estimator and a Quality of Service (QoS) Controller, alongside extending the existing resource allocator, resource monitor, and Mesos agent. The new components and their interactions are illustrated below.
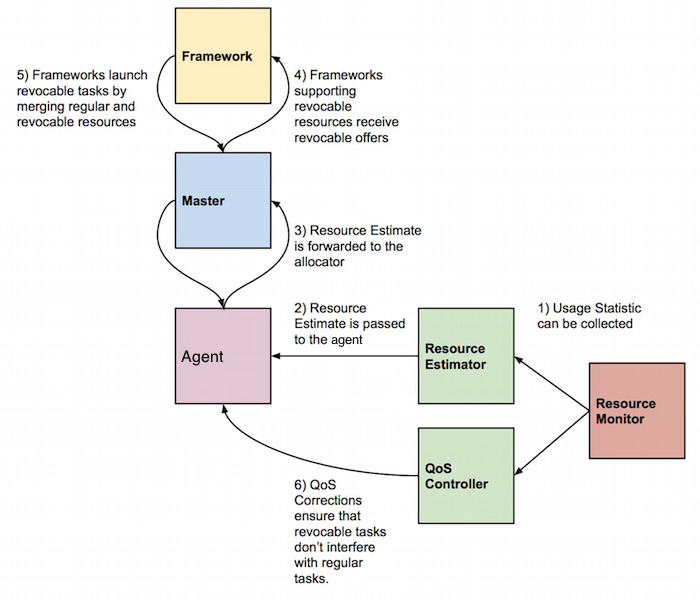
Resource estimation
-
(1) The first step is to identify the amount of oversubscribed resources. The resource estimator taps into the resource monitor and periodically gets usage statistics via
ResourceStatisticmessages. The resource estimator applies logic based on the collected resource statistics to determine the amount of oversubscribed resources. This can be a series of control algorithms based on measured resource usage slack (allocated but unused resources) and allocation slack. -
(2) The agent keeps polling estimates from the resource estimator and tracks the latest estimate.
-
(3) The agent will send the total amount of oversubscribed resources to the master when the latest estimate is different from the previous estimate.
Resource tracking & scheduling algorithm
- (4) The allocator keeps track of the oversubscribed resources separately
from regular resources and annotate those resources as
revocable. It is up to the resource estimator to determine which types of resources can be oversubscribed. It is recommended only to oversubscribe compressible resources such as cpu shares, bandwidth, etc.
Frameworks
- (5) Frameworks can choose to launch tasks on revocable resources by using
the regular
launchTasks()API. To safe-guard frameworks that are not designed to deal with preemption, only frameworks registering with theREVOCABLE_RESOURCEScapability set in its framework info will receive offers with revocable resources. Further more, revocable resources cannot be dynamically reserved and persistent volumes should not be created on revocable disk resources.
Task launch
- The revocable task is launched as usual when the
runTaskrequest is received on the agent. The resources will still be marked as revocable and isolators can take appropriate actions, if certain resources need to be setup differently for revocable and regular tasks.
NOTE: If any resource used by a task or executor is revocable, the whole container is treated as a revocable container and can therefore be killed or throttled by the QoS Controller.
Interference detection
- (6) When the revocable task is running, it is important to constantly monitor the original task running on those resources and guarantee performance based on an SLA. In order to react to detected interference, the QoS controller needs to be able to kill or throttle running revocable tasks.
Enabling frameworks to use oversubscribed resources
Frameworks planning to use oversubscribed resources need to register with the
REVOCABLE_RESOURCES capability set:
FrameworkInfo framework;
framework.set_name("Revocable framework");

framework.add_capabilities()->set_type(
    FrameworkInfo::Capability::REVOCABLE_RESOURCES);
From that point on, the framework will start to receive revocable resources in offers.
NOTE: That there is no guarantee that the Mesos cluster has oversubscription enabled. If not, no revocable resources will be offered. See below for instructions how to configure Mesos for oversubscription.
Launching tasks using revocable resources
Launching tasks using revocable resources is done through the existing
launchTasks API. Revocable resources will have the revocable field set. See
below for an example offer with regular and revocable resources.
{
  "id": "20150618-112946-201330860-5050-2210-0000",
  "framework_id": "20141119-101031-201330860-5050-3757-0000",
  "agent_id": "20150618-112946-201330860-5050-2210-S1",
  "hostname": "foobar",
  "resources": [
    {
      "name": "cpus",
      "type": "SCALAR",
      "scalar": {
        "value": 2.0
      },
      "role": "*"
    }, {
      "name": "mem",
      "type": "SCALAR",
      "scalar": {
        "value": 512.0
      },
      "role": "*"
    },
    {
      "name": "cpus",
      "type": "SCALAR",
      "scalar": {
        "value": 0.45
      },
      "role": "*",
      "revocable": {}
    }
  ]
}
Writing a custom resource estimator
The resource estimator estimates and predicts the total resources used on the
agent and informs the master about resources that can be oversubscribed. By
default, Mesos comes with a noop and a fixed resource estimator. The noop
estimator only provides an empty estimate to the agent and stalls, effectively
disabling oversubscription. The fixed estimator doesn't use the actual
measured slack, but oversubscribes the node with fixed resource amount (defined
via a command line flag).
The interface is defined below:
class ResourceEstimator
{
public:
  // Initializes this resource estimator. This method needs to be
  // called before any other member method is called. It registers
  // a callback in the resource estimator. The callback allows the
  // resource estimator to fetch the current resource usage for each
  // executor on agent.
  virtual Try<Nothing> initialize(
      const lambda::function<process::Future<ResourceUsage>()>& usage) = 0;

  // Returns the current estimation about the *maximum* amount of
  // resources that can be oversubscribed on the agent. A new
  // estimation will invalidate all the previously returned
  // estimations. The agent will be calling this method periodically
  // to forward it to the master. As a result, the estimator should
  // respond with an estimate every time this method is called.
  virtual process::Future<Resources> oversubscribable() = 0;
};
Writing a custom QoS controller
The interface for implementing custom QoS Controllers is defined below:
class QoSController
{
public:
  // Initializes this QoS Controller. This method needs to be
  // called before any other member method is called. It registers
  // a callback in the QoS Controller. The callback allows the
  // QoS Controller to fetch the current resource usage for each
  // executor on agent.
  virtual Try<Nothing> initialize(
      const lambda::function<process::Future<ResourceUsage>()>& usage) = 0;

  // A QoS Controller informs the agent about corrections to carry
  // out, but returning futures to QoSCorrection objects. For more
  // information, please refer to mesos.proto.
  virtual process::Future<std::list<QoSCorrection>> corrections() = 0;
};
NOTE The QoS Controller must not block
corrections(). Back the QoS Controller with its own libprocess actor instead.
The QoS Controller informs the agent that particular corrective actions need to be made. Each corrective action contains information about executor or task and the type of action to perform.
Mesos comes with a noop and a load qos controller. The noop controller
does not provide any corrections, thus does not assure any quality of service
for regular tasks. The load controller is ensuring the total system load
doesn't exceed a configurable thresholds and as a result try to avoid the cpu
congestion on the node. If the load is above the thresholds controller evicts
all the revocable executors. These thresholds are configurable via two module
parameters load_threshold_5min and load_threshold_15min. They represent
standard unix load averages in the system. 1 minute system load is ignored,
since for oversubscription use case it can be a misleading signal.
message QoSCorrection {
  enum Type {
    KILL = 1; // Terminate an executor.
  }

  message Kill {
    optional FrameworkID framework_id = 1;
    optional ExecutorID executor_id = 2;
  }

  required Type type = 1;
  optional Kill kill = 2;
}
Configuring oversubscription
Five new flags has been added to the agent:
| Flag | Explanation |
|---|---|
| --oversubscribed_resources_interval=VALUE | The agent periodically updates the master with the current estimation about the total amount of oversubscribed resources that are allocated and available. The interval between updates is controlled by this flag. (default: 15secs) |
| --qos_controller=VALUE | The name of the QoS Controller to use for oversubscription. |
| --qos_correction_interval_min=VALUE | The agent polls and carries out QoS corrections from the QoS Controller based on its observed performance of running tasks. The smallest interval between these corrections is controlled by this flag. (default: 0ns) |
| --resource_estimator=VALUE | The name of the resource estimator to use for oversubscription. |
The fixed resource estimator is enabled as follows:
--resource_estimator="org_apache_mesos_FixedResourceEstimator"

--modules='{
  "libraries": {
    "file": "/usr/local/lib64/libfixed_resource_estimator.so",
    "modules": {
      "name": "org_apache_mesos_FixedResourceEstimator",
      "parameters": {
        "key": "resources",
        "value": "cpus:14"
      }
    }
  }
}'
In the example above, a fixed amount of 14 cpus will be offered as revocable resources.
The load qos controller is enabled as follows:
--qos_controller="org_apache_mesos_LoadQoSController"

--qos_correction_interval_min="20secs"

--modules='{
  "libraries": {
    "file": "/usr/local/lib64/libload_qos_controller.so",
    "modules": {
      "name": "org_apache_mesos_LoadQoSController",
      "parameters": [
        {
          "key": "load_threshold_5min",
          "value": "6"
        },
        {
	  "key": "load_threshold_15min",
	  "value": "4"
        }
      ]
    }
  }
}'
In the example above, when standard unix system load average for 5 minutes will
be above 6, or for 15 minutes will be above 4 then agent will evict all the
revocable executors. LoadQoSController will be effectively run every 20
seconds.
To install a custom resource estimator and QoS controller, please refer to the modules documentation.
title: Apache Mesos - Authentication layout: documentation
Authentication
Authentication permits only trusted entities to interact with a Mesos cluster. Authentication can be used by Mesos in three ways:
- To require that frameworks be authenticated in order to register with the master.
- To require that agents be authenticated in order to register with the master.
- To require that operators be authenticated to use many HTTP endpoints.
Authentication is disabled by default. When authentication is enabled, operators can configure Mesos to either use the default authentication module or to use a custom authentication module.
The default Mesos authentication module uses the Cyrus SASL library. SASL is a flexible framework that allows two endpoints to authenticate with each other using a variety of methods. By default, Mesos uses CRAM-MD5 authentication.
Credentials, Principals, and Secrets
When using the default CRAM-MD5 authentication method, an entity that wants to authenticate with Mesos must provide a credential, which consists of a principal and a secret. The principal is the identity that the entity would like to use; the secret is an arbitrary string that is used to verify that identity. Principals are similar to user names, while secrets are similar to passwords.
Principals are used primarily for authentication and authorization; note that a principal is different from a framework's user, which is the operating system account used by the agent to run executors, and the framework's roles, which are used to determine which resources a framework can use.
Configuration
Authentication is configured by specifying command-line flags when starting the Mesos master and agent processes. For more information, refer to the configuration documentation.
Master
-
--[no-]authenticate- Iftrue, only authenticated frameworks are allowed to register. Iffalse(the default), unauthenticated frameworks are also allowed to register. -
--[no-]authenticate_http_readonly- Iftrue, authentication is required to make HTTP requests to the read-only HTTP endpoints that support authentication. Iffalse(the default), these endpoints can be used without authentication. Read-only endpoints are those which cannot be used to modify the state of the cluster. -
--[no-]authenticate_http_readwrite- Iftrue, authentication is required to make HTTP requests to the read-write HTTP endpoints that support authentication. Iffalse(the default), these endpoints can be used without authentication. Read-write endpoints are those which can be used to modify the state of the cluster. -
--[no-]authenticate_agents- Iftrue, only authenticated agents are allowed to register. Iffalse(the default), unauthenticated agents are also allowed to register. -
--authentication_v0_timeout- The timeout within which an authentication is expected to complete against a v0 framework or agent. This does not apply to the v0 or v1 HTTP APIs.(default:15secs) -
--authenticators- Specifies which authenticator module to use. The default iscrammd5, but additional modules can be added using the--modulesoption. -
--http_authenticators- Specifies which HTTP authenticator module to use. The default isbasic(basic HTTP authentication), but additional modules can be added using the--modulesoption. -
--credentials- The path to a text file which contains a list of accepted credentials. This may be optional depending on the authenticator being used.
Agent
-
--authenticatee- Analog to the master's--authenticatorsoption to specify what module to use. Defaults tocrammd5. -
--credential- Just like the master's--credentialsoption except that only one credential is allowed. This credential is used to identify the agent to the master. -
--[no-]authenticate_http_readonly- Iftrue, authentication is required to make HTTP requests to the read-only HTTP endpoints that support authentication. Iffalse(the default), these endpoints can be used without authentication. Read-only endpoints are those which cannot be used to modify the state of the agent. -
--[no-]authenticate_http_readwrite- Iftrue, authentication is required to make HTTP requests to the read-write HTTP endpoints that support authentication. Iffalse(the default), these endpoints can be used without authentication. Read-write endpoints are those which can be used to modify the state of the agent. Note that for backward compatibility reasons, the V1 executor API is not affected by this flag. -
--[no-]authenticate_http_executors- Iftrue, authentication is required to make HTTP requests to the V1 executor API. Iffalse(the default), that API can be used without authentication. If this flag istrueand custom HTTP authenticators are not specified, then the defaultJWTauthenticator is loaded to handle executor authentication. -
--http_authenticators- Specifies which HTTP authenticator module to use. The default isbasic, but additional modules can be added using the--modulesoption. -
--http_credentials- The path to a text file which contains a list (in JSON format) of accepted credentials. This may be optional depending on the authenticator being used. -
--authentication_backoff_factor- The agent will time out its authentication with the master based on exponential backoff. The timeout will be randomly chosen within the range[min, min + factor*2^n]wherenis the number of failed attempts. To tune these parameters, set the--authentication_timeout_[min|max|factor]flags. (default: 1secs) -
--authentication_timeout_min- The minimum amount of time the agent waits before retrying authenticating with the master. See--authentication_backoff_factorfor more details. (default: 5secs) -
--authentication_timeout_max- The maximum amount of time the agent waits before retrying authenticating with the master. See--authentication_backoff_factorfor more details. (default: 1mins)
Scheduler Driver
-
--authenticatee- Analog to the master's--authenticatorsoption to specify what module to use. Defaults tocrammd5. -
--authentication_backoff_factor- The scheduler will time out its authentication with the master based on exponential backoff. The timeout will be randomly chosen within the range[min, min + factor*2^n]wherenis the number of failed attempts. To tune these parameters, set the--authentication_timeout_[min|max|factor]flags. (default: 1secs) -
--authentication_timeout_min- The minimum amount of time the scheduler waits before retrying authenticating with the master. See--authentication_backoff_factorfor more details. (default: 5secs) -
--authentication_timeout_max- The maximum amount of time the scheduler waits before retrying authenticating with the master. See--authentication_backoff_factorfor more details. (default: 1mins)
Multiple HTTP Authenticators
Multiple HTTP authenticators may be loaded into the Mesos master and agent. In
order to load multiple authenticators, specify them as a comma-separated list
using the --http_authenticators flag. The authenticators will be called
serially, and the result of the first successful authentication attempt will be
returned.
If you wish to specify the default basic HTTP authenticator in addition to
custom authenticator modules, add the name basic to your authenticator list.
To specify the default JWT HTTP authenticator in addition to custom
authenticator modules, add the name jwt to your authenticator list.
Executor
If HTTP executor authentication is enabled on the agent, then all requests from HTTP executors must be authenticated. This includes the default executor, HTTP command executors, and custom HTTP executors. By default, the agent's JSON web token (JWT) HTTP authenticator is loaded to handle executor authentication on both the executor and operator API endpoints. Note that command and custom executors not using the HTTP API will remain unauthenticated.
When a secret key is loaded via the --jwt_secret_key flag, the agent will
generate a default JWT for each executor before it is launched. This token is
passed into the executor's environment via the
MESOS_EXECUTOR_AUTHENTICATION_TOKEN environment variable. In order to
authenticate with the agent, the executor should place this token into the
Authorization header of all its requests as follows:
Authorization: Bearer MESOS_EXECUTOR_AUTHENTICATION_TOKEN
In order to upgrade an existing cluster to require executor authentication, the following procedure should be followed:
-
Upgrade all agents, and provide each agent with a cryptographic key via the
--jwt_secret_keyflag. This key will be used to sign executor authentication tokens using the HMAC-SHA256 procedure. -
Before executor authentication can be enabled successfully, all HTTP executors must have executor authentication tokens in their environment and support authentication. To accomplish this, executors which were already running before the upgrade must be restarted. This could either be done all at once, or the cluster may be left in this intermediate state while executors gradually turn over.
-
Once all running default/HTTP command executors have been launched by upgraded agents, and any custom HTTP executors have been upgraded, the agent processes can be restarted with the
--authenticate_http_executorsflag set. This will enable required HTTP executor authentication, and since all executors now have authentication tokens and support authentication, their requests to the agent will authenticate successfully.
Note that HTTP executors make use of the agent operator API in order to make
nested container calls. This means that authentication of the v1 agent operator
API should not be enabled (via --authenticate_http_readwrite) when HTTP
executor authentication is disabled, or HTTP executors will not be able to
function correctly.
Framework
If framework authentication is enabled, each framework must be configured to supply authentication credentials when registering with the Mesos master. How to configure this differs between frameworks; consult your framework's documentation for more information.
As a framework developer, supporting authentication is straightforward: the
scheduler driver handles the details of authentication when a Credential
object is passed to its constructor. To enable authorization
based on the authenticated principal, the framework developer should also copy
the Credential.principal into FrameworkInfo.principal when registering.
CRAM-MD5 Example
-
Create the master's credentials file with the following content:
{ "credentials" : [ { "principal": "principal1", "secret": "secret1" }, { "principal": "principal2", "secret": "secret2" } ] } -
Start the master using the credentials file (assuming the file is
/home/user/credentials):./bin/mesos-master.sh --ip=127.0.0.1 --work_dir=/var/lib/mesos --authenticate --authenticate_agents --credentials=/home/user/credentials -
Create another file with a single credential in it (
/home/user/agent_credential):{ "principal": "principal1", "secret": "secret1" } -
Start the agent:
./bin/mesos-agent.sh --master=127.0.0.1:5050 --credential=/home/user/agent_credential -
Your new agent should have now successfully authenticated with the master.
-
You can test out framework authentication using one of the test frameworks provided with Mesos as follows:
MESOS_AUTHENTICATE=true DEFAULT_PRINCIPAL=principal2 DEFAULT_SECRET=secret2 ./src/test-framework --master=127.0.0.1:5050
title: Apache Mesos - Authorization layout: documentation
Authorization
In Mesos, the authorization subsystem allows the operator to configure the
actions that certain principals are allowed to perform. For example, the
operator can use authorization to ensure that principal foo can only register
frameworks subscribed to role bar, and no other principals can register
frameworks subscribed to any roles.
A reference implementation local authorizer provides basic security for most
use cases. This authorizer is configured using Access Control Lists (ACLs).
Alternative implementations could express their authorization rules in
different ways. The local authorizer is used if the
--authorizers flag is not specified (or manually set to
the default value local) and ACLs are specified via the
--acls flag.
This document is divided into two main sections. The first section explores the concepts necessary to successfully configure the local authorizer. The second briefly discusses how to implement a custom authorizer; this section is not directed at operators but at engineers who wish to build their own authorizer back end.
HTTP Executor Authorization
When the agent's --authenticate_http_executors flag is set, HTTP executors are
required to authenticate with the HTTP executor API. When they do so, a simple
implicit authorization rule is applied. In plain language, the rule states that
executors can only perform actions on themselves. More specifically, an
executor's authenticated principal must contain claims with keys fid, eid,
and cid, with values equal to the currently-running executor's framework ID,
executor ID, and container ID, respectively. By default, an authentication token
containing these claims is injected into the executor's environment (see the
authentication documentation for more information).
Similarly, when the agent's --authenticate_http_readwrite flag is set, HTTP
executor's are required to authenticate with the HTTP operator API when making
calls such as LAUNCH_NESTED_CONTAINER. In this case, executor authorization is
performed via the loaded authorizer module, if present. The default Mesos local
authorizer applies a simple implicit authorization rule, requiring that the
executor's principal contain a claim with key cid and a value equal to the
currently-running executor's container ID.
Local Authorizer
Role vs. Principal
A principal identifies an entity (i.e., a framework or an operator) that interacts with Mesos. A role, on the other hand, is used to associate resources with frameworks in various ways. A useful analogy can be made with user management in the Unix world: principals correspond to usernames, while roles approximately correspond to groups. For more information about roles, see the roles documentation.
In a real-world organization, principals and roles might be used to represent various individuals or groups; for example, principals could correspond to people responsible for particular frameworks, while roles could correspond to departments within the organization which run frameworks on the cluster. To illustrate this point, consider a company that wants to allocate datacenter resources amongst multiple departments, one of which is the accounting department. Here is a possible scenario in which the accounting department launches a Mesos framework and then attempts to destroy a persistent volume:
- An accountant launches their framework, which authenticates with the Mesos
master using its
principalandsecret. Here, let the framework principal bepayroll-framework; this principal represents the trusted identity of the framework. - The framework now sends a registration message to the master. This message
includes a
FrameworkInfoobject containing aprincipalandroles; in this case, it will use a single role namedaccounting. The principal in this message must bepayroll-framework, to match the one used by the framework for authentication. - The master consults the local authorizer, which in turn looks through its ACLs
to see if it has a
RegisterFrameworkACL which authorizes the principalpayroll-frameworkto register with theaccountingrole. It does find such an ACL, the framework registers successfully. Now that the framework is subscribed to theaccountingrole, any weights, reservations, persistent volumes, or quota associated with the accounting department's role will apply when allocating resources to this role within the framework. This allows operators to control the resource consumption of this department. - Suppose the framework has created a persistent volume on an agent which it
now wishes to destroy. The framework sends an
ACCEPTcall containing an offer operation which willDESTROYthe persistent volume. - However, datacenter operators have decided that they don't want the accounting
frameworks to delete volumes. Rather, the operators will manually remove the
accounting department's persistent volumes to ensure that no important
financial data is deleted accidentally. To accomplish this, they have set a
DestroyVolumeACL which asserts that the principalpayroll-frameworkcan destroy volumes created by acreator_principalofNONE; in other words, this framework cannot destroy persistent volumes, so the operation will be refused.
ACLs
When authorizing an action, the local authorizer proceeds through a list of
relevant rules until it finds one that can either grant or deny permission to
the subject making the request. These rules are configured with Access Control
Lists (ACLs) in the case of the local authorizer. The ACLs are defined with a
JSON-based language via the --acls flag.
Each ACL consist of an array of JSON objects. Each of these objects has two
entries. The first, principals, is common to all actions and describes the
subjects which wish to perform the given action. The second entry varies among
actions and describes the object on which the action will be executed. Both
entries are specified with the same type of JSON object, known as Entity. The
local authorizer works by comparing Entity objects, so understanding them is
key to writing good ACLs.
An Entity is essentially a container which can either hold a particular value
or specify the special types ANY or NONE.
A global field which affects all ACLs can be set. This field is called
permissive and it defines the behavior when no ACL applies to the request
made. If set to true (which is the default) it will allow by default all
non-matching requests, if set to false it will reject all non-matching
requests.
Note that when setting permissive to false a number of standard operations
(e.g., run_tasks or register_frameworks) will require ACLs in order to work.
There are two ways to disallow unauthorized uses on specific operations:
-
Leave
permissiveset totrueand disallowANYprincipal to perform actions to all objects except the ones explicitly allowed. Consider the example below for details. -
Set
permissivetofalsebut allowANYprincipal to perform the action onANYobject. This needs to be done for all actions which should work without being checked against ACLs. A template doing this for all actions can be found in acls_template.json.
More information about the structure of the ACLs can be found in their definition inside the Mesos source code.
ACLs are compared in the order that they are specified. In other words,
if an ACL allows some action and a later ACL forbids it, the action is
allowed; likewise, if the ACL forbidding the action appears earlier than the
one allowing the action, the action is forbidden. If no ACLs match a request,
the request is authorized if the ACLs are permissive (which is the default
behavior). If permissive is explicitly set to false, all non-matching requests
are declined.
Authorizable Actions
Currently, the local authorizer configuration format supports the following entries, each representing an authorizable action:
| Action Name | Subject | Object | Description |
|---|---|---|---|
register_frameworks |
Framework principal. | Resource roles of the framework. | (Re-)registering of frameworks. |
run_tasks |
Framework principal. | UNIX user to launch the task as. | Launching tasks/executors by a framework. |
teardown_frameworks |
Operator username. | Principals whose frameworks can be shutdown by the operator. | Tearing down frameworks. |
reserve_resources |
Framework principal or Operator username. | Resource role of the reservation. | Reserving resources. |
unreserve_resources |
Framework principal or Operator username. | Principals whose resources can be unreserved by the operator. | Unreserving resources. |
create_volumes |
Framework principal or Operator username. | Resource role of the volume. | Creating volumes. |
destroy_volumes |
Framework principal or Operator username. | Principals whose volumes can be destroyed by the operator. | Destroying volumes. |
resize_volume |
Framework principal or Operator username. | Resource role of the volume. | Growing or shrinking persistent volumes. |
create_block_disks |
Framework principal. | Resource role of the block disk. | Creating a block disk. |
destroy_block_disks |
Framework principal. | Resource role of the block disk. | Destroying a block disk. |
create_mount_disks |
Framework principal. | Resource role of the mount disk. | Creating a mount disk. |
destroy_mount_disks |
Framework principal. | Resource role of the mount disk. | Destroying a mount disk. |
get_quotas |
Operator username. | Resource role whose quota status will be queried. | Querying quota status. |
update_quotas |
Operator username. | Resource role whose quota will be updated. | Modifying quotas. |
view_roles |
Operator username. | Resource roles whose information can be viewed by the operator. | Querying roles and weights. |
get_endpoints |
HTTP username. | HTTP endpoints the user should be able to access using the HTTP "GET" method. | Performing an HTTP "GET" on an endpoint. |
update_weights |
Operator username. | Resource roles whose weights can be updated by the operator. | Updating weights. |
view_frameworks |
HTTP user. | UNIX user of whom executors can be viewed. | Filtering http endpoints. |
view_executors |
HTTP user. | UNIX user of whom executors can be viewed. | Filtering http endpoints. |
view_tasks |
HTTP user. | UNIX user of whom executors can be viewed. | Filtering http endpoints. |
access_sandboxes |
Operator username. | Operating system user whose executor/task sandboxes can be accessed. | Access task sandboxes. |
access_mesos_logs |
Operator username. | Implicitly given. A user should only use types ANY and NONE to allow/deny access to the log. | Access Mesos logs. |
register_agents |
Agent principal. | Implicitly given. A user should only use types ANY and NONE to allow/deny agent (re-)registration. | (Re-)registration of agents. |
get_maintenance_schedules |
Operator username. | Implicitly given. A user should only use types ANY and NONE to allow/deny access to the log. | View the maintenance schedule of the machines used by Mesos. |
update_maintenance_schedules |
Operator username. | Implicitly given. A user should only use types ANY and NONE to allow/deny access to the log. | Modify the maintenance schedule of the machines used by Mesos. |
start_maintenances |
Operator username. | Implicitly given. A user should only use types ANY and NONE to allow/deny access to the log. | Starts maintenance on a machine. This will make a machine and its agents unavailable. |
stop_maintenances |
Operator username. | Implicitly given. A user should only use the types ANY and NONE to allow/deny access to the log. | Ends maintenance on a machine. |
get_maintenance_statuses |
Operator username. | Implicitly given. A user should only use the types ANY and NONE to allow/deny access to the log. | View if a machine is in maintenance or not. |
Authorizable HTTP endpoints
The get_endpoints action covers:
/files/debug/logging/toggle/metrics/snapshot/slave(id)/containers/slave(id)/containerizer/debug/slave(id)/monitor/statistics
Examples
Consider for example the following ACL: Only principal foo can register
frameworks subscribed to the analytics role. All principals can register
frameworks subscribing to any other roles (including the principal foo
since permissive is the default behavior).
{
  "register_frameworks": [
                           {
                             "principals": {
                               "values": ["foo"]
                             },
                             "roles": {
                               "values": ["analytics"]
                             }
                           },
                           {
                             "principals": {
                               "type": "NONE"
                             },
                             "roles": {
                               "values": ["analytics"]
                             }
                           }
                         ]
}
Principal foo can register frameworks subscribed to the analytics and
ads roles and no other role. Any other principal (or framework without
a principal) can register frameworks subscribed to any roles.
{
  "register_frameworks": [
                           {
                             "principals": {
                               "values": ["foo"]
                             },
                             "roles": {
                               "values": ["analytics", "ads"]
                             }
                           },
                           {
                             "principals": {
                               "values": ["foo"]
                             },
                             "roles": {
                               "type": "NONE"
                             }
                           }
                         ]
}
Only principal foo and no one else can register frameworks subscribed to the
analytics role. Any other principal (or framework without a principal) can
register frameworks subscribed to any other roles.
{
  "register_frameworks": [
                           {
                             "principals": {
                               "values": ["foo"]
                             },
                             "roles": {
                               "values": ["analytics"]
                             }
                           },
                           {
                             "principals": {
                               "type": "NONE"
                             },
                             "roles": {
                               "values": ["analytics"]
                             }
                           }
                         ]
}
Principal foo can register frameworks subscribed to the analytics role
and no other roles. No other principal can register frameworks subscribed to
any roles, including *.
{
  "permissive": false,
  "register_frameworks": [
                           {
                             "principals": {
                               "values": ["foo"]
                             },
                             "roles": {
                               "values": ["analytics"]
                             }
                           }
                         ]
}
In the following example permissive is set to false; hence, principals can
only run tasks as operating system users guest or bar, but not as any other
user.
{
  "permissive": false,
  "run_tasks": [
                 {
                   "principals": { "type": "ANY" },
                   "users": { "values": ["guest", "bar"] }
                 }
               ]
}
Principals foo and bar can run tasks as the agent operating system user
alice and no other user. No other principal can run tasks.
{
  "permissive": false,
  "run_tasks": [
                 {
                   "principals": { "values": ["foo", "bar"] },
                   "users": { "values": ["alice"] }
                 }
               ]
}
Principal foo can run tasks only as the agent operating system user guest
and no other user. Any other principal (or framework without a principal) can
run tasks as any user.
{
  "run_tasks": [
                 {
                   "principals": { "values": ["foo"] },
                   "users": { "values": ["guest"] }
                 },
                 {
                   "principals": { "values": ["foo"] },
                   "users": { "type": "NONE" }
                 }
               ]
}
No principal can run tasks as the agent operating system user root. Any
principal (or framework without a principal) can run tasks as any other user.
{
  "run_tasks": [
                 {
                   "principals": { "type": "NONE" },
                   "users": { "values": ["root"] }
                 }
               ]
}
The order in which the rules are defined is important. In the following
example, the ACLs effectively forbid anyone from tearing down frameworks even
though the intention clearly is to allow only admin to shut them down:
{
  "teardown_frameworks": [
                           {
                             "principals": { "type": "NONE" },
                             "framework_principals": { "type": "ANY" }
                           },
                           {
                             "principals": { "type": "admin" },
                             "framework_principals": { "type": "ANY" }
                           }
                         ]
}
The previous ACL can be fixed as follows:
{
  "teardown_frameworks": [
                           {
                             "principals": { "type": "admin" },
                             "framework_principals": { "type": "ANY" }
                           },
                           {
                             "principals": { "type": "NONE" },
                             "framework_principals": { "type": "ANY" }
                           }
                         ]
}
The ops principal can teardown any framework using the
/teardown HTTP endpoint. No other principal can
teardown any frameworks.
{
  "permissive": false,
  "teardown_frameworks": [
                           {
                             "principals": {
                               "values": ["ops"]
                             },
                             "framework_principals": {
                               "type": "ANY"
                             }
                           }
                         ]
}
The principal foo can reserve resources for any role, and no other principal
can reserve resources.
{
  "permissive": false,
  "reserve_resources": [
                         {
                           "principals": {
                             "values": ["foo"]
                           },
                           "roles": {
                             "type": "ANY"
                           }
                         }
                       ]
}
The principal foo cannot reserve resources, and any other principal (or
framework without a principal) can reserve resources for any role.
{
  "reserve_resources": [
                         {
                           "principals": {
                             "values": ["foo"]
                           },
                           "roles": {
                             "type": "NONE"
                           }
                         }
                       ]
}
The principal foo can reserve resources only for roles prod and dev, and
no other principal (or framework without a principal) can reserve resources for
any role.
{
  "permissive": false,
  "reserve_resources": [
                         {
                           "principals": {
                             "values": ["foo"]
                           },
                           "roles": {
                             "values": ["prod", "dev"]
                           }
                         }
                       ]
}
The principal foo can unreserve resources reserved by itself and by the
principal bar. The principal bar, however, can only unreserve its own
resources. No other principal can unreserve resources.
{
  "permissive": false,
  "unreserve_resources": [
                           {
                             "principals": {
                               "values": ["foo"]
                             },
                             "reserver_principals": {
                               "values": ["foo", "bar"]
                             }
                           },
                           {
                             "principals": {
                               "values": ["bar"]
                             },
                             "reserver_principals": {
                               "values": ["bar"]
                             }
                           }
                         ]
}
The principal foo can create persistent volumes for any role, and no other
principal can create persistent volumes.
{
  "permissive": false,
  "create_volumes": [
                      {
                        "principals": {
                          "values": ["foo"]
                        },
                        "roles": {
                          "type": "ANY"
                        }
                      }
                    ]
}
The principal foo cannot create persistent volumes for any role, and any
other principal can create persistent volumes for any role.
{
  "create_volumes": [
                      {
                        "principals": {
                          "values": ["foo"]
                        },
                        "roles": {
                          "type": "NONE"
                        }
                      }
                    ]
}
The principal foo can create persistent volumes only for roles prod and
dev, and no other principal can create persistent volumes for any role.
{
  "permissive": false,
  "create_volumes": [
                      {
                        "principals": {
                          "values": ["foo"]
                        },
                        "roles": {
                          "values": ["prod", "dev"]
                        }
                      }
                    ]
}
The principal foo can destroy volumes created by itself and by the principal
bar. The principal bar, however, can only destroy its own volumes. No other
principal can destroy volumes.
{
  "permissive": false,
  "destroy_volumes": [
                       {
                         "principals": {
                           "values": ["foo"]
                         },
                         "creator_principals": {
                           "values": ["foo", "bar"]
                         }
                       },
                       {
                         "principals": {
                           "values": ["bar"]
                         },
                         "creator_principals": {
                           "values": ["bar"]
                         }
                       }
                     ]
}
The principal ops can query quota status for any role. The principal foo,
however, can only query quota status for foo-role. No other principal can
query quota status.
{
  "permissive": false,
  "get_quotas": [
                  {
                    "principals": {
                      "values": ["ops"]
                    },
                    "roles": {
                      "type": "ANY"
                    }
                  },
                  {
                    "principals": {
                      "values": ["foo"]
                    },
                    "roles": {
                      "values": ["foo-role"]
                    }
                  }
                ]
}
The principal ops can update quota information (set or remove) for any role.
The principal foo, however, can only update quota for foo-role. No other
principal can update quota.
{
  "permissive": false,
  "update_quotas": [
                     {
                       "principals": {
                         "values": ["ops"]
                       },
                       "roles": {
                         "type": "ANY"
                       }
                     },
                     {
                       "principals": {
                         "values": ["foo"]
                       },
                       "roles": {
                         "values": ["foo-role"]
                       }
                     }
                   ]
}
The principal ops can reach all HTTP endpoints using the GET
method. The principal foo, however, can only use the HTTP GET on
the /logging/toggle and /monitor/statistics endpoints. No other
principals can use GET on any endpoints.
{
  "permissive": false,
  "get_endpoints": [
                     {
                       "principals": {
                         "values": ["ops"]
                       },
                       "paths": {
                         "type": "ANY"
                       }
                     },
                     {
                       "principals": {
                         "values": ["foo"]
                       },
                       "paths": {
                         "values": ["/logging/toggle", "/monitor/statistics"]
                       }
                     }
                   ]
}
Implementing an Authorizer
In case you plan to implement your own authorizer module, the authorization interface consists of three parts:
First, the authorization::Request protobuf message represents a request to be
authorized. It follows the
Subject-Verb-Object
pattern, where a subject ---commonly a principal---attempts to perform an
action on a given object.
Second, the
Future<bool> mesos::Authorizer::authorized(const mesos::authorization::Request& request)
interface defines the entry point for authorizer modules (and the local
authorizer). A call to authorized() returns a future that indicates the result
of the (asynchronous) authorization operation. If the future is set to true, the
request was authorized successfully; if it was set to false, the request was
rejected. A failed future indicates that the request could not be processed at
the moment and it can be retried later.
The authorization::Request message is defined in authorizer.proto:
message Request {
  optional Subject subject = 1;
  optional Action  action  = 2;
  optional Object  object  = 3;
}

message Subject {
  optional string value = 1;
}

message Object {
  optional string value = 1;
  optional FrameworkInfo framework_info = 2;
  optional Task task = 3;
  optional TaskInfo task_info = 4;
  optional ExecutorInfo executor_info = 5;
  optional MachineID machine_id = 11;
}
Subject or Object are optional fiels; if they are not set they
will only match an ACL with ANY or NONE in the
corresponding location. This allows users to construct the following requests:
Can everybody perform action A on object O?, or Can principal Z
execute action X on all objects?.
Object has several optional fields of which, depending on the action,
one or more fields must be set
(e.g., the view_executors action expects the executor_info and
framework_info to be set).
The action field of the Request message is an enum. It is kept optional---
even though a valid action is necessary for every request---to allow for
backwards compatibility when adding new fields (see
MESOS-4997 for details).
Third, the ObjectApprover interface. In order to support efficient
authorization of large objects and multiple objects a user can request an
ObjectApprover via
Future<shared_ptr<const ObjectApprover>> getApprover(const authorization::Subject& subject, const authorization::Action& action).
The resulting ObjectApprover provides
Try<bool> approved(const ObjectApprover::Object& object) to synchronously
check whether objects are authorized. The ObjectApprover::Object follows the
structure of the Request::Object above.
struct Object
{
  const std::string* value;
  const FrameworkInfo* framework_info;
  const Task* task;
  const TaskInfo* task_info;
  const ExecutorInfo* executor_info;
  const MachineID* machine_id;
};
As the fields take pointer to each entity the ObjectApprover::Object does not
require the entity to be copied.
Authorizer must ensure that ObjectApprovers returned by getApprover(...) method
are valid throughout their whole lifetime. This is relied upon by parts of Mesos code
(Scheduler API, Operator API events and so on) that have a need to frequently authorize
a limited number of long-lived authorization subjects.
This code on the Mesos side, on its part, must ensure that it does not store
ObjectApprover for authorization subjects that it no longer uses (i.e. that it
does not leak ObjectApprovers).
NOTE: As the ObjectApprover is run synchronously in a different actor process
ObjectApprover.approved() call must not block!
title: Apache Mesos - SSL in Mesos layout: documentation
SSL in Mesos
By default, all the messages that flow through the Mesos cluster are unencrypted, making it possible for anyone with access to the cluster to intercept and potentially control arbitrary tasks.
SSL/TLS support was added to libprocess in Mesos 0.23.0, which encrypts the data that Mesos uses for network communication between Mesos components. Additionally, HTTPS support was added to the Mesos WebUI.
Build Configuration
There are currently two implementations of the libprocess socket interface that support SSL.
The first implementation, added in Mesos 0.23.0, uses
libevent.
Specifically it relies on the libevent-openssl library that wraps openssl.
The second implementation, added in Mesos 1.10.0, is a generic socket wrapper which only relies on the OpenSSL (1.1+) library.
Before building Mesos from source, assuming you have installed the required Dependencies, you can modify your configure line to enable SSL as follows:
../configure --enable-ssl
# Or:
../configure --enable-libevent --enable-ssl
Runtime Configuration
TLS support in Mesos can be configured with different levels of security. This section aims to help Mesos operators to better understand the trade-offs involved in them.
On a high level, one can imagine to choose between three available layers of security, each providing additional security guarantees but also increasing the deployment complexity.
-
LIBPROCESS_SSL_ENABLED=true. This provides external clients (e.g. curl) with the ability to connect to Mesos HTTP endpoints securely via TLS, verifying that the server certificate is valid and trusted. -
LIBPROCESS_SSL_VERIFY_SERVER_CERT=true. In addition to the above, this ensures that Mesos components themselves are verifying the presence of valid and trusted server certificates when making outgoing connections. This prevents man-in-the-middle attacks on communications between Mesos components, and on communications between a Mesos component and an external server.WARNING: This setting only makes sense if
LIBPROCESS_SSL_ENABLE_DOWNGRADEis set tofalse, otherwise a malicious actor can simply bypass certificate verification by downgrading to a non-TLS connection. -
LIBPROCESS_SSL_REQUIRE_CLIENT_CERT=true. In addition to the above, this enforces the use of TLS client certificates on all connections to any Mesos component. This ensures that only trusted clients can connect to any Mesos component, preventing reception of forged or malformed messages.This implies that all schedulers or other clients (including the web browsers used by human operators) that are supposed to connect to any endpoint of a Mesos component must be provided with valid client certificates.
WARNING: As above, this setting only makes sense if
LIBPROCESS_SSL_ENABLE_DOWNGRADEis set tofalse.
For secure usage, it is recommended to set LIBPROCESS_SSL_ENABLED=true,
LIBPROCESS_SSL_VERIFY_SERVER_CERT=true, LIBPROCESS_SSL_HOSTNAME_VALIDATION_SCHEME=openssl
and LIBPROCESS_SSL_ENABLE_DOWNGRADE=false. This provides a good trade-off
between security and usability.
It is not recommended in general to expose Mesos components to the public internet, but in cases
where they are the use of LIBPROCESS_SSL_REQUIRE_CLIENT_CERT is strongly suggested.
Environment Variables
Once you have successfully built and installed your new binaries, here are the environment variables that are applicable to the Master, Agent, Framework Scheduler/Executor, or any libprocess process:
NOTE: Prior to 1.0, the SSL related environment variables used to be prefixed by SSL_. However, we found that they may collide with other programs and lead to unexpected results (e.g., openssl, see MESOS-5863 for details). To be backward compatible, we accept environment variables prefixed by both SSL_ or LIBPROCESS_SSL_. New users should use the LIBPROCESS_SSL_ version.
LIBPROCESS_SSL_ENABLED=(false|0,true|1) [default=false|0]
Turn on or off SSL. When it is turned off it is the equivalent of default Mesos with libevent as the backing for events. All sockets default to the non-SSL implementation. When it is turned on, the default configuration for sockets is SSL. This means outgoing connections will use SSL, and incoming connections will be expected to speak SSL as well. None of the below flags are relevant if SSL is not enabled. If SSL is enabled, LIBPROCESS_SSL_CERT_FILE and LIBPROCESS_SSL_KEY_FILE must be supplied.
LIBPROCESS_SSL_SUPPORT_DOWNGRADE=(false|0,true|1) [default=false|0]
Control whether or not non-SSL connections can be established. If this is enabled on the accepting side, then the accepting side will downgrade to a non-SSL socket if the connecting side is attempting to communicate via non-SSL. (e.g. HTTP).
If this is enabled on the connecting side, then the connecting side will retry on a non-SSL socket if establishing the SSL connection failed.
See Upgrading Your Cluster for more details.
LIBPROCESS_SSL_KEY_FILE=(path to key)
The location of the private key used by OpenSSL.
// For example, to generate a key with OpenSSL:
openssl genrsa -des3 -f4 -passout pass:some_password -out key.pem 4096
LIBPROCESS_SSL_CERT_FILE=(path to certificate)
The location of the certificate that will be presented.
// For example, to generate a root certificate with OpenSSL:
// (assuming the signing key already exists in `key.pem`)
openssl req -new -x509 -passin pass:some_password -days 365 -keyout key.pem -out cert.pem
LIBPROCESS_SSL_VERIFY_CERT=(false|0,true|1) [default=false|0]
This is a legacy alias for the LIBPROCESS_SSL_VERIFY_SERVER_CERT setting.
LIBPROCESS_SSL_VERIFY_SERVER_CERT=(false|0,true|1) [default=false|0]
This setting only affects the behaviour of libprocess in TLS client mode.
If this is true, a remote server is required to present a server certificate, and the presented server certificates will be verified. That means it will be checked that the certificate is cryptographically valid, was generated by a trusted CA, and contains the correct hostname.
If this is false, a remote server is still required to present a server certificate (unless an anonymous cipher is used), but the presented server certificates will not be verified.
NOTE: When LIBPROCESS_SSL_REQUIRE_CERT is true, LIBPROCESS_SSL_VERIFY_CERT is automatically
set to true for backwards compatibility reasons.
LIBPROCESS_SSL_REQUIRE_CERT=(false|0,true|1) [default=false|0]
This is a legacy alias for the LIBPROCESS_SSL_REQUIRE_CLIENT_CERT setting.
LIBPROCESS_SSL_REQUIRE_CLIENT_CERT=(false|0,true|1) [default=false|0]
This setting only affects the behaviour of libprocess in TLS server mode.
If this is true, enforce that certificates must be presented by connecting clients. This means all connections (including external tooling trying to access HTTP endpoints, like web browsers etc.) must present valid certificates in order to establish a connection.
NOTE: The specifics of what it means for the certificate to "contain the correct hostname"
depend on the selected value of LIBPROCESS_SSL_HOSTNAME_VALIDATION_SCHEME.
NOTE: If this is set to false, client certificates are not verified even if they are presented
and LIBPROCESS_SSL_VERIFY_CERT is set to true.
LIBPROCESS_SSL_VERIFY_DEPTH=(N) [default=4]
The maximum depth used to verify certificates. The default is 4. See the OpenSSL documentation or contact your system administrator to learn why you may want to change this.
LIBPROCESS_SSL_VERIFY_IPADD=(false|0,true|1) [default=false|0]
Enable IP address verification in the certificate subject alternative name extension. When set
to true the peer certificate verification will be able to use the IP address of a peer connection.
The specifics on when a certificate containing an IP address will we accepted depend on the
selected value of the LIBPROCESS_SSL_HOSTNAME_VALIDATION_SCHEME.
LIBPROCESS_SSL_CA_DIR=(path to CA directory)
The directory used to find the certificate authority / authorities. You can specify LIBPROCESS_SSL_CA_DIR or LIBPROCESS_SSL_CA_FILE depending on how you want to restrict your certificate authorization.
LIBPROCESS_SSL_CA_FILE=(path to CA file)
The file used to find the certificate authority. You can specify LIBPROCESS_SSL_CA_DIR or LIBPROCESS_SSL_CA_FILE depending on how you want to restrict your certificate authorization.
LIBPROCESS_SSL_CIPHERS=(accepted ciphers separated by ':') [default=AES128-SHA:AES256-SHA:RC4-SHA:DHE-RSA-AES128-SHA:DHE-DSS-AES128-SHA:DHE-RSA-AES256-SHA:DHE-DSS-AES256-SHA]
A list of :-separated ciphers. Use these if you want to restrict or open up the accepted ciphers for OpenSSL. Read the OpenSSL documentation or contact your system administrators to see whether you want to override the default values.
LIBPROCESS_SSL_ENABLE_SSL_V3=(false|0,true|1) [default=false|0]
LIBPROCESS_SSL_ENABLE_TLS_V1_0=(false|0,true|1) [default=false|0]
LIBPROCESS_SSL_ENABLE_TLS_V1_1=(false|0,true|1) [default=false|0]
LIBPROCESS_SSL_ENABLE_TLS_V1_2=(false|0,true|1) [default=true|1]
LIBPROCESS_SSL_ENABLE_TLS_V1_3=(false|0,true|1) [default=false|0]
The above switches enable / disable the specified protocols. By default only TLS V1.2 is enabled. SSL V2 is always disabled; there is no switch to enable it. The mentality here is to restrict security by default, and force users to open it up explicitly. Many older version of the protocols have known vulnerabilities, so only enable these if you fully understand the risks. TLS V1.3 is not supported yet and should not be enabled. MESOS-9730. SSLv2 is disabled completely because modern versions of OpenSSL disable it using multiple compile time configuration options. #Dependencies
LIBPROCESS_SSL_ECDH_CURVE=(auto|list of curves separated by ':') [default=auto]
List of elliptic curves which should be used for ECDHE-based cipher suites, in preferred order. Available values depend on the OpenSSL version used. Default value auto allows OpenSSL to pick the curve automatically.
OpenSSL versions prior to 1.0.2 allow for the use of only one curve; in those cases, auto defaults to prime256v1.
LIBPROCESS_SSL_HOSTNAME_VALIDATION_SCHEME=(legacy|openssl) [default=legacy]
This flag is used to select the scheme by which the hostname validation check works.
Since hostname validation is part of certificate verification, this flag has no
effect unless one of LIBPROCESS_SSL_VERIFY_SERVER_CERT or LIBPROCESS_SSL_REQUIRE_CLIENT_CERT
is set to true.
Currently, it is possible to choose between two schemes:
-
openssl:In client mode: Perform the hostname validation checks during the TLS handshake. If the client connects via hostname, accept the certificate if it contains the hostname as common name (CN) or as a subject alternative name (SAN). If the client connects via IP address and
LIBPROCESS_SSL_VERIFY_IPADDis true, accept the certificate if it contains the IP as a subject alternative name.NOTE: If the client connects via IP address and
LIBPROCESS_SSL_VERIFY_IPADDis false, the connection attempt cannot succeed.In server mode: Do not perform any hostname validation checks.
This setting requires OpenSSL >= 1.0.2 to be used.
-
legacy:Use a custom hostname validation algorithm that is run after the connection is established, and immediately close the connection if it fails.
In both client and server mode: Do a reverse DNS lookup on the peer IP. If
LIBPROCESS_SSL_VERIFY_IPADDis set tofalse, accept the certificate if it contains the first result of that lookup as either the common name or as a subject alternative name. IfLIBPROCESS_SSL_VERIFY_IPADDis set totrue, additionally accept the certificate if it contains the peer IP as a subject alternative name.
It is suggested that operators choose the 'openssl' setting unless they have
applications relying on the legacy behaviour of the 'libprocess' scheme. It is
using standardized APIs (X509_VERIFY_PARAM_check_{host,ip}) provided by OpenSSL to
make hostname validation more uniform across applications. It is also more secure,
since attackers that are able to forge a DNS or rDNS result can launch a successful
man-in-the-middle attack on the 'legacy' scheme.
libevent
If building with --enable-libevent, we require the OpenSSL support from
libevent. The suggested version of libevent is
2.0.22-stable.
As new releases come out we will try to maintain compatibility.
// For example, on OSX:
brew install libevent
OpenSSL
We require OpenSSL. There are multiple branches of OpenSSL that are being maintained by the community. Since security requires being vigilant, we recommend reading the release notes for the current releases of OpenSSL and deciding on a version within your organization based on your security needs.
When building with libevent, Mesos is not too deeply dependent on specific OpenSSL versions, so there is room for you to make security decisions as an organization. When building without libevent, OpenSSL 1.1+ is required, because Mesos makes use of APIs introduced in later versions of OpenSSL.
Please ensure the event2 (when building with libevent) and
openssl headers are available for building Mesos.
// For example, on OSX:
brew install openssl
Upgrading Your Cluster
There is no SSL specific requirement for upgrading different components in a specific order.
The recommended strategy is to restart all your components to enable SSL with downgrades support enabled. Once all components have SSL enabled, then do a second restart of all your components to disable downgrades. This strategy will allow each component to be restarted independently at your own convenience with no time restrictions. It will also allow you to try SSL in a subset of your cluster.
NOTE: While different components in your cluster are serving SSL vs non-SSL traffic, any relative links in the WebUI may be broken. Please see the WebUI section for details. Here are sample commands for upgrading your cluster:
// Restart each component with downgrade support (master, agent, framework):
LIBPROCESS_SSL_ENABLED=true LIBPROCESS_SSL_SUPPORT_DOWNGRADE=true LIBPROCESS_SSL_KEY_FILE=<path-to-your-private-key> LIBPROCESS_SSL_CERT_FILE=<path-to-your-certificate> <Any other LIBPROCESS_SSL_* environment variables you may choose> <your-component (e.g. bin/master.sh)> <your-flags>

// Restart each component WITHOUT downgrade support (master, agent, framework):
LIBPROCESS_SSL_ENABLED=true LIBPROCESS_SSL_SUPPORT_DOWNGRADE=false LIBPROCESS_SSL_KEY_FILE=<path-to-your-private-key> LIBPROCESS_SSL_CERT_FILE=<path-to-your-certificate> <Any other LIBPROCESS_SSL_* environment variables you may choose> <your-component (e.g. bin/master.sh)> <your-flags>
Executors must be able to access the SSL environment variables and the files referred to by those variables. Environment variables can be provided to an executor by specifying CommandInfo.environment or by using the agent's --executor_environment_variables command line flag. If the agent and the executor are running in separate containers, ContainerInfo.volumes can be used to mount SSL files from the host into the executor's container.
The end state is a cluster that is only communicating with SSL.
NOTE: Any tools you may use that communicate with your components must be able to speak SSL, or they will be denied. You may choose to maintain LIBPROCESS_SSL_SUPPORT_DOWNGRADE=true for some time as you upgrade your internal tooling. The advantage of LIBPROCESS_SSL_SUPPORT_DOWNGRADE=true is that all components that speak SSL will do so, while other components may still communicate over insecure channels.
WebUI
The default Mesos WebUI uses relative links. Some of these links transition between endpoints served by the master and agents. The WebUI currently does not have enough information to change the 'http' vs 'https' links based on whether the target endpoint is currently being served by an SSL-enabled binary. This may cause certain links in the WebUI to be broken when a cluster is in a transition state between SSL and non-SSL. Any tools that hit these endpoints will still be able to access them as long as they hit the endpoint using the right protocol, or the LIBPROCESS_SSL_SUPPORT_DOWNGRADE option is set to true.
NOTE: Frameworks with their own WebUI will need to add HTTPS support separately.
Certificates
Most browsers have built in protection that guard transitions between pages served using different certificates. For this reason you may choose to serve both the master and agent endpoints using a common certificate that covers multiple hostnames. If you do not do this, certain links, such as those to agent sandboxes, may seem broken as the browser treats the transition between differing certificates transition as unsafe.
title: Apache Mesos - Secrets Handling layout: documentation
Secrets
Starting 1.4.0 release, Mesos allows tasks to populate environment variables and file volumes with secret contents that are retrieved using a secret-resolver interface. It also allows specifying image-pull secrets for private container registry. This allows users to avoid exposing critical secrets in task definitions. Secrets are fetched/resolved using a secret-resolver module (see below).
NOTE: Secrets are only supported for Mesos containerizer and not for the Docker containerizer.
Secrets Message
Secrets can be specified using the following protobuf message:
message Secret {
  enum Type {
    UNKNOWN = 0;
    REFERENCE = 1;
    VALUE = 2;
  }

  message Reference {
    required string name = 1;
    optional string key = 2;
  }

  message Value {
    required bytes data = 1;
  }

  optional Type type = 1;

  optional Reference reference = 2;
  optional Value value = 3;
}
Secrets can be of type reference or value (only one of reference and value must be set).
A secret reference can be used by modules to refer to a secret stored in a secure back-end.
The key field can be used to reference a single value within a secret containing arbitrary key-value pairs.
For example, given a back-end secret store with a secret named "/my/secret" containing the following key-value pairs:
{
  "username": "my-user",
  "password": "my-password
}
The username could be referred to in a Secret by specifying "my/secret" for the name and "username" for the key.
Secret also supports pass-by-value where the value of a secret can be directly passed in the message.
Environment-based Secrets
Environment variables can either be traditional value-based or secret-based. For the latter, one can specify a secret as part of environment definition as shown in the following example:
{
  "variables" : [
    {
      "name": "MY_SECRET_ENV",
      "type": "SECRET",
      "secret": {
        "type": "REFERENCE",
        "reference": {
          "name": "/my/secret",
          "key": "username"
        }
      }
    },
    {
      "name": "MY_NORMAL_ENV",
      "value": "foo"
    }
  ]
}
File-based Secrets
A new volume/secret isolator is available to create secret-based files inside
the task container. To use a secret, one can specify a new volume as follows:
{
  "mode": "RW",
  "container_path": "path/to/secret/file",
  "source":
  {
    "type": "SECRET",
    "secret": {
      "type": "REFERENCE",
      "reference": {
        "name": "/my/secret",
        "key": "username"
      }
    }
  }
}
This will create a tmpfs-based file mount in the container at "path/to/secret/file" which will contain the secret text fetched from the back-end secret store.
The volume/secret isolator is not enabled by default. To enable it, it must be specified in --isolator=volume/secret agent flag.
Image-pull Secrets
Currently, image-pull secrets only support Docker images for Mesos
containerizer. Appc images are not supported.
One can store Docker config containing credentials to authenticate with Docker registry in the secret store.
The secret is expected to be a Docker config file in JSON format with UTF-8 character encoding.
The secret can then be referenced in the Image protobuf as follows:
{
  "type": "DOCKER",
  "docker":
  message Docker {
    "name": "<REGISTRY_HOST>/path/to/image",
    "secret": {
      "type": "REFERENCE",
      "reference": {
        "name": "/my/secret/docker/config"
      }
    }
  }
}
SecretResolver Module
The SecretResolver module is called from Mesos agent to fetch/resolve any image-pull, environment-based, or file-based secrets. (See Mesos Modules for more information on using Mesos modules).
class SecretResolver
{
  virtual process::Future<Secret::Value> resolve(const Secret& secret) const;
};
The default implementation simply resolves value-based Secrets. A custom secret-resolver module can be specified using the --secret_resolver=<module-name> agent flag.
Containerizers
Motivation
Containerizers are used to run tasks in 'containers', which in turn are used to:
- Isolate a task from other running tasks.
- 'Contain' tasks to run in limited resource runtime environment.
- Control a task's resource usage (e.g., CPU, memory) programatically.
- Run software in a pre-packaged file system image, allowing it to run in different environments.
Types of containerizers
Mesos plays well with existing container technologies (e.g., docker) and also provides its own container technology. It also supports composing different container technologies (e.g., docker and mesos).
Mesos implements the following containerizers:
User can specify the types of containerizers to use via the agent flag
--containerizers.
Composing containerizer
This feature allows multiple container technologies to play together. It is
enabled when you configure the --containerizers agent flag with multiple comma
seperated containerizer names (e.g., --containerizers=mesos,docker). The order
of the comma separated list is important as the first containerizer that
supports the task's container configuration will be used to launch the task.
Use cases:
- For testing tasks with different types of resource isolations. Since 'mesos' containerizers have more isolation abilities, a framework can use composing containerizer to test a task using 'mesos' containerizer's controlled environment and at the same time test it to work with 'docker' containers by just changing the container parameters for the task.
Docker containerizer
Docker containerizer allows tasks to be run inside docker container. This
containerizer is enabled when you configure the agent flag as
--containerizers=docker.
Use cases:
- If a task needs to be run with the tooling that comes with the docker package.
- If Mesos agent is running inside a docker container.
For more details, see Docker Containerizer.
Mesos containerizer
This containerizer allows tasks to be run with an array of pluggable isolators
provided by Mesos. This is the native Mesos containerizer solution and is
enabled when you configure the agent flag as --containerizers=mesos.
Use cases:
- Allow Mesos to control the task's runtime environment without depending on other container technologies (e.g., docker).
- Want fine grained operating system controls (e.g., cgroups/namespaces provided by Linux).
- Want Mesos's latest container technology features.
- Need additional resource controls like disk usage limits, which might not be provided by other container technologies.
- Want to add custom isolation for tasks.
For more details, see Mesos Containerizer.
References
- Containerizer Internals for implementation details of containerizers.
Containerizer
Containerizers are Mesos components responsible for launching containers. They own the containers launched for the tasks/executors, and are responsible for their isolation, resource management, and events (e.g., statistics).
Containerizer internals
Containerizer creation and launch
- Agent creates a containerizer based on the flags (using agent flag
--containerizers). If multiple containerizers (e.g., docker, mesos) are specified using the--containerizersflag, then the composing containerizer will be used to create a containerizer. - If an executor is not specified in
TaskInfo, Mesos agent will use the default executor for the task (depending on the Containerizer the agent is using, it could bemesos-executorormesos-docker-executor). TODO: Update this after MESOS-1718 is completed. After this change, master will be responsible for generating executor information.
Types of containerizers
Mesos currently supports the following containerizers:
Composing Containerizer
Composing containerizer will compose the specified containerizers
(using agent flag --containerizers) and act like a single
containerizer. This is an implementation of the composite design
pattern.
Docker Containerizer
Docker containerizer manages containers using the docker engine provided in the docker package.
Container launch
- Docker containerizer will attempt to launch the task in docker only
if
ContainerInfo::typeis set to DOCKER. - Docker containerizer will first pull the image.
- Calls pre-launch hook.
- The executor will be launched in one of the two ways:
A) Mesos agent runs in a docker container
- This is indicated by the presence of agent flag
--docker_mesos_image. In this case, the value of flag--docker_mesos_imageis assumed to be the docker image used to launch the Mesos agent. - If the task includes an executor (custom executor), then that executor is launched in a docker container.
- If the task does not include an executor i.e. it defines a command, the
default executor
mesos-docker-executoris launched in a docker container to execute the command via Docker CLI.
B) Mesos agent does not run in a docker container
- If the task includes an executor (custom executor), then that executor is launched in a docker container.
- If task does not include an executor i.e. it defines a command, a subprocess
is forked to execute the default executor
mesos-docker-executor.mesos-docker-executorthen spawns a shell to execute the command via Docker CLI.
Mesos Containerizer
Mesos containerizer is the native Mesos containerizer. Mesos
Containerizer will handle any executor/task that does not specify
ContainerInfo::DockerInfo.
Container launch
- Calls prepare on each isolator.
- Forks the executor using Launcher (see Launcher). The forked child is blocked from executing until it is been isolated.
- Isolate the executor. Call isolate with the pid for each isolator (see Isolators).
- Fetch the executor.
- Exec the executor. The forked child is signalled to continue. It will first execute any preparation commands from isolators and then exec the executor.
Launcher
Launcher is responsible for forking/destroying containers.
- Forks a new process in the containerized context. The child will exec the binary at the given path with the given argv, flags, and environment.
- The I/O of the child will be redirected according to the specified I/O descriptors.
Linux launcher
- Creates a "freezer" cgroup for the container.
- Creates posix "pipe" to enable communication between host (parent process) and container process.
- Spawn child process (container process) using
clonesystem call. - Moves the new container process to the freezer hierarchy.
- Signals the child process to continue (exec'ing) by writing a character to the write end of the pipe in the parent process.
Starting from Mesos 1.1.0, nested container is supported. The Linux Launcher is responsible to fork the subprocess for the nested container with appropriate Linux namespaces being cloned. The following is the table for Linux namespaces that are supported for top level and nested containers.
Linux Namespaces
| Linux Namespaces | Top Level Container | Nested Container |
|---|---|---|
| Mount | Not shared | Not shared |
| PID | Configurable | Configurable |
| Network & UTS | Configurable | Shared w/ parent |
| IPC | Not shared -> configurable (TBD) | Not shared -> configurable (TBD) |
| Cgroup | Shared w/ agent -> Not shared (TBD) | Shared w/ parent -> Not shared (TBD) |
| User (not supported) | Shared w/ agent | Shared w/ parent |
*Note: For the top level container, shared means that the container
shares the namespace from the agent. For the nested container, shared
means that the nested container shares the namespace from its parent
container.
Posix launcher (TBD)
Isolators
Isolators are responsible for creating an environment for the containers where resources like cpu, network, storage and memory can be isolated from other containers.
Containerizer states
Docker
- FETCHING
- PULLING
- RUNNING
- DESTROYING
Mesos
- PREPARING
- ISOLATING
- FETCHING
- RUNNING
- DESTROYING
Docker Containerizer
Mesos 0.20.0 adds the support for launching tasks that contains Docker images, with also a subset of Docker options supported while we plan on adding more in the future.
Users can either launch a Docker image as a Task, or as an Executor.
The following sections will describe the API changes along with Docker support, and also how to setup Docker.
Setup
To run the agent to enable the Docker Containerizer, you must launch the agent with "docker" as one of the containerizers option.
Example: mesos-agent --containerizers=docker,mesos
Each agent that has the Docker containerizer should have Docker CLI client installed (version >= 1.8.0).
If you enable iptables on agent, make sure the iptables allow all traffic from docker bridge interface through add below rule:
iptables -A INPUT -s 172.17.0.0/16 -i docker0 -p tcp -j ACCEPT
How do I use the Docker Containerizer?
TaskInfo before 0.20.0 used to only support either setting a CommandInfo that launches a task running the bash command, or an ExecutorInfo that launches a custom Executor that will launch the task.
With 0.20.0 we added a ContainerInfo field to TaskInfo and ExecutorInfo that allows a Containerizer such as Docker to be configured to run the task or executor.
To run a Docker image as a task, in TaskInfo one must set both the command and the container field as the Docker Containerizer will use the accompanied command to launch the docker image. The ContainerInfo should have type Docker and a DockerInfo that has the desired docker image.
To run a Docker image as an executor, in TaskInfo one must set the ExecutorInfo that contains a ContainerInfo with type docker and the CommandInfo that will be used to launch the executor. Note that the Docker image is expected to launch up as a Mesos executor that will register with the agent once it launches.
What does the Docker Containerizer do?
The Docker Containerizer is translating Task/Executor Launch and
Destroy calls to Docker CLI commands.
Currently the Docker Containerizer when launching as task will do the following:
-
Fetch all the files specified in the CommandInfo into the sandbox.
-
Pull the docker image from the remote repository.
-
Run the docker image with the Docker executor, and map the sandbox directory into the Docker container and set the directory mapping to the MESOS_SANDBOX environment variable. The executor will also stream the container logs into stdout/stderr files in the sandbox.
-
On container exit or containerizer destroy, stop and remove the docker container.
The Docker Containerizer launches all containers with the mesos-
prefix plus the agent id (ie: mesos-agent1-abcdefghji), and also
assumes all containers with the mesos- prefix is managed by the
agent and is free to stop or kill the containers.
When launching the docker image as an Executor, the only difference is that it skips launching a command executor but just reaps on the docker container executor pid.
Note that we currently default to host networking when running a docker image, to easier support running a docker image as an Executor.
The containerizer also supports optional force pulling of the image.
It is set disabled as default, so the docker image will only be
updated again if it's not available on the host. To enable force
pulling an image, force_pull_image has to be set as true.
Private Docker repository
To run an image from a private repository, one can include the uri
pointing to a .dockercfg that contains login information. The
.dockercfg file will be pulled into the sandbox the Docker
Containerizer set the HOME environment variable pointing to the
sandbox so docker cli will automatically pick up the config file.
Starting from 1.0, we provide an alternative way to specify docker
config file for pulling images from private registries. We allow
operators to specify a shared docker config file using an agent flag.
This docker config file will be used to pull images from private
registries for all containers. See configuration
documentation for detail. Operators can either
specify the flag as an absolute path pointing to the docker config
file (need to manually configure .docker/config.json or .dockercfg
on each agent), or specify the flag as a JSON-formatted string. For
example:
--docker_config=file:///home/vagrant/.docker/config.json
or as a JSON object,
--docker_config="{ \
  \"auths\": { \
    \"https://index.docker.io/v1/\": { \
      \"auth\": \"xXxXxXxXxXx=\", \
      \"email\": \"username@example.com\" \
    } \
  } \
}"
CommandInfo to run Docker images
A docker image currently supports having an entrypoint and/or a default command.
To run a docker image with the default command (ie: docker run image), the CommandInfo's value must not be set. If the value is set
then it will override the default command.
To run a docker image with an entrypoint defined, the CommandInfo's
shell option must be set to false. If shell option is set to true the
Docker Containerizer will run the user's command wrapped with /bin/sh -c which will also become parameters to the image entrypoint.
Recover Docker containers on agent recovery
The Docker containerizer supports recovering Docker containers when the agent restarts, which supports both when the agent is running in a Docker container or not.
With the --docker_mesos_image flag enabled, the Docker containerizer
assumes the containerizer is running in a container itself and
modifies the mechanism it recovers and launches docker containers
accordingly.
title: Apache Mesos - Mesos Containerizer layout: documentation
Mesos Containerizer
The Mesos Containerizer provides lightweight containerization and resource isolation of executors using Linux-specific functionality such as control cgroups and namespaces. It is composable so operators can selectively enable different isolators.
It also provides basic support for POSIX systems (e.g., OSX) but without any actual isolation, only resource usage reporting.
Isolators
Isolators are components that each define an aspect of how a tasks execution environment (or container) is constructed. Isolators can control how containers are isolated from each other, how task resource limits are enforced, how networking is configured, how security policies are applied.
Since the isolator interface is modularized, operators can write modules that implement custom isolators.
Mesos supports the following built-in isolators.
- appc/runtime
- cgroups/blkio
- cgroups/cpu
- cgroups/cpuset
- cgroups/devices
- cgroups/hugetlb
- cgroups/mem
- cgroups/net_cls
- cgroups/net_prio
- cgroups/perf_event
- cgroups/pids
- disk/du
- disk/xfs
- docker/runtime
- docker/volume
- environment_secret
- filesystem/linux
- filesystem/posix
- filesystem/shared
- filesystem/windows
- gpu/nvidia
- linux/capabilities
- linux/devices
- linux/nnp
- linux/seccomp
- namespaces/ipc
- namespaces/pid
- network/cni
- network/port_mapping
- network/ports
- posix/cpu
- posix/mem
- posix/rlimits
- volume/csi
- volume/host_path
- volume/image
- volume/sandbox_path
- volume/secret
- windows/cpu
- windows/mem
title: Apache Mesos - Supporting Container Images in Mesos Containerizer layout: documentation
Supporting Container Images in Mesos Containerizer
Motivation
Mesos currently supports several containerizers, notably the Mesos containerizer and the Docker containerizer. Mesos containerizer uses native OS features directly to provide isolation between containers, while Docker containerizer delegates container management to the Docker engine.
Maintaining two containerizers is hard. For instance, when we add new features to Mesos (e.g., persistent volumes, disk isolation), it becomes a burden to update both containerizers. Even worse, sometimes the isolation on some resources (e.g., network handles on an agent) requires coordination between two containerizers, which is very hard to implement in practice. In addition, we found that extending and customizing isolation for containers launched by Docker engine is difficult, mainly because we do not have a way to inject logics during the life cycle of a container.
Therefore, we made an effort to unify containerizers in Mesos (MESOS-2840, a.k.a. the Universal Containerizer). We improved Mesos containerizer so that it now supports launching containers that specify container images (e.g., Docker/Appc images).
Getting Started
To support container images, we introduced a new component in Mesos containerizer, called image provisioner. Image provisioner is responsible for pulling, caching and preparing container root filesystems. It also extracts runtime configurations from container images which will then be passed to the corresponding isolators for proper isolation.
There are a few container image specifications, notably Docker, Appc, and OCI (future). Currently, we support Docker and Appc images. More details about what features are supported or not can be found in the following sections.
NOTE: container image is only supported on Linux currently.
Configure the agent
To enable container image support in Mesos containerizer, the operator
will need to specify the --image_providers agent flag which tells
Mesos containerizer what types of container images are allowed. For
example, setting --image_providers=docker allow containers to use
Docker images. The operators can also specify multiple container image
types. For instance, --image_providers=docker,appc allows both
Docker and Appc container images.
A few isolators need to be turned on in order to provide proper
isolation according to the runtime configurations specified in the
container image. The operator needs to add the following isolators to
the --isolation flag.
-
filesystem/linux: This is needed because supporting container images involves changing filesystem root, and onlyfilesystem/linuxsupport that currently. Note that this isolator requires root permission. -
docker/runtime: This is used to provide support for runtime configurations specified in Docker images (e.g., Entrypoint/Cmd, environment variables, etc.). See more details about this isolator in Mesos containerizer doc. Note that if this isolator is not specified and--image_providerscontainsdocker, the agent will refuse to start.
In summary, to enable container image support in Mesos containerizer, please specify the following agent flags:
$ sudo mesos-agent \
  --containerizers=mesos \
  --image_providers=appc,docker \
  --isolation=filesystem/linux,docker/runtime
Framework API
We introduced a new protobuf message Image which allow frameworks to
specify container images for their containers. It has two types right
now: APPC and DOCKER, representing Appc and Docker images
respectively.
For Appc images, the name and labels are what described in the
spec.
For Docker images, the name is the Docker image reference in the
following form (the same format expected by docker pull):
[REGISTRY_HOST[:REGISTRY_PORT]/]REPOSITORY[:TAG|@DIGEST]
message Image {
  enum Type {
    APPC = 1;
    DOCKER = 2;
  }

  message Appc {
    required string name = 1;
    optional Labels labels = 3;
  }

  message Docker {
    required string name = 1;
  }

  required Type type = 1;

  // Only one of the following image messages should be set to match
  // the type.
  optional Appc appc = 2;
  optional Docker docker = 3;
}
The framework needs to specify MesosInfo in ContainerInfo in order
to launch containers with container images. In other words, the
framework needs to set the type to ContainerInfo.MESOS, indicating
that it wants to use the Mesos containerizer. If MesosInfo.image is
not specified, the container will use the host filesystem. If
MesosInfo.image is specified, it will be used as the container
image when launching the container.
message ContainerInfo {
  enum Type {
    DOCKER = 1;
    MESOS = 2;
  }

  message MesosInfo {
    optional Image image = 1;
  }

  required Type type = 1;
  optional MesosInfo mesos = 5;
}
Test it out!
First, start the Mesos master:
$ sudo sbin/mesos-master --work_dir=/tmp/mesos/master
Then, start the Mesos agent:
$ sudo GLOG_v=1 sbin/mesos-agent \
  --master=<MASTER_IP>:5050 \
  --isolation=docker/runtime,filesystem/linux \
  --work_dir=/tmp/mesos/agent \
  --image_providers=docker \
  --executor_environment_variables="{}"
Now, use Mesos CLI (i.e., mesos-execute) to launch a Docker container
(e.g., redis). Note that --shell=false tells Mesos to use the
default entrypoint and cmd specified in the Docker image.
$ sudo bin/mesos-execute \
  --master=<MASTER_IP>:5050 \
  --name=test \
  --docker_image=library/redis \
  --shell=false
Verify if your container is running by launching a redis client:
$ sudo docker run -ti --net=host redis redis-cli
127.0.0.1:6379> ping
PONG
127.0.0.1:6379>
Docker Support and Current Limitations
Image provisioner uses Docker v2 registry
API to fetch Docker
images/layers. Both docker manifest
v2 schema1
and v2 schema2
are supported (v2 schema2 is supported starting from 1.8.0). The
fetching is based on curl, therefore SSL is automatically handled.
For private registries, the operator needs to configure curl
with the location of required CA certificates.
Fetching requiring authentication is supported through the
--docker_config agent flag. Starting from 1.0, operators can use
this agent flag to specify a shared docker config file, which is
used for pulling private repositories with authentication. Per
container credential is not supported yet (coming soon).
Operators can either specify the flag as an absolute path pointing to
the docker config file (need to manually configure
.docker/config.json or .dockercfg on each agent), or specify the
flag as a JSON-formatted string. See configuration
documentation for detail. For example:
--docker_config=file:///home/vagrant/.docker/config.json
or as a JSON object,
--docker_config="{ \
  \"auths\": { \
    \"https://index.docker.io/v1/\": { \
      \"auth\": \"xXxXxXxXxXx=\", \
      \"email\": \"username@example.com\" \
    } \
  } \
}"
Private registry is supported either through the --docker_registry
agent flag, or specifying private registry for each container using
image name <REGISTRY>/<REPOSITORY> (e.g.,
localhost:80/gilbert/inky:latest). If <REGISTRY> is included as
a prefix in the image name, the registry specified through the agent
flag --docker_registry will be ignored.
If the --docker_registry agent flag points to a local directory
(e.g., /tmp/mesos/images/docker), the provisioner will pull Docker
images from local filesystem, assuming Docker archives (result of
docker save) are stored there based on the image name and tag. For
example, the operator can put a busybox:latest.tar (the result of
docker save -o busybox:latest.tar busybox) under
/tmp/mesos/images/docker and launch the agent by specifying
--docker_registry=/tmp/mesos/images/docker. Then the framework can
launch a Docker container by specifying busybox:latest as the name
of the Docker image. This flag can also point to an HDFS URI
(experimental in Mesos 1.7) (e.g., hdfs://localhost:8020/archives/)
to fetch images from HDFS if the hadoop command is available on the
agent.
If the --switch_user flag is set on the agent and the framework
specifies a user (either CommandInfo.user or FrameworkInfo.user),
we expect that user exists in the container image and its uid and gids
matches that on the host. User namespace is not supported yet. If the
user is not specified, root will be used by default. The operator or
the framework can limit the
capabilities
of the container by using the
linux/capabilities isolator.
Currently, we support host, bridge and user defined networks
(reference).
none is not supported yet. We support the above networking modes in
Mesos Containerizer using the
CNI (Container Network
Interface) standard. Please refer to the network/cni
isolator document for more details about how to configure the network
for the container.
More agent flags
--docker_registry: The default URL for pulling Docker images. It
could either be a Docker registry server URL (i.e:
https://registry.docker.io), or a local path (i.e:
/tmp/docker/images) in which Docker image archives (result of
docker save) are stored. The default value is
https://registry-1.docker.io.
--docker_store_dir: Directory the Docker provisioner will store
images in. All the Docker images are cached under this directory. The
default value is /tmp/mesos/store/docker.
--docker_config: The default docker config file for agent. Can
be provided either as an absolute path pointing to the agent local
docker config file, or as a JSON-formatted string. The format of
the docker config file should be identical to docker's default one
(e.g., either $HOME/.docker/config.json or $HOME/.dockercfg).
Appc Support and Current Limitations
Currently, only the root filesystem specified in the Appc image is supported. Other runtime configurations like environment variables, exec, working directory are not supported yet (coming soon).
For image discovery, we current support a simple discovery mechanism.
We allow operators to specify a URI prefix which will be prepend to
the URI template {name}-{version}-{os}-{arch}.{ext}. For example, if
the URI prefix is file:///tmp/appc/ and the Appc image name is
example.com/reduce-worker with version:1.0.0, we will fetch the
image at file:///tmp/appc/example.com/reduce-worker-1.0.0.aci.
More agent flags
appc_simple_discovery_uri_prefix: URI prefix to be used for simple
discovery of appc images, e.g., http://, https://,
hdfs://<hostname>:9000/user/abc/cde. The default value is http://.
appc_store_dir: Directory the appc provisioner will store images in.
All the Appc images are cached under this directory. The default value
is /tmp/mesos/store/appc.
Provisioner Backends
A provisioner backend takes a set of filesystem layers and stacks them
into a root filesystem. Currently, we support the following backends:
copy, bind, overlay and aufs. Mesos will validate if the
selected backend works with the underlying filesystem (the filesystem
used by the image store --docker_store_dir or --appc_store_dir)
using the following logic table:
+---------+--------------+------------------------------------------+
| Backend | Suggested on | Disabled on                              |
+---------+--------------+------------------------------------------+
| aufs    | ext4 xfs     | btrfs aufs eCryptfs                      |
| overlay | ext4 xfs*    | btrfs aufs overlay overlay2 zfs eCryptfs |
| bind    |              | N/A(`--sandbox_directory' must exist)    |
| copy    |              | N/A                                      |
+---------+--------------+------------------------------------------+
NOTE: xfs support on overlay is enabled only when d_type=true. Use
xfs_info to verify that the xfs ftype option is set to 1. To format
an xfs filesystem for overlay, use the flag -n ftype=1 with mkfs.xfs.
The provisioner backend can be specified through the agent flag
--image_provisioner_backend. If not set, Mesos will select the best
backend automatically for the users/operators. The selection logic is
as following:
1. Use `overlay` backend if the overlayfs is available.
2. Use `aufs` backend if the aufs is available and overlayfs is not supported.
3. Use `copy` backend if none of above is selected.
Copy
The Copy backend simply copies all the layers into a target root directory to create a root filesystem.
Bind
This is a specialized backend that may be useful for deployments using large (multi-GB) single-layer images and where more recent kernel features such as overlayfs are not available. For small images (10's to 100's of MB) the copy backend may be sufficient. Bind backend is faster than Copy as it requires nearly zero IO.
The bind backend currently has these two limitations:
-
The bind backend supports only a single layer. Multi-layer images will fail to provision and the container will fail to launch!
-
The filesystem is read-only because all containers using this image share the source. Select writable areas can be achieved by mounting read-write volumes to places like
/tmp,/var/tmp,/home, etc. using theContainerInfo. These can be relative to the executor work directory. Since the filesystem is read-only,--sandbox_directoryand/tmpmust already exist within the filesystem because the filesystem isolator is unable to create it (e.g., either the image writer needs to create the mount point in the image, or the operator needs to set agent flag--sandbox_directoryproperly).
Overlay
The reason overlay backend was introduced is because the copy backend will waste IO and space while the bind backend can only deal with one layer. The overlay backend allows containizer to utilize the filesystem to merge multiple filesystems into one efficiently.
The overlay backend depends on support for multiple lower layers, which requires Linux kernel version 4.0 or later. For more information of overlayfs, please refer to here.
AUFS
The reason AUFS is introduced is because overlayfs support hasn't been merged until kernel 3.18 and Docker's default storage backend for ubuntu 14.04 is AUFS.
Like overlayfs, AUFS is also a unioned file system, which is very stable, has a lot of real-world deployments, and has strong community support.
Some Linux distributions do not support AUFS. This is usually because AUFS is not included in the mainline (upstream) Linux kernel.
For more information of AUFS, please refer to here.
Executor Dependencies in a Container Image
Mesos has this concept of executors. All tasks are launched by an executor. For a general purpose executor (e.g., thermos) of a framework (e.g., Aurora), requiring it and all its dependencies to be present in all possible container images that a user might use is not trivial.
In order to solve this issue, we propose a solution where we allow the
executor to run on the host filesystem (without a container image).
Instead, it can specify a volume whose source is an Image. Mesos
containerizer will provision the image specified in the volume,
and mount it under the sandbox directory. The executor can perform
pivot_root or chroot itself to enter the container root
filesystem.
Garbage Collect Unused Container Images
Experimental support of garbage-collecting unused container images was added at
Mesos 1.5. This can be either configured automatically via a new agent flag
--image_gc_config, or manually invoked through agent's
v1 Operator HTTP API. This can be used
to avoid unbounded disk space usage of image stores.
This is implemented with a simple mark-and-sweep logic. When image GC happens, we check all layers and images referenced by active running containers and avoid removing them from the image store. As a pre-requisite, if there are active containers launched before Mesos 1.5.0, we cannot determine what images can be safely garbage collected, so agent will refuse to invoke image GC. To garbage collect container images, users are expected to drain all containers launched before Mesos 1.5.0.
NOTE: currently, the image GC is only supported for docker store in Mesos Containerizer.
Automatic Image GC through Agent Flag
To enable automatic image GC, use the new agent flag --image_gc_config:
--image_gc_config=file:///home/vagrant/image-gc-config.json
or as a JSON object,
--image_gc_config="{ \
  \"image_disk_headroom\": 0.1, \
  \"image_disk_watch_interval\": { \
    \"nanoseconds\": 3600000000000 \
    }, \
  \"excluded_images\": \[ \] \
}"
Manual Image GC through HTTP API
See PRUNE_IMAGES section in
v1 Operator HTTP API for manual image GC
through the agent HTTP API.
References
For more information on the Mesos containerizer filesystem, namespace, and isolator features, visit Mesos Containerizer. For more information on launching Docker containers through the Docker containerizer, visit Docker Containerizer.
title: Apache Mesos - Docker Volume Support in Mesos Containerizer layout: documentation
Docker Volume Support in Mesos Containerizer
Mesos 1.0 adds Docker volume support to the
MesosContainerizer (a.k.a., the universal
containerizer) by introducing the new docker/volume isolator.
This document describes the motivation, overall architecture, configuration steps for enabling Docker volume isolator, and required framework changes.
Table of Contents
Motivation
The integration of external storage in Mesos is an attractive feature. The Mesos persistent volume primitives allow stateful services to persist data on an agent's local storage. However, the amount of storage capacity that can be directly attached to a single agent is limited---certain applications (e.g., databases) would like to access more data than can easily be attached to a single node. Using external storage can also simplify data migration between agents/containers, and can make backups and disaster recovery easier.
The Docker Volume Driver API defines an interface between the container runtime and external storage systems. It has been widely adopted. There are Docker volume plugins for a variety of storage drivers, such as Convoy, Flocker, GlusterFS, and REX-Ray. Each plugin typically supports a variety of external storage systems, such as Amazon EBS, OpenStack Cinder, etc.
Therefore, introducing support for external storage in Mesos through the
docker/volume isolator provides Mesos with tremendous flexibility to
orchestrate containers on a wide variety of external storage technologies.
How does it work?

The docker/volume isolator interacts with Docker volume plugins using
dvdcli, an open-source command line tool
from EMC.
When a new task with Docker volumes is launched, the docker/volume isolator
will invoke dvdcli to mount the
corresponding Docker volume onto the host and then onto the container.
When the task finishes or is killed, the docker/volume isolator will invoke
dvdcli to unmount the corresponding Docker
volume.
The detailed workflow for the docker/volume isolator is as follows:
-
A framework specifies external volumes in
ContainerInfowhen launching a task. -
The master sends the launch task message to the agent.
-
The agent receives the message and asks all isolators (including the
docker/volumeisolator) to prepare for the container with theContainerInfo. -
The isolator invokes dvdcli to mount the corresponding external volume to a mount point on the host.
-
The agent launches the container and bind-mounts the volume into the container.
-
The bind-mounted volume inside the container will be unmounted from the container automatically when the container finishes, as the container is in its own mount namespace.
-
The agent invokes isolator cleanup which invokes dvdcli to unmount all mount points for the container.
Configuration
To use the docker/volume isolator, there are certain actions required by
operators and framework developers. In this section we list the steps required
by the operator to configure docker/volume isolator and the steps required by
framework developers to specify the Docker volumes.
Pre-conditions
-
Install
dvdcliversion 0.1.0 on each agent. -
Install the Docker volume plugin on each agent.
-
Explicitly create the Docker volumes that are going to be accessed by Mesos tasks. If this is not done, volumes will be implicitly created by dvdcli but the volumes may not fit into framework resource requirement well.
Configuring Docker Volume Isolator
In order to configure the docker/volume isolator, the operator needs to
configure two flags at agent startup as follows:
  sudo mesos-agent \
    --master=<master IP> \
    --ip=<agent IP> \
    --work_dir=/var/lib/mesos \
    --isolation=filesystem/linux,docker/volume \
    --docker_volume_checkpoint_dir=<mount info checkpoint path>
The docker/volume isolator must be specified in the --isolation flag at
agent startup; the docker/volume isolator has a dependency on the
filesystem/linux isolator.
The --docker_volume_checkpoint_dir is an optional flag with a default value of
/var/run/mesos/isolators/docker/volume. The docker/volume isolator will
checkpoint all Docker volume mount point information under
--docker_volume_checkpoint_dir for recovery. The checkpoint information under
the default --docker_volume_checkpoint_dir will be cleaned up after agent
restart. Therefore, it is recommended to set --docker_volume_checkpoint_dir to
a directory which will survive agent restart.
Enabling frameworks to use Docker volumes
Volume Protobuf
The Volume protobuf message has been updated to support Docker volumes.
message Volume {
  ...

  required string container_path = 1;

  message Source {
    enum Type {
      UNKNOWN = 0;
      DOCKER_VOLUME = 1;
    }

    message DockerVolume {
      optional string driver = 1;
      required string name = 2;
      optional Parameters driver_options = 3;
    }

    optional Type type = 1;
    optional DockerVolume docker_volume = 2;
  }

  optional Source source = 5;
}
When requesting a Docker volume for a container, the framework developer needs to
set Volume for the container, which includes mode, container_path and
source.
The source field specifies where the volume comes from. Framework developers need to
specify the type, Docker volume driver, name and options. At present,
only the DOCKER_VOLUME type is supported; we plan to add support for more
types of volumes in the future.
How to specify container_path:
-
If you are launching a Mesos container
without rootfs. Ifcontainer_pathis an absolute path, you need to make sure the absolute path exists on your host root file system as the container shares the host root file system; otherwise, the task will fail. -
For other cases like launching a Mesos container
without rootfsandcontainer_pathis a relative path, or launching a taskwith rootfsandcontainer_pathis an absolute path, or launching a taskwith rootfsandcontainer_pathas a relative path, the isolator will help create thecontainer_pathas the mount point.
The following table summarizes the above rules for container_path:
| Container with rootfs | Container without rootfs | |
|---|---|---|
| Absolute container_path | No need to exist | Must exist |
| Relative container_path | No need to exist | No need to exist |
Examples
-
Launch a task with one Docker volume using the default command executor.
TaskInfo { ... "command" : ..., "container" : { "volumes" : [ { "container_path" : "/mnt/volume", "mode" : "RW", "source" : { "type" : "DOCKER_VOLUME", "docker_volume" : { "driver" : "rexray", "name" : "myvolume" } } } ] } } -
Launch a task with two Docker volumes using the default command executor.
TaskInfo {
  ...
  "command" : ...,
  "container" : {
    "volumes" : [
      {
        "container_path" : "volume1",
        "mode" : "RW",
        "source" : {
          "type" : "DOCKER_VOLUME",
          "docker_volume" : {
            "driver" : "rexray",
            "name" : "volume1"
          }
        }
      },
      {
        "container_path" : "volume2",
        "mode" : "RW",
        "source" : {
          "type" : "DOCKER_VOLUME",
          "docker_volume" : {
            "driver" : "rexray",
            "name" : "volume2",
            "driver_options" : {
              "parameter" : [{
                "key" : <key>,
                "value" : <value>
              }, {
                "key" : <key>,
                "value" : <value>
              }]
            }
          }
        }
      }
    ]
  }
}
NOTE: The task launch will be failed if one container uses multiple Docker
volumes with the same driver and name.
Limitations
Using the same Docker volume in both the Docker Containerizer and the Mesos Containerizer simultaneously is strongly discouraged, because the MesosContainerizer has its own reference counting to decide when to unmount a Docker volume. Otherwise, it would be problematic if a Docker volume is unmounted by MesosContainerizer but the DockerContainerizer is still using it.
Test it out!
This section presents examples for launching containers with Docker volumes. The following example is using convoy as the Docker volume driver.
Start the Mesos master.
$ sudo mesos-master --work_dir=/tmp/mesos/master
Start the Mesos agent.
  $ sudo mesos-agent \
    --master=<MASTER_IP>:5050 \
    --isolation=docker/volume,docker/runtime,filesystem/linux \
    --work_dir=/tmp/mesos/agent \
    --image_providers=docker \
    --executor_environment_variables="{}"
Create a volume named as myvolume with
convoy.
$ convoy create myvolume
Prepare a volume json file named as myvolume.json with following content.
  [{
    "container_path":"\/tmp\/myvolume",
    "mode":"RW",
    "source":
    {
      "docker_volume":
        {
          "driver":"convoy",
          "name":"myvolume"
        },
        "type":"DOCKER_VOLUME"
    }
  }]
Now, use Mesos CLI (i.e., mesos-execute) to launch a Docker container with
--volumes=<path>/myvolume.json option.
  $ sudo mesos-execute \
    --master=<MASTER_IP>:5050 \
    --name=test \
    --docker_image=ubuntu:14.04 \
    --command="touch /tmp/myvolume/myfile" \
    --volumes=<path>/myvolume.json
Create another task to verify the file myfile was created successfully.
  $ sudo mesos-execute \
    --master=<MASTER_IP>:5050 \
    --name=test \
    --docker_image=ubuntu:14.04 \
    --command="ls /tmp/myvolume" \
    --volumes=<path>/myvolume.json
Check the sandbox
for the second task to check the file myfile was created successfully.
  $ cat stdout
    Received SUBSCRIBED event
    Subscribed executor on mesos002
    Received LAUNCH event
    Starting task test
    Forked command at 27288
    sh -c 'ls /tmp/myvolume/'
    lost+found
    myfile
    Command exited with status 0 (pid: 27288)
title: Apache Mesos - Nvidia GPU Support layout: documentation
Nvidia GPU Support
Mesos 1.0.0 added first-class support for Nvidia GPUs.
The minimum required Nvidia driver version is 340.29.
Overview
Getting up and running with GPU support in Mesos is fairly straightforward once you know the steps necessary to make it work as expected. On one side, this includes setting the necessary agent flags to enumerate GPUs and advertise them to the Mesos master. On the other side, this includes setting the proper framework capabilities so that the Mesos master will actually include GPUs in the resource offers it sends to a framework. So long as all of these constraints are met, accepting offers that contain GPUs and launching tasks that consume them should be just as straightforward as launching a traditional task that only consumes CPUs, memory, and disk.
Mesos exposes GPUs as a simple SCALAR resource in the same
way it always has for CPUs, memory, and disk. That is, a resource
offer such as the following is now possible:
cpus:8; mem:1024; disk:65536; gpus:4;
However, unlike CPUs, memory, and disk, only whole numbers of GPUs
can be selected. If a fractional amount is selected, launching the
task will result in a TASK_ERROR.
At the time of this writing, Nvidia GPU support is only available for tasks launched through the Mesos containerizer (i.e., no support exists for launching GPU capable tasks through the Docker containerizer). That said, the Mesos containerizer now supports running docker images natively, so this limitation should not affect most users.
Moreover, we mimic the support provided by nvidia-docker to automatically mount the proper Nvidia drivers and tools directly into your docker container. This means you can easily test your GPU-enabled docker containers locally and deploy them to Mesos with the assurance that they will work without modification.
In the following sections we walk through all of the flags and framework capabilities necessary to enable Nvidia GPU support in Mesos. We then show an example of setting up and running an example test cluster that launches tasks both with and without docker containers. Finally, we conclude with a step-by-step guide of how to install any necessary Nvidia GPU drivers on your machine.
Agent Flags
The following isolation flags are required to enable Nvidia GPU support on an agent.
--isolation="filesystem/linux,cgroups/devices,gpu/nvidia"
The filesystem/linux flag tells the agent to use Linux-specific
commands to prepare the root filesystem and volumes (e.g., persistent
volumes) for containers that require them. Specifically, it relies on
Linux mount namespaces to prevent the mounts of a container from being
propagated to the host mount table. In the case of GPUs, we require
this flag to properly mount certain Nvidia binaries (e.g.,
nvidia-smi) and libraries (e.g., libnvidia-ml.so) into a container
when necessary.
The cgroups/devices flag tells the agent to restrict access to a
specific set of devices for each task that it launches (i.e., a subset
of all devices listed in /dev). When used in conjunction with the
gpu/nvidia flag, the cgroups/devices flag allows us to grant /
revoke access to specific GPUs on a per-task basis.
By default, all GPUs on an agent are automatically discovered and sent to the Mesos master as part of its resource offer. However, it may sometimes be necessary to restrict access to only a subset of the GPUs available on an agent. This is useful, for example, if you want to exclude a specific GPU device because an unwanted Nvidia graphics card is listed alongside a more powerful set of GPUs. When this is required, the following additional agent flags can be used to accomplish this:
--nvidia_gpu_devices="<list_of_gpu_ids>"

--resources="gpus:<num_gpus>"
For the --nvidia_gpu_devices flag, you need to provide a comma
separated list of GPUs, as determined by running nvidia-smi on the
host where the agent is to be launched (see
below for instructions on what external
dependencies must be installed on these hosts to run this command).
Example output from running nvidia-smi on a machine with four GPUs
can be seen below:
+------------------------------------------------------+
| NVIDIA-SMI 352.79     Driver Version: 352.79         |
|-------------------------------+----------------------+----------------------+
| GPU  Name        Persistence-M| Bus-Id        Disp.A | Volatile Uncorr. ECC |
| Fan  Temp  Perf  Pwr:Usage/Cap|         Memory-Usage | GPU-Util  Compute M. |
|===============================+======================+======================|
|   0  Tesla M60           Off  | 0000:04:00.0     Off |                    0 |
| N/A   34C    P0    39W / 150W |     34MiB /  7679MiB |      0%      Default |
+-------------------------------+----------------------+----------------------+
|   1  Tesla M60           Off  | 0000:05:00.0     Off |                    0 |
| N/A   35C    P0    39W / 150W |     34MiB /  7679MiB |      0%      Default |
+-------------------------------+----------------------+----------------------+
|   2  Tesla M60           Off  | 0000:83:00.0     Off |                    0 |
| N/A   38C    P0    40W / 150W |     34MiB /  7679MiB |      0%      Default |
+-------------------------------+----------------------+----------------------+
|   3  Tesla M60           Off  | 0000:84:00.0     Off |                    0 |
| N/A   34C    P0    39W / 150W |     34MiB /  7679MiB |     97%      Default |
+-------------------------------+----------------------+----------------------+
The GPU id to choose can be seen in the far left of each row. Any
subset of these ids can be listed in the --nvidia_gpu_devices
flag (i.e., all of the following values of this flag are valid):
--nvidia_gpu_devices="0"
--nvidia_gpu_devices="0,1"
--nvidia_gpu_devices="0,1,2"
--nvidia_gpu_devices="0,1,2,3"
--nvidia_gpu_devices="0,2,3"
--nvidia_gpu_devices="3,1"
etc...
For the --resources=gpus:<num_gpus> flag, the value passed to
<num_gpus> must equal the number of GPUs listed in
--nvidia_gpu_devices. If these numbers do not match, launching the
agent will fail. This can sometimes be a source of confusion, so it
is important to emphasize it here for clarity.
Framework Capabilities
Once you launch an agent with the flags above, GPU resources will be
advertised to the Mesos master along side all of the traditional
resources such as CPUs, memory, and disk. However, the master will
only forward offers that contain GPUs to frameworks that have
explicitly enabled the GPU_RESOURCES framework capability.
The choice to make frameworks explicitly opt-in to this GPU_RESOURCES
capability was to keep legacy frameworks from accidentally consuming
non-GPU resources on GPU-capable machines (and thus preventing your GPU
jobs from running). It's not that big a deal if all of your nodes have
GPUs, but in a mixed-node environment, it can be a big problem.
An example of setting this capability in a C++-based framework can be seen below:
FrameworkInfo framework;
framework.add_capabilities()->set_type(
      FrameworkInfo::Capability::GPU_RESOURCES);

GpuScheduler scheduler;

driver = new MesosSchedulerDriver(
    &scheduler,
    framework,
    127.0.0.1:5050);

driver->run();
Minimal GPU Capable Cluster
In this section we walk through two examples of configuring GPU-capable clusters and running tasks on them. The first example demonstrates the minimal setup required to run a command that consumes GPUs on a GPU-capable agent. The second example demonstrates the setup necessary to launch a docker container that does the same.
Note: Both of these examples assume you have installed the external dependencies required for Nvidia GPU support on Mesos. Please see below for more information.
Minimal Setup Without Support for Docker Containers
The commands below show a minimal example of bringing up a GPU-capable
Mesos cluster on localhost and executing a task on it. The required
agent flags are set as described above, and the mesos-execute
command has been told to enable the GPU_RESOURCES framework
capability so it can receive offers containing GPU resources.
$ mesos-master \
      --ip=127.0.0.1 \
      --work_dir=/var/lib/mesos

$ mesos-agent \
      --master=127.0.0.1:5050 \
      --work_dir=/var/lib/mesos \
      --isolation="cgroups/devices,gpu/nvidia"

$ mesos-execute \
      --master=127.0.0.1:5050 \
      --name=gpu-test \
      --command="nvidia-smi" \
      --framework_capabilities="GPU_RESOURCES" \
      --resources="gpus:1"
If all goes well, you should see something like the following in the
stdout out of your task:
+------------------------------------------------------+
| NVIDIA-SMI 352.79     Driver Version: 352.79         |
|-------------------------------+----------------------+----------------------+
| GPU  Name        Persistence-M| Bus-Id        Disp.A | Volatile Uncorr. ECC |
| Fan  Temp  Perf  Pwr:Usage/Cap|         Memory-Usage | GPU-Util  Compute M. |
|===============================+======================+======================|
|   0  Tesla M60           Off  | 0000:04:00.0     Off |                    0 |
| N/A   34C    P0    39W / 150W |     34MiB /  7679MiB |      0%      Default |
+-------------------------------+----------------------+----------------------+
Minimal Setup With Support for Docker Containers
The commands below show a minimal example of bringing up a GPU-capable
Mesos cluster on localhost and running a docker container on it. The
required agent flags are set as described above, and the
mesos-execute command has been told to enable the GPU_RESOURCES
framework capability so it can receive offers containing GPU
resources. Additionally, the required flags to enable support for
docker containers (as described here) have been
set up as well.
$ mesos-master \
      --ip=127.0.0.1 \
      --work_dir=/var/lib/mesos

$ mesos-agent \
      --master=127.0.0.1:5050 \
      --work_dir=/var/lib/mesos \
      --image_providers=docker \
      --executor_environment_variables="{}" \
      --isolation="docker/runtime,filesystem/linux,cgroups/devices,gpu/nvidia"

$ mesos-execute \
      --master=127.0.0.1:5050 \
      --name=gpu-test \
      --docker_image=nvidia/cuda \
      --command="nvidia-smi" \
      --framework_capabilities="GPU_RESOURCES" \
      --resources="gpus:1"
If all goes well, you should see something like the following in the
stdout out of your task.
+------------------------------------------------------+
| NVIDIA-SMI 352.79     Driver Version: 352.79         |
|-------------------------------+----------------------+----------------------+
| GPU  Name        Persistence-M| Bus-Id        Disp.A | Volatile Uncorr. ECC |
| Fan  Temp  Perf  Pwr:Usage/Cap|         Memory-Usage | GPU-Util  Compute M. |
|===============================+======================+======================|
|   0  Tesla M60           Off  | 0000:04:00.0     Off |                    0 |
| N/A   34C    P0    39W / 150W |     34MiB /  7679MiB |      0%      Default |
+-------------------------------+----------------------+----------------------+
External Dependencies
Any host running a Mesos agent with Nvidia GPU support MUST have a valid Nvidia kernel driver installed. It is also highly recommended to install the corresponding user-level libraries and tools available as part of the Nvidia CUDA toolkit. Many jobs that use Nvidia GPUs rely on CUDA and not including it will severely limit the type of GPU-aware jobs you can run on Mesos.
Note: The minimum supported version of CUDA is 6.5.
Installing the Required Tools
The Nvidia kernel driver can be downloaded at the link below. Make sure to choose the proper model of GPU, operating system, and CUDA toolkit you plan to install on your host:
http://www.nvidia.com/Download/index.aspx
Unfortunately, most Linux distributions come preinstalled with an open
source video driver called Nouveau. This driver conflicts with the
Nvidia driver we are trying to install. The following guides may prove
useful to help guide you through the process of uninstalling Nouveau
before installing the Nvidia driver on CentOS or Ubuntu.
http://www.dedoimedo.com/computers/centos-7-nvidia.html
http://www.allaboutlinux.eu/remove-nouveau-and-install-nvidia-driver-in-ubuntu-15-04/
After installing the Nvidia kernel driver, you can follow the instructions in the link below to install the Nvidia CUDA toolkit:
http://docs.nvidia.com/cuda/cuda-getting-started-guide-for-linux/
In addition to the steps listed in the link above, it is highly
recommended to add CUDA's lib directory into your ldcache so that
tasks launched by Mesos will know where these libraries exist and link
with them properly.
sudo bash -c "cat > /etc/ld.so.conf.d/cuda-lib64.conf << EOF
/usr/local/cuda/lib64
EOF"

sudo ldconfig
If you choose not to add CUDAs lib directory to your ldcache,
you MUST add it to every task's LD_LIBRARY_PATH that requires
it.
Note: This is not the recommended method. You have been warned.
Verifying the Installation
Once the kernel driver has been installed, you can make sure
everything is working by trying to run the bundled nvidia-smi tool.
nvidia-smi
You should see output similar to the following:
Thu Apr 14 11:58:17 2016
+------------------------------------------------------+
| NVIDIA-SMI 352.79     Driver Version: 352.79         |
|-------------------------------+----------------------+----------------------+
| GPU  Name        Persistence-M| Bus-Id        Disp.A | Volatile Uncorr. ECC |
| Fan  Temp  Perf  Pwr:Usage/Cap|         Memory-Usage | GPU-Util  Compute M. |
|===============================+======================+======================|
|   0  Tesla M60           Off  | 0000:04:00.0     Off |                    0 |
| N/A   34C    P0    39W / 150W |     34MiB /  7679MiB |      0%      Default |
+-------------------------------+----------------------+----------------------+
|   1  Tesla M60           Off  | 0000:05:00.0     Off |                    0 |
| N/A   35C    P0    39W / 150W |     34MiB /  7679MiB |      0%      Default |
+-------------------------------+----------------------+----------------------+
|   2  Tesla M60           Off  | 0000:83:00.0     Off |                    0 |
| N/A   38C    P0    38W / 150W |     34MiB /  7679MiB |      0%      Default |
+-------------------------------+----------------------+----------------------+
|   3  Tesla M60           Off  | 0000:84:00.0     Off |                    0 |
| N/A   34C    P0    38W / 150W |     34MiB /  7679MiB |     99%      Default |
+-------------------------------+----------------------+----------------------+

+-----------------------------------------------------------------------------+
| Processes:                                                       GPU Memory |
|  GPU       PID  Type  Process name                               Usage      |
|=============================================================================|
|  No running processes found                                                 |
+-----------------------------------------------------------------------------+
To verify your CUDA installation, it is recommended to go through the instructions at the link below:
http://docs.nvidia.com/cuda/cuda-getting-started-guide-for-linux/#install-samples
Finally, you should get a developer to run Mesos's Nvidia GPU-related unit tests on your machine to ensure that everything passes (as described below).
Running Mesos Unit Tests
At the time of this writing, the following Nvidia GPU specific unit tests exist on Mesos:
DockerTest.ROOT_DOCKER_NVIDIA_GPU_DeviceAllow
DockerTest.ROOT_DOCKER_NVIDIA_GPU_InspectDevices
NvidiaGpuTest.ROOT_CGROUPS_NVIDIA_GPU_VerifyDeviceAccess
NvidiaGpuTest.ROOT_INTERNET_CURL_CGROUPS_NVIDIA_GPU_NvidiaDockerImage
NvidiaGpuTest.ROOT_CGROUPS_NVIDIA_GPU_FractionalResources
NvidiaGpuTest.NVIDIA_GPU_Discovery
NvidiaGpuTest.ROOT_CGROUPS_NVIDIA_GPU_FlagValidation
NvidiaGpuTest.NVIDIA_GPU_Allocator
NvidiaGpuTest.ROOT_NVIDIA_GPU_VolumeCreation
NvidiaGpuTest.ROOT_NVIDIA_GPU_VolumeShouldInject)
The capitalized words following the '.' specify test filters to
apply when running the unit tests. In our case the filters that apply
are ROOT, CGROUPS, and NVIDIA_GPU. This means that these tests
must be run as root on Linux machines with cgroups support that
have Nvidia GPUs installed on them. The check to verify that Nvidia
GPUs exist is to look for the existence of the Nvidia System
Management Interface (nvidia-smi) on the machine where the tests are
being run. This binary should already be installed if the instructions
above have been followed correctly.
So long as these filters are satisfied, you can run the following to execute these unit tests:
[mesos]$ GTEST_FILTER="" make -j check
[mesos]$ sudo bin/mesos-tests.sh --gtest_filter="*NVIDIA_GPU*"
title: Apache Mesos - Sandbox layout: documentation
Mesos "Sandbox"
Mesos refers to the "sandbox" as a temporary directory that holds files specific to a single executor. Each time an executor is run, the executor is given its own sandbox and the executor's working directory is set to the sandbox.
Sandbox files
The sandbox holds:
- Files fetched by Mesos, prior to starting the executor's tasks.
- The output of the executor and tasks (as files "stdout" and "stderr").
- Files created by the executor and tasks, with some exceptions.
NOTE: With the introduction of persistent volumes, executors and tasks should never create files outside of the sandbox. However, some containerizers do not enforce this sandboxing.
Where is the sandbox?
The sandbox is located within the agent's working directory (which is specified
via the --work_dir flag). To find a particular executor's sandbox, you must
know the agent's ID, the executor's framework's ID, and the executor's ID.
Each run of the executor will have a corresponding sandbox, denoted by a
container ID.
The sandbox is located on the agent, inside a directory tree like the following:
root ('--work_dir')
|-- slaves
|   |-- latest (symlink)
|   |-- <agent ID>
|       |-- frameworks
|           |-- <framework ID>
|               |-- executors
|                   |-- <executor ID>
|                       |-- runs
|                           |-- latest (symlink)
|                           |-- <container ID> (Sandbox!)
Using the sandbox
NOTE: For anything other than Mesos, the executor, or the task(s), the sandbox should be considered a read-only directory. This is not enforced via permissions, but the executor/tasks may malfunction if the sandbox is mutated unexpectedly.
Via a file browser
If you have access to the machine running the agent, you can navigate to the sandbox directory directly.
Via the Mesos web UI
Sandboxes can be browsed and downloaded via the Mesos web UI. Tasks and executors will be shown with a "Sandbox" link. Any files that live in the sandbox will appear in the web UI.
Via the /files endpoint
Underneath the web UI, the files are fetched from the agent via the /files
endpoint running on the agent.
| Endpoint | Description |
|---|---|
/files/browse?path=...
|
Returns a JSON list of files and directories contained in the path.
Each list is a JSON object containing all the fields normally found in
ls -l.
|
/files/debug
|
Returns a JSON object holding the internal mapping of files managed by this endpoint. This endpoint can be used to quickly fetch the paths of all files exposed on the agent. |
/files/download?path=...
|
Returns the raw contents of the file located at the given path.
Where the file extension is understood, the Content-Type
header will be set appropriately.
|
/files/read?path=...
|
Reads a chunk of the file located at the given path and returns a JSON
object containing the read "data" and the
"offset" in bytes.
Optional query parameters:
|
Sandbox size
The maximum size of the sandbox is dependent on the containerization of the executor and isolators:
- Mesos containerizer - For backwards compatibility, the Mesos containerizer
does not enforce a container's disk quota by default. However, if the
--enforce_container_disk_quotaflag is enabled on the agent, anddisk/duis specified in the--isolationflag, the executor will be killed if the sandbox size exceeds the executor'sdiskresource. - Docker containerizer - As of Docker
1.9.1, the Docker containerizer does not enforce nor support a disk quota. See the Docker issue.
Sandbox lifecycle
Sandbox files are scheduled for garbage collection when:
- An executor is removed or terminated.
- A framework is removed.
- An executor is recovered unsuccessfully during agent recovery.
- If the
--gc_non_executor_container_sandboxesagent flag is enabled, nested container sandboxes will also be garbage collected when the container exits.
NOTE: During agent recovery, all of the executor's runs, except for the latest run, are scheduled for garbage collection as well.
Garbage collection is scheduled based on the --gc_delay agent flag. By
default, this is one week since the sandbox was last modified.
After the delay, the files are deleted.
Additionally, according to the --disk_watch_interval agent flag, files
scheduled for garbage collection are pruned based on the available disk and
the --gc_disk_headroom agent flag.
See the formula here.
Container Volumes
For each volume a container specifies (i.e., ContainerInfo.volumes),
the following fields must be specified:
-
container_path: Path in the container filesystem at which the volume will be mounted. If the path is a relative path, it is relative to the container's sandbox. -
mode: If the volume is read-only or read-write. -
source: Describe where the volume originates from. See more details in the following section.
Volume Source Types
HOST_PATH Volume Source
This volume source represents a path on the host filesystem. The path can either point to a directory or a file (either a regular file or a device file).
The following example shows a HOST_PATH volume that mounts
/var/lib/mysql on the host filesystem to the same location in the
container.
{
  "container_path": "/var/lib/mysql",
  "mode": "RW",
  "source": {
    "type": "HOST_PATH",
    "host_path": {
      "path": "/var/lib/mysql"
    }
  }
}
The mode and ownership of the volume will be the same as that on the host filesystem.
If you are using the Mesos Containerizer,
HOST_PATH volumes are handled by the volume/host_path isolator. To
enable this isolator, append volume/host_path to the --isolation
flag when starting the agent. This isolator depends on the
filesystem/linux
isolator.
Docker Containerizer supports HOST_PATH
volume as well.
SANDBOX_PATH Volume Source
There are currently two types of SANDBOX_PATH volume sources:
SELF and PARENT.
If you are using Mesos Containerizer,
SANDBOX_PATH volumes are handled by the volume/sandbox_path
isolator. To enable this isolator, append volume/sandbox_path to
the --isolation flag when starting the agent.
The Docker Containerizer only supports
SELF type SANDBOX_PATH volumes currently.
SELF Type
This represents a path in the container's own sandbox. The path can point to either a directory or a file in the sandbox of the container.
The following example shows a SANDBOX_PATH volume from the
container's own sandbox that mount the subdirectory tmp in the
sandbox to /tmp in the container root filesystem. This will be
useful to cap the /tmp usage in the container (if disk isolator is
used and --enforce_container_disk_quota is turned on).
{
  "container_path": "/tmp",
  "mode": "RW",
  "source": {
    "type": "SANDBOX_PATH",
    "sandbox_path": {
      "type": "SELF",
      "path": "tmp"
    }
  }
}
The ownership of the volume will be the same as that of the sandbox of the container.
Note that container_path has to be an absolute path in this case. If
container_path is relative, that means it's a volume from a
subdirectory in the container sandbox to another subdirectory in the
container sandbox. In that case, the user can just create a symlink,
instead of using a volume.
PARENT Type
This represents a path in the sandbox of the parent container. The path can point to either a directory or a file in the sandbox of the parent container. See the nested container doc for more details about what a parent container is.
The following example shows a SANDBOX_PATH volume from the sandbox
of the parent container that mounts the subdirectory shared_volume in
the sandbox of the parent container to subdirectory volume in the
sandbox of the container.
{
  "container_path": "volume",
  "mode": "RW",
  "source": {
    "type": "SANDBOX_PATH",
    "sandbox_path": {
      "type": "PARENT",
      "path": "shared_volume"
    }
  }
}
The ownership of the volume will be the same as that of the sandbox of the parent container.
DOCKER_VOLUME Volume Source
See more details in this doc.
SECRET Volume Source
See more details in this doc.
title: Apache Mesos - Mesos Nested Container and Task Group layout: documentation
Overview
Motivation
A pod can be defined as a set of containers co-located and co-managed on an agent that share some resources (e.g., network namespace, volumes) but not others (e.g., container image, resource limits). Here are the use cases for pod:
- Run a side-car container (e.g., logger, backup) next to the main application controller.
- Run an adapter container (e.g., metrics endpoint, queue consumer) next to the main container.
- Run transient tasks inside a pod for operations which are short-lived and whose exit does not imply that a pod should exit (e.g., a task which backs up data in a persistent volume).
- Provide performance isolation between latency-critical application and supporting processes.
- Run a group of containers sharing volumes and network namespace while some of them can have their own mount namespace.
- Run a group of containers with the same life cycle, e.g, one container's failure would cause all other containers being cleaned up.
In order to have first class support for running "pods", two new
primitives are introduced in Mesos: Task Group and Nested Container.
Background
Mesos has the concept of Executors and Tasks. An executor can launch multiple tasks while the executor runs in a container. An agent can run multiple executors. The pod can be implemented by leveraging the executor and task abstractions. More specifically, the executor runs in the top level container (called executor container) and its tasks run in separate nested containers inside this top level container, while the container image can be specified for each container.
Task Groups
The concept of a "task group" addresses a previous limitation of the scheduler and executor APIs, which could not send a group of tasks to an executor atomically. Even though a scheduler can launch multiple tasks for the same executor in a LAUNCH operation, these tasks are delivered to the executor one at a time via separate LAUNCH events. It cannot guarantee atomicity since any individual task might be dropped due to different reasons (e.g., network partition). Therefore, the task group provides all-or-nothing semantics to ensure a group of tasks are delivered atomically to an executor.
Nested Containers
The concept of a "nested container" describes containers nested under an executor container. In the typical case of a Linux agent, they share a network namespace and volumes so that they can communicate using the network and access the same data, though they may have their own container images and resource limits. On Linux, they may share cgroups or have their own - see the section below on resource limits for more information.
With the agent nested container API, executors can utilize the containerizer in the agent to launch nested containers. Both authorized operators or executors will be allowed to create nested containers. The Mesos default executor makes use of this API when launching tasks, and custom executors may consume it as well.
Resource Requests and Limits
In each task, the resources required by that task can be specified. Common
resource types are cpus, mem, and disk. The resources listed in the
resources field are known as resource "requests" and represent the minimum
resource guarantee required by the task; these resources are used to set the
cgroups of the nested container associated with the task and will always be
available to the task process if they are needed. The quantities specified in
the limits field are the resource "limits", which represent the maximum amount
of cpus and/or mem that the task may use. Setting a CPU or memory limit
higher than the corresponding request allows the task to consume more than its
allocated amount of CPU or memory when there are unused resources available on
the agent.
When multiple nested containers run under a single executor, the enforcement
of resource constraints depends on the value of the
container.linux_info.share_cgroups field. When this boolean field is true
(this is the default), each container is constrained by the cgroups of its
parent container. This means that if multiple tasks run underneath one executor,
their resource constraints will be enforced as a sum of all the task resource
constraints, applied collectively to those task processes. In this case, nested
container resource consumption is collectively managed via one set of cgroup
subsystem control files associated with the parent executor container.
When the share_cgroups field is set to false, the resource consumption of
each task is managed via a unique set of cgroups associated with that task's
nested container, which means that each task process is subject to its own
resource requests and limits. Note that if you want to specify limits on a
task, the task's container MUST set share_cgroups to false. Also note that
all nested containers under a single executor container must share the same
value of share_cgroups.
Note that when a task sets a memory limit higher than its memory request, the Mesos agent will change the OOM score adjustment of the task process using a heuristic based on the task's memory request and the agent's memory capacity. This means that if the agent's memory becomes exhausted and processes must be OOM-killed to reclaim memory at a time when the task is consuming more than its memory request, the task process will be killed preferentially.
Task Group API
Framework API
message TaskGroupInfo {
  repeated TaskInfo tasks = 1;
}

message Offer {
  ...

  message Operation {
    enum Type {
      ...
      LAUNCH_GROUP = 6;
      ...
    }
    ...

    message LaunchGroup {
      required ExecutorInfo executor = 1;
      required TaskGroupInfo task_group = 2;
    }
    ...

    optional LaunchGroup launch_group = 7;
  }
}
By using the TaskGroup Framework API, frameworks can launch a task
group with the default executor
or a custom executor. The group of tasks can be specified through an
offer operation LaunchGroup when accepting an offer. The
ExecutorInfo indicates the executor to launch the task group, while
the TaskGroupInfo includes the group of tasks to be launched
atomically.
To use the default executor for launching the task group, the framework should:
- Set
ExecutorInfo.typeasDEFAULT. - Set
ExecutorInfo.resourcesfor the resources needed for the executor.
Please note that the following fields in the ExecutorInfo are not allowed to set when using the default executor:
ExecutorInfo.command.ExecutorInfo.container.type,ExecutorInfo.container.dockerandExecutorInfo.container.mesos.
To allow containers to share a network namespace:
- Set
ExecutorInfo.container.network.
To allow containers to share an ephemeral volume:
- Specify the
volume/sandbox_pathisolator. - Set
TaskGroupInfo.tasks.container.volumes.source.typeasSANDBOX_PATH. - Set
TaskGroupInfo.tasks.container.volumes.source.sandbox_path.typeasPARENTand the path relative to the parent container's sandbox.
Executor API
message Event {
  enum Type {
    ...
    LAUNCH_GROUP = 8;
    ...
  }
  ...

  message LaunchGroup {
    required TaskGroupInfo task_group = 1;
  }
  ...

  optional LaunchGroup launch_group = 8;
}
A new event LAUNCH_GROUP is added to Executor API. Similar to the
Framework API, the LAUNCH_GROUP event guarantees a group of tasks
are delivered to the executor atomically.
Nested Container API
New Agent API
package mesos.agent;

message Call {
  enum Type {
    ...
    // Calls for managing nested containers underneath an executor's container.
    NESTED_CONTAINER_LAUNCH = 14;  // See 'NestedContainerLaunch' below.
    NESTED_CONTAINER_WAIT = 15;    // See 'NestedContainerWait' below.
    NESTED_CONTAINER_KILL = 16;    // See 'NestedContainerKill' below.
  }

  // Launches a nested container within an executor's tree of containers.
  message LaunchNestedContainer {
    required ContainerID container_id = 1;
    optional CommandInfo command = 2;
    optional ContainerInfo container = 3;
  }

  // Waits for the nested container to terminate and receives the exit status.
  message WaitNestedContainer {
    required ContainerID container_id = 1;
  }

  // Kills the nested container. Currently only supports SIGKILL.
  message KillNestedContainer {
    required ContainerID container_id = 1;
  }

  optional Type type = 1;
  ...
  optional NestedContainerLaunch nested_container_launch = 6;
  optional NestedContainerWait nested_container_wait = 7;
  optional NestedContainerKill nested_container_kill = 8;
}

message Response {
  enum Type {
    ...
    NESTED_CONTAINER_WAIT = 13;    // See 'NestedContainerWait' below.
  }

  // Returns termination information about the nested container.
  message NestedContainerWait {
    optional int32 exit_status = 1;
  }

  optional Type type = 1;
  ...
  optional NestedContainerWait nested_container_wait = 14;
}
By adding the new Agent API, any authorized entity, including the executor itself, its tasks, or the operator can use this API to launch/wait/kill nested containers. Multi-level nesting is supported by using this API. Technically, the nested level is up to 32 since it is limited by the maximum depth of pid namespace and user namespace from the Linux Kernel.
The following is the workflow of how the new Agent API works:
-
The executor sends a
NESTED_CONTAINER_LAUNCHcall to the agent.+---------------------+ | | | Container | | | +-------------+ | +-----------------+ | | | LAUNCH | | | | | | <------------+ | | Executor | | | | | | | | | Mesos Agent | | +-----------------+ | | | | | | | | | | | | | +-------------+ | | +---------------------+ -
Depending on the
LaunchNestedContainerfrom the executor, the agent launches a nested container inside of the executor container by callingcontainerizer::launch().+---------------------+ | | | Container | | | +-------------+ | +-----------------+ | | | LAUNCH | | | | | | <------------+ | | Executor | | | | | | | | | Mesos Agent | | +-----------------+ | | | | | | | | +---------+ | | | +------------> | |Nested | | +-------------+ | |Container| | | +---------+ | +---------------------+ -
The executor sends a
NESTED_CONTAINER_WAITcall to the agent.+---------------------+ | | | Container | | | +-------------+ | +-----------------+ | | | WAIT | | | | | | <------------+ | | Executor | | | | | | | | | Mesos Agent | | +-----------------+ | | | | | | | | +---------+ | | | | |Nested | | +-------------+ | |Container| | | +---------+ | +---------------------+ -
Depending on the
ContainerID, the agent callscontainerizer::wait()to wait for the nested container to terminate or exit. Once the container terminates or exits, the agent returns the container exit status to the executor.+---------------------+ | | | Container | | | +-------------+ WAIT | +-----------------+ | | | <------------+ | | | | | | | | Executor | | | | +------------> | | | | | Mesos Agent | Exited with | +-----------------+ | | | status 0 | | | | | +--XX-XX--+ | | | | | XXX | | +-------------+ | | XXX | | | +--XX-XX--+ | +---------------------+
Future Work
- Authentication and authorization on the new Agent API.
- Command health checks inside of the container's mount namespace.
- Resource isolation for nested containers.
- Resource statistics reporting for nested containers.
- Multiple task groups.
Reference
title: Apache Mesos - Standalone Containers layout: documentation
Standalone Containers
Traditionally, launching a container in a Mesos cluster involves communication between multiple components:
                                                 Container(s)
  +-----------+     +--------+     +-------+     +----------+
  | Framework | <-> | Master | <-> | Agent | <-> | Executor |
  +-----------+     +--------+     +-------+     |  `->Task |
                         ^                       +----------+
                         |         +-------+     +----------+
                         +------>  | Agent | <-> | Executor |
                         |         +-------+     |  `->Task |
                        ...                      +----------+
Mesos 1.5 introduced "Standalone Containers", which provide an alternate path for launching containers with a reduced scope and feature set:
                   +-------+    +----------------------+
  Operator API <-> | Agent | -> | Standalone Container |
                   +-------+    +----------------------+
NOTE: Agents currently require a connection to a Mesos master in order to accept any Operator API calls. This limitation is not necessary and may be fixed in future.
NOTE: Standalone containers only apply to the Mesos containerizer. For standalone docker containers, use docker directly.
As hinted by the diagrams, standalone containers are launched on single Agents, rather than cluster-wide. This document describes the major differences between normal containers and standalone containers; and provides some examples of how to use the new Operator APIs.
Launching a Standalone Container
Because standalone containers are launched directly on Mesos Agents, these containers do not participate in the Mesos Master's offer cycle. This means standalone containers can be launched regardless of resource allocation and can potentially overcommit the Mesos Agent, but cannot use reserved resources.
An Operator API might look like this:
LAUNCH_CONTAINER HTTP Request (JSON):

POST /api/v1  HTTP/1.1

Host: agenthost:5051
Content-Type: application/json

{
  "type": "LAUNCH_CONTAINER",
  "launch_container": {
    "container_id": {
      "value": "my-standalone-container-id"
    },
    "command": {
      "value": "sleep 100"
    },
    "resources": [
      {
        "name": "cpus",
        "scalar": { "value": 2.0 },
        "type": "SCALAR"
      },
      {
        "name": "mem",
        "scalar": { "value": 1024.0 },
        "type": "SCALAR"
      },
      {
        "name": "disk",
        "scalar": { "value": 1024.0 },
        "type": "SCALAR"
      }
    ],
    "container": {
      "type": "MESOS",
      "mesos": {
        "image": {
          "type": "DOCKER",
          "docker": {
            "name": "alpine"
          }
        }
      }
    }
  }
}
The Agent will return:
- 200 OK if the launch succeeds, including fetching any container images or URIs specified in the launch command.
- 202 Accepted if the specified ContainerID is already in use by a running container.
- 400 Bad Request if the launch fails for any reason.
NOTE: Nested containers share the same Operator API. To launch a nested container, the ContainerID needs to have a parent; and no resources may be specified in the request.
Monitoring a Standalone Container
Standalone containers are not managed by a framework, do not use executors, and therefore do not have status updates. They are not automatically relaunched upon completion/failure.
After launching a standalone container, the operator should monitor the
container via the WAIT_CONTAINER call:
WAIT_CONTAINER HTTP Request (JSON):

POST /api/v1  HTTP/1.1

Host: agenthost:5051
Content-Type: application/json
Accept: application/json

{
  "type": "WAIT_CONTAINER",
  "wait_container": {
    "container_id": {
      "value": "my-standalone-container-id"
    }
  }
}

WAIT_CONTAINER HTTP Response (JSON):

HTTP/1.1 200 OK

Content-Type: application/json

{
  "type": "WAIT_CONTAINER",
  "wait_container": {
    "exit_status": 0
  }
}
This is a blocking HTTP call that only returns after the container has exited.
If the specified ContainerID does not exist, the call returns a 404.
Killing a Standalone Container
A standalone container can be signalled (usually to kill it) via this API:
KILL_CONTAINER HTTP Request (JSON):

POST /api/v1  HTTP/1.1

Host: agenthost:5051
Content-Type: application/json

{
  "type": "KILL_CONTAINER",
  "kill_container": {
    "container_id": {
      "value": "my-standalone-container-id"
    }
  }
}

KILL_CONTAINER HTTP Response (JSON):

HTTP/1.1 200 OK
If the specified ContainerID does not exist, the call returns a 404.
Cleaning up a Standalone Container
Unlike other containers, a standalone container's sandbox is not garbage collected by the Agent after some time (like other sandbox directories). The Agent is unable to garbage collect these containers because there is no status update mechanism to report the exit status of the container.
Standalone container sandboxes must be manually cleaned up by the operator and
are located in the agent's work directory under
/containers/<my-standalone-container-id>.
Networking support in Mesos
Table of contents
Introduction
Mesos supports two container runtime engines, the MesosContainerizer
and the DockerContainerizer. Both the container run time engines
provide IP-per-container support allowing containers to be attached to
different types of IP networks. However, the two container run time
engines differ in the way IP-per-container support is implemented. The
MesosContainerizer uses the network/cni isolator to implement the
Container Network Interface (CNI)
to provide networking support for Mesos containers, while the
DockerContainerizer relies on the Docker daemon to provide
networking support using Docker's Container Network
Model.
Note that while IP-per-container is one way to achieve network
isolation between containers, there are other alternatives to
implement network isolation within MesosContainerizer, e.g., using
the port-mapping network isolator.
While the two container run-time engines use different mechanisms to provide networking support for containers, the interface to specify the network that a container needs to join, and the interface to retrieve networking information for a container remain the same.
The NetworkInfo protobuf, described below, is the interface provided
by Mesos to specify network related information for a container and to
learn network information associated with a container.
message NetworkInfo {
  enum Protocol {
    IPv4 = 1;
    IPv6 = 2;
  }

  message IPAddress {
    optional Protocol protocol = 1;
    optional string ip_address = 2;
  }

  repeated IPAddress ip_addresses = 5;
  optional string name = 6;
  repeated string groups = 3;
  optional Labels labels = 4;
};
This document describes the usage of the NetworkInfo protobuf, by
frameworks, to attach containers to IP networks. It also describes the
interfaces provided to retrieve IP address and other network related
information for a container, once the container has been attached to
an IP network.
Attaching containers to IP networks
Mesos containerizer
MesosContainerizer has the network/cni isolator enabled
by default, which implements CNI (Container Network Interface). The
network/cni isolator identifies CNI networks by using canonical
names. When frameworks want to associate containers to a specific CNI
network they specify a network name in the name field of the NetworkInfo protobuf. Details about the configuration and interaction
of Mesos containers with CNI networks can be found in the
documentation describing "CNI support for Mesos containers".
Docker containerizer
Starting docker 1.9, there are four networking modes available in
Docker: NONE, HOST, BRIDGE and USER. "Docker container
networks"
provides more details about the various networking modes available in
docker. Mesos supports all the four networking modes provided by
Docker. To connect a docker container using a specific mode the
framework needs to specify the network mode in the DockerInfo
protobuf.
message DockerInfo {
  // The docker image that is going to be passed to the registry.
  required string image = 1;

  // Network options.
  enum Network {
    HOST = 1;
    BRIDGE = 2;
    NONE = 3;
    USER = 4;
  }

  optional Network network = 2 [default = HOST];
 };
For NONE, HOST, and BRIDGE network mode the framework only needs
to specify the network mode in the DockerInfo protobuf. To use other
networks, such as MACVLAN on Linux, TRANSPARENT and L2BRIDGE on
Windows, or any other user-defined network, the network needs to be
created beforehand and the USER network mode needs to be chosen. For
the USER mode, since a user-defined docker network is identified by a
canonical network name (similar to CNI networks) apart from setting the
network mode in DockerInfo the framework also needs to specify the
name field in the NetworkInfo protobuf corresponding to the name of
the user-defined docker network.
Note that on Windows, the HOST network mode is not supported. Although the
BRIDGE network mode does not exist on Windows, it has an equivalent mode
called NAT, so on Windows agents, the BRIDGE mode will be interpretted as
NAT. If the network mode is not specified, then the default mode will be
chosen, which is HOST on Linux and NAT on Windows.
Limitations of Docker containerizer
One limitation that the DockerContainerizer imposes on the
containers using the USER network mode is that these containers cannot
be attached to multiple docker networks. The reason this limitation
exists is that to connect a container to multiple Docker networks,
Docker requires the container to be created first and then attached to
the different networks. This model of orchestration does not fit the
current implementation of the DockerContainerizer and hence the
restriction of limiting docker container to a single network.
Retrieving network information for a container
Whenever a task runs on a Mesos agent, the executor associated with
the task returns a TaskStatus protobuf associated with the task.
Containerizers (Mesos or Docker) responsible for the container will
populate the ContainerStatus protobuf associated with the
TaskStatus. The ContainerStatus will contain multiple
NetworkInfo protobuf instances, one each for the interfaces
associated with the container. Any IP address associated with the
container will be reflected in the NetworkInfo protobuf instances.
The TaskStatus associated with each task can be accessed at the
Agent's state endpoint on which the task is running or it can be
accessed in the Master's state endpoint.
title: Apache Mesos - Networking for Mesos-Managed Containers layout: documentation
Networking for Mesos-Managed Containers
While networking plays a key role in data center infrastructure, it is -- for now -- beyond the scope of Mesos to try to address the concerns of networking setup, topology and performance. However, Mesos can ease integrations with existing networking solutions and enable features, like IP per container, task-granular task isolation and service discovery. More often than not, it will be challenging to provide a one-size-fits-all networking solution. The requirements and available solutions will vary across all cloud-only, on-premise, and hybrid deployments.
One of the primary goals for the networking support in Mesos was to have a pluggable mechanism to allow users to enable custom networking solution as needed. As a result, several extensions were added to Mesos components in version 0.25.0 to enable networking support. Further, all the extensions are opt-in to allow older frameworks and applications without networking support to coexist with the newer ones.
The rest of this document describes the overall architecture of all the involved components, configuration steps for enabling IP-per-container, and required framework changes.
How does it work?
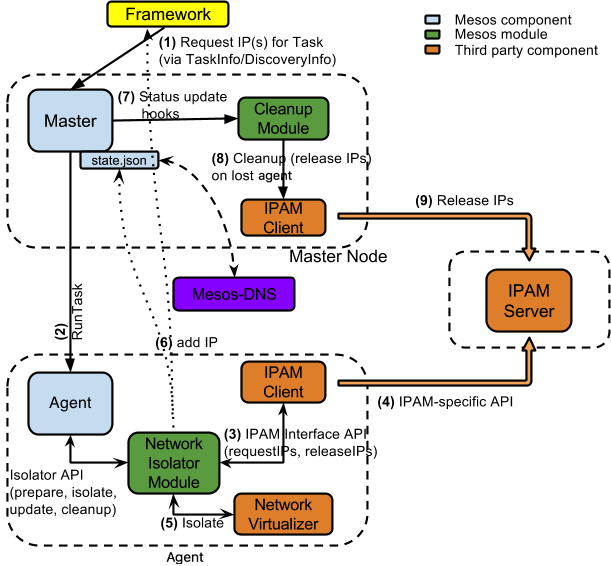
A key observation is that the networking support is enabled via a Mesos module and thus the Mesos master and agents are completely oblivious of it. It is completely up to the networking module to provide the desired support. Next, the IP requests are provided on a best effort manner. Thus, the framework should be willing to handle ignored (in cases where the module(s) are not present) or declined (the IPs can't be assigned due to various reasons) requests.
To maximize backwards-compatibility with existing frameworks, schedulers must opt-in to network isolation per-container. Schedulers opt in to network isolation using new data structures in the TaskInfo message.
Terminology
-
IP Address Management (IPAM) Server
- assigns IPs on demand
- recycles IPs once they have been released
- (optionally) can tag IPs with a given string/id.
-
IPAM client
- tightly coupled with a particular IPAM server
- acts as a bridge between the "Network Isolator Module" and the IPAM server
- communicates with the server to request/release IPs
-
Network Isolator Module (NIM):
- a Mesos module for the Agent implementing the
Isolatorinterface - looks at TaskInfos to detect the IP requirements for the tasks
- communicates with the IPAM client to request/release IPs
- communicates with an external network virtualizer/isolator to enable network isolation
- a Mesos module for the Agent implementing the
-
Cleanup Module:
- responsible for doing a cleanup (releasing IPs, etc.) during an Agent lost event, dormant otherwise
Framework requests IP address for containers
-
A Mesos framework uses the TaskInfo message to requests IPs for each container being launched. (The request is ignored if the Mesos cluster doesn't have support for IP-per-container.)
-
Mesos Master processes TaskInfos and forwards them to the Agent for launching tasks.
Network isolator module gets IP from IPAM server
-
Mesos Agent inspects the TaskInfo to detect the container requirements (MesosContainerizer in this case) and prepares various Isolators for the to-be-launched container.
- The NIM inspects the TaskInfo to decide whether to enable network isolator or not.
-
If network isolator is to be enabled, NIM requests IP address(es) via IPAM client and informs the Agent.
Agent launches container with a network namespace
- The Agent launches a container within a new network namespace.
- The Agent calls into NIM to perform "isolation"
- The NIM then calls into network virtualizer to isolate the container.
Network virtualizer assigns IP address to the container and isolates it.
- NIM then "decorates" the TaskStatus with the IP information.
- The IP address(es) from TaskStatus are made available at Master's /state endpoint.
- The TaskStatus is also forwarded to the framework to inform it of the IP addresses.
- When a task is killed or lost, NIM communicates with IPAM client to release corresponding IP address(es).
Cleanup module detects lost Agents and performs cleanup
-
The cleanup module gets notified if there is an Agent-lost event.
-
The cleanup module communicates with the IPAM client to release all IP address(es) associated with the lost Agent. The IPAM may have a grace period before the address(es) are recycled.
Configuration
The network isolator module is not part of standard Mesos distribution. However, there is an example implementation at https://github.com/mesosphere/net-modules.
Once the network isolation module has been built into a shared dynamic library, we can load it into Mesos Agent (see modules documentation on instructions for building and loading a module).
Enabling frameworks for IP-per-container capability
NetworkInfo
A new NetworkInfo message has been introduced:
message NetworkInfo {
  enum Protocol {
    IPv4 = 1;
    IPv6 = 2;
  }

  message IPAddress {
    optional Protocol protocol = 1;

    optional string ip_address = 2;
  }

  repeated IPAddress ip_addresses = 5;

  optional string name = 6;

  optional Protocol protocol = 1 [deprecated = true]; // Since 0.26.0

  optional string ip_address = 2 [deprecated = true]; // Since 0.26.0

  repeated string groups = 3;

  optional Labels labels = 4;
};
When requesting an IP address from the IPAM, one needs to set the protocol
field to IPv4 or IPv6. Setting ip_address to a valid IP address allows the
framework to specify a static IP address for the container (if supported by the
NIM). This is helpful in situations where a task must be bound to a particular
IP address even as it is killed and restarted on a different node.
Setting name to a valid network name allows the framework to specify a network
for the container to join, it is up to the network isolator to decide how to
interpret this field, e.g., network/cni isolator will interpret it as the name
of a CNI network.
Examples of specifying network requirements
Frameworks wanting to enable IP per container, need to provide NetworkInfo
message in TaskInfo. Here are a few examples:
-
A request for one address of unspecified protocol version using the default command executor
TaskInfo { ... command: ..., container: ContainerInfo { network_infos: [ NetworkInfo { ip_addresses: [ IPAddress { protocol: None; ip_address: None; } ] groups: []; labels: None; } ] } } -
A request for one IPv4 and one IPv6 address, in two groups using the default command executor
TaskInfo { ... command: ..., container: ContainerInfo { network_infos: [ NetworkInfo { ip_addresses: [ IPAddress { protocol: IPv4; ip_address: None; }, IPAddress { protocol: IPv6; ip_address: None; } ] groups: ["dev", "test"]; labels: None; } ] } } -
A request for two network interfaces, each with one IP address, each in a different network group using the default command executor
TaskInfo { ... command: ..., container: ContainerInfo { network_infos: [ NetworkInfo { ip_addresses: [ IPAddress { protocol: None; ip_address: None; } ] groups: ["foo"]; labels: None; }, NetworkInfo { ip_addresses: [ IPAddress { protocol: None; ip_address: None; } ] groups: ["bar"]; labels: None; }, ] } } -
A request for a specific IP address using a custom executor
TaskInfo { ... executor: ExecutorInfo { ..., container: ContainerInfo { network_infos: [ NetworkInfo { ip_addresses: [ IPAddress { protocol: None; ip_address: "10.1.2.3"; } ] groups: []; labels: None; } ] } } } -
A request for joining a specific network using the default command executor
TaskInfo {
  ...
  command: ...,
  container: ContainerInfo {
    network_infos: [
      NetworkInfo {
        name: "network1";
      }
    ]
  }
}
NOTE: The Mesos Containerizer will reject any CommandInfo that has a ContainerInfo. For this reason, when opting in to network isolation when using the Mesos Containerizer, set TaskInfo.ContainerInfo.NetworkInfo.
Address Discovery
The NetworkInfo message allows frameworks to request IP address(es) to be assigned at task launch time on the Mesos agent. After opting in to network isolation for a given executor's container in this way, frameworks will need to know what address(es) were ultimately assigned in order to perform health checks, or any other out-of-band communication.
This is accomplished by adding a new field to the TaskStatus message.
message ContainerStatus {
   repeated NetworkInfo network_infos;
}

message TaskStatus {
  ...
  optional ContainerStatus container;
  ...
};
Further, the container IP addresses are also exposed via Master's state
endpoint. The JSON output from Master's state endpoint contains a list of task
statuses. If a task's container was started with it's own IP address, the
assigned IP address will be exposed as part of the TASK_RUNNING status.
NOTE: Since per-container address(es) are strictly opt-in from the framework, the framework may ignore the IP address(es) provided in StatusUpdate if it didn't set NetworkInfo in the first place.
Writing a Custom Network Isolator Module
A network isolator module implements the Isolator interface provided by Mesos. The module is loaded as a dynamic shared library in to the Mesos Agent and gets hooked up in the container launch sequence. A network isolator may communicate with external IPAM and network virtualizer tools to fulfill framework requirements.
In terms of the Isolator API, there are three key callbacks that a network isolator module should implement:
-
Isolator::prepare()provides the module with a chance to decide whether or not the enable network isolation for the given task container. If the network isolation is to be enabled, the Isolator::prepare call would inform the Agent to create a private network namespace for the coordinator. It is this interface, that will also generate an IP address (statically or with the help of an external IPAM agent) for the container. -
Isolator::isolate()provide the module with the opportunity to isolate the container after it has been created but before the executor is launched inside the container. This would involve creating virtual ethernet adapter for the container and assigning it an IP address. The module can also use help of an external network virtualizer/isolator for setting up network for the container. -
Isolator::cleanup()is called when the container terminates. This allows the module to perform any cleanups such as recovering resources and releasing IP addresses as needed.
Container Network Interface (CNI) for Mesos Containers
This document describes the network/cni isolator, a network isolator
for the MesosContainerizer that implements
the Container Network Interface
(CNI) specification. The
network/cni isolator allows containers launched using the
MesosContainerizer to be attached to several different types of IP
networks. The network technologies on which containers can possibly
be launched range from traditional layer 3/layer 2 networks such as
VLAN, ipvlan, macvlan, to the new class of networks designed for
container orchestration such as
Calico,
Weave and
Flannel. The
MesosContainerizer has the network/cni isolator enabled by
default.
Table of Contents
Motivation
Having a separate network namespace for each container is attractive for orchestration engines such as Mesos, since it provides containers with network isolation and allows users to operate on containers as if they were operating on an end-host. Without network isolation users have to deal with managing network resources such as TCP/UDP ports on an end host, complicating the design of their application.
The challenge is in implementing the ability in the orchestration
engine to communicate with the underlying network in order to
configure IP connectivity to the container. This problem arises due
to the diversity in terms of the choices of IPAM (IP address
management system) and networking technologies available for enabling
IP connectivity. To solve this problem we would need to adopt a driver
based network orchestration model, where the MesosContainerizer can
offload the business intelligence of configuring IP connectivity to a
container, to network specific drivers.
The Container Network Interface (CNI) is a specification proposed by CoreOS that provides such a driver based model. The specification defines a JSON schema that defines the inputs and outputs expected of a CNI plugin (network driver). The specification also provides a clear separation of concerns for the container run time and the CNI plugin. As per the specification the container run time is expected to configure the namespace for the container, a unique identifier for the container (container ID), and a JSON formatted input to the plugin that defines the configuration parameters for a given network. The responsibility of the plugin is to create a veth pair and attach one of the veth pairs to the network namespace of the container, and the other end to a network understood by the plugin. The CNI specification also allows for multiple networks to exist simultaneously, with each network represented by a canonical name, and associated with a unique CNI configuration. There are already CNI plugins for a variety of networks such as bridge, ipvlan, macvlan, Calico, Weave and Flannel.
Thus, introducing support for CNI in Mesos through the network/cni
isolator provides Mesos with tremendous flexibility to orchestrate
containers on a wide variety of network technologies.
Usage
The network/cni isolator is enabled by default. However, to use the
isolator there are certain actions required by the operator and the
frameworks. In this section we specify the steps required by the
operator to configure CNI networks on Mesos and the steps required by
frameworks to attach containers to a CNI network.
Configuring CNI networks
In order to configure the network/cni isolator the operator
specifies two flags at Agent startup as follows:
sudo mesos-slave --master=<master IP> --ip=<Agent IP>
  --work_dir=/var/lib/mesos
  --network_cni_config_dir=<location of CNI configs>
  --network_cni_plugins_dir=<search path for CNI plugins>
Note that the network/cni isolator learns all the available networks
by looking at the CNI configuration in the --network_cni_config_dir
at startup. This implies that if a new CNI network needs to be added
after Agent startup, the Agent needs to be restarted. The
network/cni isolator has been designed with recover capabilities
and hence restarting the Agent (and therefore the network/cni
isolator) will not affect container orchestration.
Optionally, the operator could specify the
--network_cni_root_dir_persist flag. This flag would allow
network/cni isolator to persist the network related information
across reboot and allow network/cni isolator to carry out network
cleanup post reboot. This is useful for the CNI networks that depend
on the isolator to clean their network state.
Adding/Deleting/Modifying CNI networks
The network/cni isolator learns about all the CNI networks by
reading the CNI configuration specified in --network_cni_config_dir.
Hence, if the operator wants to add a CNI network, the corresponding
configuration needs to be added to --network_cni_config_dir.
While the network/cni isolator learns the CNI networks by reading
the CNI configuration files in --network_cni_config_dir, it does not
keep an in-memory copy of the CNI configurations. The network/cni
isolator only stores a mapping of the CNI network names to the
corresponding CNI configuration files. Whenever the network/cni
isolator needs to attach a container to a CNI network it reads the
corresponding configuration from the disk and invokes the appropriate
plugin with the specified JSON configuration. Though the network/cni
isolator does not keep an in-memory copy of the JSON configuration, it
checkpoints the CNI configuration used to launch a container.
Checkpointing the CNI configuration protects the resources, associated
with the container, by freeing them correctly when the container is
destroyed, even if the CNI configuration is deleted.
The fact that the network/cni isolator always reads the CNI
configurations from the disk allows the operator to dynamically add,
modify and delete CNI configurations without the need to restart the
agent. Whenever the operator modifies an existing CNI configuration,
the agent will pick up this new CNI configuration when the next
container is launched on that specific CNI network. Similarly when the
operator deletes a CNI network the network/cni isolator will
"unlearn" the CNI network (since it will have a reference to this CNI
network when it started) in case a framework tries to launch a
container on the deleted CNI network.
Attaching containers to CNI networks
Frameworks can specify the CNI network to which they want their
containers to be attached by setting the name field in the
NetworkInfo protobuf. The name field was introduced in the
NetworkInfo protobuf as part of
MESOS-4758. Also,
by specifying multiple instances of the NetworkInfo protobuf with
different name in each of the protobuf, the MesosContainerizer
will attach the container to all the different CNI networks specified.
The default behavior for containers is to join the host network, i.e., if the framework does not specify a name in the
NetworkInfo protobuf, the network/cni isolator will be a no-op for
that container and will not associate a new network namespace with the
container. This would effectively make the container use the host
network namespace, attaching it to the host network.
**NOTE**: While specifying multiple `NetworkInfo` protobuf allows a
container to be attached to different CNI networks, if one of the
`NetworkInfo` protobuf is without the `name` field the `network/cni`
isolator simply "skips" the protobuf, attaching the container to all
the specified CNI networks except the `host network`.  To attach a
container to the host network as well as other CNI networks you
will need to attach the container to a CNI network (such as
bridge/macvlan) that, in turn, is attached to the host network.
Passing network labels and port-mapping information to CNI plugins
When invoking CNI plugins (e.g., with command ADD), the isolator will
pass on some Mesos meta-data to the plugins by specifying the args
field in the network configuration
JSON
according to the CNI spec. Currently, the isolator only passes on
NetworkInfo of the corresponding network to the plugin. This is
simply the JSON representation of the NetworkInfo protobuf. For
instance:
{
  "name" : "mynet",
  "type" : "bridge",
  "args" : {
    "org.apache.mesos" : {
      "network_info" : {
        "name" : "mynet",
        "labels" : {
          "labels" : [
            { "key" : "app", "value" : "myapp" },
            { "key" : "env", "value" : "prod" }
          ]
        },
        "port_mappings" : [
          { "host_port" : 8080, "container_port" : 80 },
          { "host_port" : 8081, "container_port" : 443 }
        ]
      }
    }
  }
}
It is important to note that labels or port_mappings within the
NetworkInfo is set by frameworks launching the container, and the
isolator passses on this information to the CNI plugins. As per the
spec, it is the prerogative of the CNI plugins to use this meta-data
information as they see fit while attaching/detaching containers to a CNI
network. E.g., CNI plugins could use labels to enforce domain
specific policies, or port_mappings to implement NAT rules.
Accessing container network namespace
The network/cni isolator allocates a network namespace to a
container when it needs to attach the container to a CNI network. The
network namespace is checkpointed on the host file system and can be
useful to debug network connectivity to the network namespace. For a
given container the network/cni isolator checkpoints its network
namespace at:
/var/run/mesos/isolators/network/cni/<container ID>/ns
The network namespace can be used with the ip command from the
iproute2
package by creating a symbolic link to the network namespace. Assuming
the container ID is 5baff64c-d028-47ba-864e-a5ee679fc069 you can
create the symlink as follows:
ln -s /var/run/mesos/isolators/network/cni/5baff64c-d028-47ba-8ff64c64e-a5ee679fc069/ns /var/run/netns/5baff64c
Now we can use the network namespace identifier 5baff64c to run
commands in the new network name space using the
iproute2 package.
E.g. you can view all the links in the container network namespace by
running the command:
ip netns exec 5baff64c ip link
Similarly you can view the container's route table by running:
ip netns exec 5baff64c ip route show
NOTE: Once
MESOS-5278 is
completed, executing commands within the container network namespace
would be simplified and we will no longer have a dependency on the
iproute2 package to debug Mesos container networking.
Networking Recipes
This section presents examples for launching containers on different
CNI networks. For each of the examples the assumption is that the CNI
configurations are present at /var/lib/mesos/cni/config, and the
plugins are present at /var/lib/mesos/cni/plugins. The Agents
therefore need to be started with the following command:
sudo mesos-slave --master=<master IP> --ip=<Agent IP>
--work_dir=/var/lib/mesos
--network_cni_config_dir=/var/lib/mesos/cni/config
--network_cni_plugins_dir=/var/lib/mesos/cni/plugins
--isolation=filesystem/linux,docker/runtime
--image_providers=docker
Apart from the CNI configuration parameters, we are also starting the
Agent with the ability to launch docker images on
MesosContainerizer. We enable this ability in the
MesosContainerizer by enabling the filesystem/linux and
docker/runtime isolator and setting the image provider to
docker.
To present an example of a framework launching containers on a
specific CNI network, the mesos-execute CLI framework has been
modified to take a --networks flag which will allow this example
framework to launch containers on the specified network. You can find
the mesos-execute framework in your Mesos installation directory at
<mesos installation>/bin/mesos-execute.
A bridge network
The
bridge
plugin attaches containers to a Linux bridge. Linux bridges could be
configured to attach to VLANs and VxLAN allowing containers to be
plugged into existing layer 2 networks. We present an example below,
where the CNI configuration instructs the MesosContainerizer to
invoke a bridge plugin to connect a container to a Linux bridge. The
configuration also instructs the bridge plugin to assign an IP address
to the container by invoking a
host-local
IPAM.
First, build the CNI plugin according to the instructions in the CNI repository then copy the bridge binary to the plugins directory on each agent.
Next, create the configuration file and copy this to the CNI configuration directory on each agent.
{
"name": "cni-test",
"type": "bridge",
"bridge": "mesos-cni0",
"isGateway": true,
"ipMasq": true,
"ipam": {
"type": "host-local",
"subnet": "192.168.0.0/16",
"routes": [
{ "dst":
"0.0.0.0/0" }
]
}
}
The CNI configuration tells the bridge plugin to attach the
container to a bridge called mesos-cni0. If the bridge does not
exist the bridge plugin will create one.
It is important to note the routes section in the ipam dictionary.
For Mesos, the executors launched as containers need to register
with the Agent in order for a task to be successfully launched.
Hence, it is imperative that the Agent IP is reachable from the
container IP and vice versa. In this specific instance we specified a
default route for the container, allowing containers to reach any
network that will be routeable by the gateway, which for this CNI
configuration is the bridge itself.
Another interesting attribute in the CNI configuration is the ipMasq
option. Setting this to true will install an iptable rule in the
host network namespace that would SNAT all traffic originating from
the container and egressing the Agent. This allows containers to talk
to the outside world even when they are in an address space that is
not routeable from outside the agent.
Below we give an example of launching a Ubuntu container and
attaching it to the mesos-cni0 bridge. You can launch the Ubuntu
container using the mesos-execute framework as follows:
sudo mesos-execute --command=/bin/bash
--docker_image=ubuntu:latest --master=<master IP>:5050 --name=ubuntu
--networks=cni-test --no-shell
The above command would pull the Ubuntu image from the docker hub
and launch it using the MesosContainerizer and attach it to the
mesos-cni0 bridge.
You can verify the network settings of the Ubuntu container by
creating a symlink to the network namespace and running the ip
command as describe in the section "Accessing container network
namespace".
Assuming we created a reference for the network namespace in
/var/run/netns/5baff64c . The output of the IP address and route table
in the container network namespace would be as follows:
$ sudo ip netns exec 5baff64c ip addr show
1: lo: <LOOPBACK> mtu 65536 qdisc noop state DOWN group default
link/loopback 00:00:00:00:00:00 brd 00:00:00:00:00:00
3: eth0: <BROADCAST,MULTICAST,UP,LOWER_UP> mtu 1500 qdisc noqueue state UP group default
link/ether 8a:2c:f9:41:0a:54 brd ff:ff:ff:ff:ff:ff
inet 192.168.0.2/16 scope global eth0
valid_lft forever preferred_lft forever
inet6 fe80::882c:f9ff:fe41:a54/64 scope link
valid_lft forever preferred_lft forever
$ sudo ip netns exec 5baff64c ip route show
default via 192.168.0.1 dev eth0
192.168.0.0/16 dev eth0 proto kernel scope link src 192.168.0.2
A port-mapper plugin for CNI networks
For private, isolated, networks such as a bridge network where the IP address of a container is not routeable from outside the host it becomes imperative to provide containers with DNAT capabilities so that services running on the container can be exposed outside the host on which the container is running.
Unfortunately, there is no CNI plugin available in the
containernetworking/cni
repository that provides port-mapping functionality.
Hence, we have developed a port-mapper CNI plugin that resides
within the Mesos code base called the mesos-cni-port-mapper. The
mesos-cni-port-mapper is designed to work with any other CNI plugin
that requires DNAT capabilities. One of the most obvious being the
bridge CNI plugin.
We explain the operational semantics of the mesos-cni-port-mapper
plugin by taking an example CNI configuration that allows the
mesos-cni-port-mapper to provide DNAT functionality to the bridge
plugin.
{
"name" : "port-mapper-test",
"type" : "mesos-cni-port-mapper",
"excludeDevices" : ["mesos-cni0"],
"chain": "MESOS-TEST-PORT-MAPPER",
"delegate": {
"type": "bridge",
"bridge": "mesos-cni0",
"isGateway": true,
"ipMasq": true,
"ipam": {
"type": "host-local",
"subnet": "192.168.0.0/16",
"routes": [
{ "dst":
"0.0.0.0/0" }
]
}
}
}
For the CNI configuration above, apart from the parameters that the
mesos-cni-port-mapper plugin accepts, the important point to note in
the CNI configuration of the plugin is the "delegate" field. The
"delegate" field allows the mesos-cni-port-mapper to wrap the CNI
configuration of any other CNI plugin, and allows the plugin to
provide DNAT capabilities to any CNI network. In this specific case
the mesos-cni-port-mapper is providing DNAT capabilities to
containers running on the bridge network mesos-cni0. The parameters
that the mesos-cni-port-mapper accepts are listed below:
- name : Name of the CNI network.
- type : Name of the port-mapper CNI plugin.
- chain : The chain in which the iptables DNAT rule will be added in the NAT table. This allows the operator to group DNAT rules for a given CNI network under its own chain, allowing for better management of the iptables rules.
- excludeDevices: These are a list of ingress devices on which the DNAT rule should not be applied.
- delegate : This is a JSON dict that holds the CNI JSON configuration of a CNI plugin that the port-mapper plugin is expected to invoke.
The mesos-cni-port-mapper relies heavily on iptables to provide
the DNAT capabilities to a CNI network. In order for the port-mapper
plugin to function properly we have certain minimum
requirements for iptables as listed below:
- iptables 1.4.20 or higher: This because we need to use the -w option of iptables in order to allow atomic writes to iptables.
- Require the xt_comments module of iptables: We use the comments module to tag iptables rules belonging to a container. These tags are used as a key while deleting iptables rules when the specific container is deleted.
Finally, while the CNI configuration of the port-mapper plugin tells
the plugin as to how and where to install the iptables rules, and which
CNI plugin to "delegate" the attachment/detachment of the container, the
port-mapping information itself is learned by looking at the
NetworkInfo set in the args field of the CNI configuration passed
by Mesos to the port-mapper plugin. Please refer to the "Passing
network labels and port-mapping information to CNI
plugins" section for more details.
A Calico network
Calico provides 3rd-party CNI plugin that works out-of-the-box with Mesos CNI.
Calico takes a pure Layer-3 approach to networking, allocating a unique, routable IP address to each Meso task. Task routes are distributed by a BGP vRouter run on each Agent, which leverages the existing Linux kernel forwarding engine without needing tunnels, NAT, or overlays. Additionally, Calico supports rich and flexible network policy which it enforces using bookended ACLs on each compute node to provide tenant isolation, security groups, and external reachability constraints.
For information on setting up and using Calico-CNI, see Calico's guide on integerating with Mesos.
A Cilium network
Cilium provides a CNI plugin that works with Mesos.
Cilium brings HTTP-aware network security filtering to Linux container frameworks. Using a new Linux kernel technology called BPF, Cilium provides a simple and efficient way to define and enforce both network-layer and HTTP-layer security policies.
For more information on using Cilium with Mesos, check out the Getting Started Using Mesos Guide.
A Weave network
Weave provides a CNI implementation that works out-of-the-box with Mesos.
Weave provides hassle free configuration by assigning an ip-per-container and providing a fast DNS on each node. Weave is fast, by automatically choosing the fastest path between hosts. Multicast addressing and routing is fully supported. It has built in NAT traversal and encryption and continues to work even during a network partition. Finally, Multi-cloud deployments are easy to setup and maintain, even when there are multiple hops.
For more information on setting up and using Weave CNI, see Weave's CNI documentation
title: Apache Mesos - Port Mapping Network Isolator layout: documentation
Port Mapping Network Isolator
The port mapping network isolator provides a way to achieve per-container network monitoring and isolation without relying on IP per container. The network isolator prevents a single container from exhausting the available network ports, consuming an unfair share of the network bandwidth or significantly delaying packet transmission for others. Network statistics for each active container are published through the /monitor/statistics endpoint on the agent. The port mapping network isolator is transparent for the majority of tasks running on an agent (those that bind to port 0 and let the kernel allocate their port).
Installation
Port mapping network isolator is not supported by default. To enable it you need to install additional dependencies and configure it during the build process.
Prerequisites
Per-container network monitoring and isolation is only supported on Linux kernel versions 3.6 and above. Additionally, the kernel must include these patches (merged in kernel version 3.15).
- 6a662719c9868b3d6c7d26b3a085f0cd3cc15e64
- 0d5edc68739f1c1e0519acbea1d3f0c1882a15d7
- e374c618b1465f0292047a9f4c244bd71ab5f1f0
- 25f929fbff0d1bcebf2e92656d33025cd330cbf8
The following packages are required on the agent:
Additionally, if you are building from source, you need will also need the libnl3 development package to compile Mesos:
- libnl3-devel / libnl3-dev >= 3.2.26
Build
To build Mesos with port mapping network isolator support, you need to add a configure option:
$ ./configure --with-network-isolator
$ make
Configuration
The port mapping network isolator is enabled on the agent by adding
network/port_mapping to the agent command line --isolation flag.
--isolation="network/port_mapping"
If the agent has not been compiled with port mapping network isolator support, it will refuse to start and print an error:
I0708 00:17:08.080271 44267 containerizer.cpp:111] Using isolation: network/port_mapping
Failed to create a containerizer: Could not create MesosContainerizer: Unknown or unsupported
isolator: network/port_mapping
Configuring network ports
Without port mapping network isolator, all the containers on a host share the public IP address of the agent and can bind to any port allowed by the OS.
When the port mapping network isolator is enabled, each container on the agent has a separate network stack (via Linux network namespaces). All containers still share the same public IP of the agent (so that the service discovery mechanism does not need to be changed). The agent assigns each container a non-overlapping range of the ports and only packets to/from these assigned port ranges will be delivered. Applications requesting the kernel assign a port (by binding to port 0) will be given ports from the container assigned range. Applications can bind to ports outside the container assigned ranges but packets from to/from these ports will be silently dropped by the host.
Mesos provides two ranges of ports to containers:
-
OS allocated "ephemeral" ports are assigned by the OS in a range specified for each container by Mesos.
-
Mesos allocated "non-ephemeral" ports are acquired by a framework using the same Mesos resource offer mechanism used for cpu, memory etc. for allocation to executors/tasks as required.
Additionally, the host itself will require ephemeral ports for network communication. You need to configure these three non-overlapping port ranges on the host.
Host ephemeral port range
The currently configured host ephemeral port range can be discovered at any time
using the command sysctl net.ipv4.ip_local_port_range. If ports need to be set
aside for agent containers, the ephemeral port range can be updated in
/etc/sysctl.conf. Rebooting after the update will apply the change and
eliminate the possibility that ports are already in use by other processes. For
example, by adding the following:
# net.ipv4.ip_local_port_range defines the host ephemeral port range, by
# default 32768-61000. We reduce this range to allow the Mesos agent to
# allocate ports 32768-57344
# net.ipv4.ip_local_port_range = 32768 61000
net.ipv4.ip_local_port_range = 57345 61000
Container port ranges
The container ephemeral and non-ephemeral port ranges are configured using the
agent --resources flag. The non-ephemeral port range is provided to the
master, which will then offer it to frameworks for allocation.
The ephemeral port range is sub-divided by the agent, giving
ephemeral_ports_per_container (default 1024) to each container. The maximum
number of containers on the agent will therefore be limited to approximately:
number of ephemeral_ports / ephemeral_ports_per_container
The master --max_executors_per_agent flag is be used to prevent allocation of
more executors on an agent when the ephemeral port range has been exhausted.
It is recommended (but not required) that ephemeral_ports_per_container be set
to a power of 2 (e.g., 512, 1024) and the lower bound of the ephemeral port
range be a multiple of ephemeral_ports_per_container to minimize CPU overhead
in packet processing. For example:
--resources=ports:[31000-32000];ephemeral_ports:[32768-57344] \
--ephemeral_ports_per_container=512
Rate limiting container traffic
Outbound traffic from a container to the network can be rate limited to prevent
a single container from consuming all available network resources with
detrimental effects to the other containers on the host. The
--egress_rate_limit_per_container flag specifies that each container launched
on the host be limited to the specified bandwidth (in bytes per second).
Network traffic which would cause this limit to be exceeded is delayed for later
transmission. The TCP protocol will adjust to the increased latency and reduce
the transmission rate ensuring no packets need be dropped.
--egress_rate_limit_per_container=100MB
We do not rate limit inbound traffic since we can only modify the network flows after they have been received by the host and any congestion has already occurred.
Egress traffic isolation
Delaying network data for later transmission can increase latency and jitter
(variability) for all traffic on the interface. Mesos can reduce the impact on
other containers on the same host by using flow classification and isolation
using the containers port ranges to maintain unique flows for each container and
sending traffic from these flows fairly (using the
FQ_Codel
algorithm). Use the --egress_unique_flow_per_container flag to enable.
--egress_unique_flow_per_container
Putting it all together
A complete agent command line enabling port mapping network isolator, reserving ports 57345-61000 for host ephemeral ports, 32768-57344 for container ephemeral ports, 31000-32000 for non-ephemeral ports allocated by the framework, limiting container transmit bandwidth to 300 Mbits/second (37.5MBytes) with unique flows enabled would thus be:
mesos-agent \
--isolation=network/port_mapping \
--resources=ports:[31000-32000];ephemeral_ports:[32768-57344] \
--ephemeral_ports_per_container=1024 \
--egress_rate_limit_per_container=37500KB \
--egress_unique_flow_per_container
Monitoring container network statistics
Mesos exposes statistics from the Linux network stack for each container network on the /monitor/statistics agent endpoint.
From the network interface inside the container, we report the following
counters (since container creation) under the statistics key:
| Metric | Description | Type |
|---|---|---|
net_rx_bytes |
Received bytes | Counter |
net_rx_dropped |
Packets dropped on receive | Counter |
net_rx_errors |
Errors reported on receive | Counter |
net_rx_packets |
Packets received | Counter |
net_tx_bytes |
Sent bytes | Counter |
net_tx_dropped |
Packets dropped on send | Counter |
net_tx_errors |
Errors reported on send | Counter |
net_tx_packets |
Packets sent | Counter |
Additionally, Linux Traffic Control can report the following
statistics for the elements which implement bandwidth limiting and bloat
reduction under the statistics/net_traffic_control_statistics key. The entry
for each of these elements includes:
| Metric | Description | Type |
|---|---|---|
backlog |
Bytes queued for transmission [1] | Gauge |
bytes |
Sent bytes | Counter |
drops |
Packets dropped on send | Counter |
overlimits |
Count of times the interface was over its transmit limit when it attempted to send a packet. Since the normal action when the network is overlimit is to delay the packet, the overlimit counter can be incremented many times for each packet sent on a heavily congested interface. [2] | Counter |
packets |
Packets sent | Counter |
qlen |
Packets queued for transmission | Gauge |
ratebps |
Transmit rate in bytes/second [3] | Gauge |
ratepps |
Transmit rate in packets/second [3] | Gauge |
requeues |
Packets failed to send due to resource contention (such as kernel locking) [3] | Counter |
[1] backlog is only reported on the bloat_reduction interface.
[2] overlimits are only reported on the bw_limit interface.
[3] Currently always reported as 0 by the underlying Traffic Control element.
For example, these are the statistics you will get by hitting the /monitor/statistics endpoint on an agent with network monitoring turned on:
$ curl -s http://localhost:5051/monitor/statistics | python2.6 -mjson.tool
[
{
"executor_id": "job.1436298853",
"executor_name": "Command Executor (Task: job.1436298853) (Command: sh -c 'iperf ....')",
"framework_id": "20150707-195256-1740121354-5150-29801-0000",
"source": "job.1436298853",
"statistics": {
"cpus_limit": 1.1,
"cpus_nr_periods": 16314,
"cpus_nr_throttled": 16313,
"cpus_system_time_secs": 2667.06,
"cpus_throttled_time_secs": 8036.840845388,
"cpus_user_time_secs": 123.49,
"mem_anon_bytes": 8388608,
"mem_cache_bytes": 16384,
"mem_critical_pressure_counter": 0,
"mem_file_bytes": 16384,
"mem_limit_bytes": 167772160,
"mem_low_pressure_counter": 0,
"mem_mapped_file_bytes": 0,
"mem_medium_pressure_counter": 0,
"mem_rss_bytes": 8388608,
"mem_total_bytes": 9945088,
"net_rx_bytes": 10847,
"net_rx_dropped": 0,
"net_rx_errors": 0,
"net_rx_packets": 143,
"net_traffic_control_statistics": [
{
"backlog": 0,
"bytes": 163206809152,
"drops": 77147,
"id": "bw_limit",
"overlimits": 210693719,
"packets": 107941027,
"qlen": 10236,
"ratebps": 0,
"ratepps": 0,
"requeues": 0
},
{
"backlog": 15481368,
"bytes": 163206874168,
"drops": 27081494,
"id": "bloat_reduction",
"overlimits": 0,
"packets": 107941070,
"qlen": 10239,
"ratebps": 0,
"ratepps": 0,
"requeues": 0
}
],
"net_tx_bytes": 163200529816,
"net_tx_dropped": 0,
"net_tx_errors": 0,
"net_tx_packets": 107936874,
"perf": {
"duration": 0,
"timestamp": 1436298855.82807
},
"timestamp": 1436300487.41595
}
}
]
title: Apache Mesos - Multiple Disks layout: documentation
Multiple Disks
Mesos provides a mechanism for operators to expose multiple disk resources. When
creating persistent volumes frameworks can decide
whether to use specific disks by examining the source field on the disk
resources offered.
Types of Disk Resources
Disk resources come in three forms:
- A
Rootdisk is presented by not having thesourceset inDiskInfo. - A
Pathdisk is presented by having thePATHenum set forsourceinDiskInfo. It also has arootwhich the operator uses to specify the directory to be used to store data. - A
Mountdisk is presented by having theMOUNTenum set forsourceinDiskInfo. It also has arootwhich the operator uses to specify the mount point used to store data.
Operators can use the JSON-formated --resources option on the agent to provide
these different kind of disk resources on agent start-up. Example resource
values in JSON format can be found below. By default (if --resources is not
specified), the Mesos agent will only make the root disk available to the
cluster.
NOTE: Once you specify any Disk resource manually (i.e., via the
--resources flag), Mesos will stop auto-detecting the Root disk resource.
Hence if you want to use the Root disk you will need to manually specify it
using the format described below.
Root disk
A Root disk is the basic disk resource in Mesos. It usually maps to the
storage on the main operating system drive that the operator has presented to
the agent. Data is mapped into the work_dir of the agent.
An example resources value for a root disk is shown below. Note that the
operator could optionally specify a role for the disk, which would result in
statically reserving the disk for a single role.
[
{
"name" : "disk",
"type" : "SCALAR",
"scalar" : { "value" : 2048 }
}
]
Path disks
A Path disk is an auxiliary disk resource provided by the operator. This
can be carved up into smaller chunks by creating persistent volumes that use
less than the total available space on the disk. Common uses for this kind of
disk are extra logging space, file archives or caches, or other non
performance-critical applications. Operators can present extra disks on their
agents as Path disks simply by creating a directory and making that the root
of the Path in DiskInfo's source.
Path disks are also useful for mocking up a multiple disk environment by
creating some directories on the operating system drive. This should only be
done in a testing or staging environment. Note that creating multiple Path
disks on the same filesystem requires statically partitioning the available disk
space. For example, suppose a 10GB storage device is mounted to /foo and the
Mesos agent is configured with two Path disks at /foo/disk1 and
/foo/disk2. To avoid the risk of running out of space on the device, disk1
and disk2 should be configured (when the Mesos agent is started) to use at
most 10GB of disk space in total.
An example resources value for a Path disk is shown below. Note that the
operator could optionally specify a role for the disk, which would result in
statically reserving the disk for a single role.
[
{
"name" : "disk",
"type" : "SCALAR",
"scalar" : { "value" : 2048 },
"disk" : {
"source" : {
"type" : "PATH",
"path" : { "root" : "/mnt/data" }
}
}
}
]
Mount disks
A Mount disk is an auxiliary disk resource provided by the operator. This
cannot be carved up into smaller chunks by frameworks. This lack of
flexibility allows operators to provide assurances to frameworks that they will
have exclusive access to the disk device. Common uses for this kind of disk
include database storage, write-ahead logs, or other performance-critical
applications.
On Linux, Mount disks must map to a mount point in the /proc/mounts
table. Operators should mount a physical disk with their preferred file system
and provide the mount point as the root of the Mount in DiskInfo's
source.
Aside from the performance advantages of Mount disks, applications running on
them should be able to rely on disk errors when they attempt to exceed the
capacity of the volume. This holds true as long as the file system in use
correctly propagates these errors. Due to this expectation, the disk/du
isolation is disabled for Mount disks.
An example resources value for a Mount disk is shown below. Note that the
operator could optionally specify a role for the disk, which would result in
statically reserving the disk for a single role.
[
{
"name" : "disk",
"type" : "SCALAR",
"scalar" : { "value" : 2048 },
"disk" : {
"source" : {
"type" : "MOUNT",
"mount" : { "root" : "/mnt/data" }
}
}
}
]
Block disks
Mesos currently does not allow operators to expose raw block devices. It may do so in the future, but there are security and flexibility concerns that need to be addressed in a design document first.
Implementation
A Path disk will have sub-directories created within the root which will be
used to differentiate the different volumes that are created on it. When a
persistent volume on a Path disk is destroyed, Mesos will remove all the files
and directories stored in the volume, as well as the sub-directory within root
that was created by Mesos for the volume.
A Mount disk will not have sub-directories created, allowing applications
to use the full file system mounted on the device. This construct allows Mesos
tasks to access volumes that contain pre-existing directory structures. This can
be useful to simplify ingesting data such as a pre-existing Postgres database or
HDFS data directory. Note that when a persistent volume on a Mount disk is
destroyed, Mesos will remove all the files and directories stored in the volume,
but will not remove the root directory (i.e., the mount point).
Operators should be aware of these distinctions when inspecting or cleaning up remnant data.
title: Apache Mesos - Persistent Volumes layout: documentation
Persistent Volumes
Mesos supports creating persistent volumes from disk resources. When launching a task, you can create a volume that exists outside the task's sandbox and will persist on the node even after the task dies or completes. When the task exits, its resources -- including the persistent volume -- can be offered back to the framework, so that the framework can launch the same task again, launch a recovery task, or launch a new task that consumes the previous task's output as its input.
Persistent volumes enable stateful services such as HDFS and Cassandra to store their data within Mesos rather than having to resort to workarounds (e.g., writing task state to a distributed filesystem that is mounted at a well-known location outside the task's sandbox).
Usage
Persistent volumes can only be created from reserved disk resources, whether it be statically reserved or dynamically reserved. A dynamically reserved persistent volume also cannot be unreserved without first explicitly destroying the volume. These rules exist to limit accidental mistakes, such as a persistent volume containing sensitive data being offered to other frameworks in the cluster. Similarly, a persistent volume cannot be destroyed if there is an active task that is still using the volume.
Please refer to the Reservation documentation for details regarding reservation mechanisms available in Mesos.
Persistent volumes can also be created on isolated and auxiliary disks by reserving multiple disk resources.
By default, a persistent volume cannot be shared between tasks running under different executors: that is, once a task is launched using a persistent volume, that volume will not appear in any resource offers until the task has finished running. Shared volumes are a type of persistent volumes that can be accessed by multiple tasks at the same agent simultaneously; see the documentation on shared volumes for more information.
Persistent volumes can be created by operators and frameworks.
By default, frameworks and operators can create volumes for any
role and destroy any persistent volume. Authorization
allows this behavior to be limited so that volumes can only be created for
particular roles and only particular volumes can be destroyed. For these
operations to be authorized, the framework or operator should provide a
principal to identify itself. To use authorization with reserve, unreserve,
create, and destroy operations, the Mesos master must be configured with the
appropriate ACLs. For more information, see the
authorization documentation.
- The following messages are available for frameworks to send back via the
acceptOffersAPI as a response to a resource offer:Offer::Operation::CreateOffer::Operation::DestroyOffer::Operation::GrowVolumeOffer::Operation::ShrinkVolume
- For each message in above list, a corresponding call in HTTP Operator API is available for operators or administrative tools;
/create-volumesand/destroy-volumesHTTP endpoints allow operators to manage persistent volumes through the master.
When a persistent volume is destroyed, all the data on that volume is removed
from the agent's filesystem. Note that for persistent volumes created on Mount
disks, the root directory is not removed, because it is typically the mount
point used for a separate storage device.
In the following sections, we will walk through examples of each of the interfaces described above.
Framework API
Offer::Operation::Create
A framework can create volumes through the resource offer cycle. Suppose we receive a resource offer with 2048 MB of dynamically reserved disk:
{
"id" : <offer_id>,
"framework_id" : <framework_id>,
"slave_id" : <slave_id>,
"hostname" : <hostname>,
"resources" : [
{
"name" : "disk",
"type" : "SCALAR",
"scalar" : { "value" : 2048 },
"role" : <offer's allocation role>,
"reservation" : {
"principal" : <framework_principal>
}
}
]
}
We can create a persistent volume from the 2048 MB of disk resources by sending
an Offer::Operation message via the acceptOffers API.
Offer::Operation::Create has a volumes field which specifies the persistent
volume information. We need to specify the following:
-
The ID for the persistent volume; this must be unique per role on each agent.
-
The non-nested relative path within the container to mount the volume.
-
The permissions for the volume. Currently,
"RW"is the only possible value. -
If the framework provided a principal when registering with the master, then the
disk.persistence.principalfield must be set to that principal. If the framework did not provide a principal when registering, then thedisk.persistence.principalfield can take any value, or can be left unset. Note that theprincipalfield determines the "creator principal" when authorization is enabled, even if authentication is disabled.{ "type" : Offer::Operation::CREATE, "create": { "volumes" : [ { "name" : "disk", "type" : "SCALAR", "scalar" : { "value" : 2048 }, "role" : <offer's allocation role>, "reservation" : { "principal" : <framework_principal> }, "disk": { "persistence": { "id" : <persistent_volume_id>, "principal" : <framework_principal> }, "volume" : { "container_path" : <container_path>, "mode" : <mode> } } } ] } }
If this succeeds, a subsequent resource offer will contain the following persistent volume:
{
"id" : <offer_id>,
"framework_id" : <framework_id>,
"slave_id" : <slave_id>,
"hostname" : <hostname>,
"resources" : [
{
"name" : "disk",
"type" : "SCALAR",
"scalar" : { "value" : 2048 },
"role" : <offer's allocation role>,
"reservation" : {
"principal" : <framework_principal>
},
"disk": {
"persistence": {
"id" : <persistent_volume_id>
},
"volume" : {
"container_path" : <container_path>,
"mode" : <mode>
}
}
}
]
}
Offer::Operation::Destroy
A framework can destroy persistent volumes through the resource offer cycle. In Offer::Operation::Create, we created a persistent volume from 2048 MB of disk resources. The volume will continue to exist until it is explicitly destroyed. Suppose we would like to destroy the volume we created. First, we receive a resource offer (copy/pasted from above):
{
"id" : <offer_id>,
"framework_id" : <framework_id>,
"slave_id" : <slave_id>,
"hostname" : <hostname>,
"resources" : [
{
"name" : "disk",
"type" : "SCALAR",
"scalar" : { "value" : 2048 },
"role" : <offer's allocation role>,
"reservation" : {
"principal" : <framework_principal>
},
"disk": {
"persistence": {
"id" : <persistent_volume_id>
},
"volume" : {
"container_path" : <container_path>,
"mode" : <mode>
}
}
}
]
}
We can destroy the persistent volume by sending an Offer::Operation message
via the acceptOffers API. Offer::Operation::Destroy has a volumes field
which specifies the persistent volumes to be destroyed.
{
"type" : Offer::Operation::DESTROY,
"destroy" : {
"volumes" : [
{
"name" : "disk",
"type" : "SCALAR",
"scalar" : { "value" : 2048 },
"role" : <offer's allocation role>,
"reservation" : {
"principal" : <framework_principal>
},
"disk": {
"persistence": {
"id" : <persistent_volume_id>
},
"volume" : {
"container_path" : <container_path>,
"mode" : <mode>
}
}
}
]
}
}
If this request succeeds, the persistent volume will be destroyed, and all files and directories associated with the volume will be deleted. However, the disk resources will still be reserved. As such, a subsequent resource offer will contain the following reserved disk resources:
{
"id" : <offer_id>,
"framework_id" : <framework_id>,
"slave_id" : <slave_id>,
"hostname" : <hostname>,
"resources" : [
{
"name" : "disk",
"type" : "SCALAR",
"scalar" : { "value" : 2048 },
"role" : <offer's allocation role>,
"reservation" : {
"principal" : <framework_principal>
}
}
]
}
Those reserved resources can then be used as normal: e.g., they can be used to create another persistent volume or can be unreserved.
Offer::Operation::GrowVolume
Sometimes, a framework or an operator may find that the size of an existing persistent volume may be too small (possibly due to increased usage). In Offer::Operation::Create, we created a persistent volume from 2048 MB of disk resources. Suppose we want to grow the size of the volume to 4096 MB, we first need resource offer(s) with at least 2048 MB of disk resources with the same reservation and disk information:
{
"id" : <offer_id>,
"framework_id" : <framework_id>,
"slave_id" : <slave_id>,
"hostname" : <hostname>,
"resources" : [
{
"name" : "disk",
"type" : "SCALAR",
"scalar" : { "value" : 2048 },
"role" : <offer's allocation role>,
"reservation" : {
"principal" : <framework_principal>
}
},
{
"name" : "disk",
"type" : "SCALAR",
"scalar" : { "value" : 2048 },
"role" : <offer's allocation role>,
"reservation" : {
"principal" : <framework_principal>
},
"disk": {
"persistence": {
"id" : <persistent_volume_id>
},
"volume" : {
"container_path" : <container_path>,
"mode" : <mode>
}
}
}
]
}
We can grow the persistent volume by sending an Offer::Operation message.
Offer::Operation::GrowVolume has a volume field which specifies the
persistent volume to grow, and an addition field which specifies the
additional disk space resource.
{
"type" : Offer::Operation::GROW_VOLUME,
"grow_volume" : {
"volume" : {
"name" : "disk",
"type" : "SCALAR",
"scalar" : { "value" : 2048 },
"role" : <offer's allocation role>,
"reservation" : {
"principal" : <framework_principal>
},
"disk": {
"persistence": {
"id" : <persistent_volume_id>
},
"volume" : {
"container_path" : <container_path>,
"mode" : <mode>
}
}
},
"addition" : {
"name" : "disk",
"type" : "SCALAR",
"scalar" : { "value" : 2048 },
"role" : <offer's allocation role>,
"reservation" : {
"principal" : <framework_principal>
}
}
}
}
If this request succeeds, the persistent volume will be grown to the new size, and all files and directories associated with the volume will not be touched. A subsequent resource offer will contain the grown volume:
{
"id" : <offer_id>,
"framework_id" : <framework_id>,
"slave_id" : <slave_id>,
"hostname" : <hostname>,
"resources" : [
{
"name" : "disk",
"type" : "SCALAR",
"scalar" : { "value" : 4096 },
"role" : <offer's allocation role>,
"reservation" : {
"principal" : <framework_principal>
},
"disk": {
"persistence": {
"id" : <persistent_volume_id>
},
"volume" : {
"container_path" : <container_path>,
"mode" : <mode>
}
}
}
]
}
Offer::Operation::ShrinkVolume
Similarly, a framework or an operator may find that the size of an existing persistent volume may be too large (possibly due to over provisioning), and want to free up unneeded disk space resources. In Offer::Operation::Create, we created a persistent volume from 2048 MB of disk resources. Suppose we want to shrink the size of the volume to 1024 MB, we first need a resource offer with the volume to shrink:
{
"id" : <offer_id>,
"framework_id" : <framework_id>,
"slave_id" : <slave_id>,
"hostname" : <hostname>,
"resources" : [
{
"name" : "disk",
"type" : "SCALAR",
"scalar" : { "value" : 2048 },
"role" : <offer's allocation role>,
"reservation" : {
"principal" : <framework_principal>
},
"disk": {
"persistence": {
"id" : <persistent_volume_id>
},
"volume" : {
"container_path" : <container_path>,
"mode" : <mode>
}
}
}
]
}
We can shrink the persistent volume by sending an Offer::Operation message via
the acceptOffers API. Offer::Operation::ShrinkVolume has a volume field
which specifies the persistent volume to grow, and a subtract field which
specifies the scalar value of disk space to subtract from the volume:
{
"type" : Offer::Operation::SHRINK_VOLUME,
"shrink_volume" : {
"volume" : {
"name" : "disk",
"type" : "SCALAR",
"scalar" : { "value" : 2048 },
"role" : <offer's allocation role>,
"reservation" : {
"principal" : <framework_principal>
},
"disk": {
"persistence": {
"id" : <persistent_volume_id>
},
"volume" : {
"container_path" : <container_path>,
"mode" : <mode>
}
}
},
"subtract" : {
"value" : 1024
}
}
}
If this request succeeds, the persistent volume will be shrunk to the new size, and all files and directories associated with the volume will not be touched. A subsequent resource offer will contain the shrunk volume as well as freed up disk resources with the same reservation information:
{
"id" : <offer_id>,
"framework_id" : <framework_id>,
"slave_id" : <slave_id>,
"hostname" : <hostname>,
"resources" : [
{
"name" : "disk",
"type" : "SCALAR",
"scalar" : { "value" : 1024 },
"role" : <offer's allocation role>,
"reservation" : {
"principal" : <framework_principal>
}
},
{
"name" : "disk",
"type" : "SCALAR",
"scalar" : { "value" : 1024 },
"role" : <offer's allocation role>,
"reservation" : {
"principal" : <framework_principal>
},
"disk": {
"persistence": {
"id" : <persistent_volume_id>
},
"volume" : {
"container_path" : <container_path>,
"mode" : <mode>
}
}
}
]
}
Some restrictions about resizing a volume (applicable to both Offer::Operation::GrowVolume and Offer::Operation::ShrinkVolume):
- Only persistent volumes created on an agent's local disk space with
ROOTorPATHtype can be resized; - A persistent volume cannot be actively used by a task when being resized;
- A persistent volume cannot be shared when being resized;
- Volume resize operations cannot be included in an ACCEPT call with other operations which make use of the resized volume.
Versioned HTTP Operator API
As described above, persistent volumes can be created by a framework scheduler as part of the resource offer cycle. Persistent volumes can also be managed using the HTTP Operator API.
This capability is intended for use by operators and administrative tools.
For each offer operation which interacts with persistent volume, there is an equivalent call in master's HTTP Operator API.
Unversioned Operator HTTP Endpoints
Several HTTP endpoints like /create-volumes and /destroy-volumes can still be used to manage persisent volumes, but we generally encourage operators to use versioned HTTP Operator API instead, as new features like resize support may not be backported.
/create-volumes
To use this endpoint, the operator should first ensure that a reservation for
the necessary resources has been made on the appropriate agent (e.g., by using
the /reserve HTTP endpoint or by configuring a
static reservation). The information that must be included in a request to this
endpoint is similar to that of the CREATE offer operation. One difference is
the required value of the disk.persistence.principal field: when HTTP
authentication is enabled on the master, the field must be set to the same
principal that is provided in the request's HTTP headers. When HTTP
authentication is disabled, the disk.persistence.principal field can take any
value, or can be left unset. Note that the principal field determines the
"creator principal" when authorization is enabled, even if
HTTP authentication is disabled.
To create a 512MB persistent volume for the ads role on a dynamically reserved
disk resource, we can send an HTTP POST request to the master's
/create-volumes endpoint like so:
curl -i \
-u <operator_principal>:<password> \
-d slaveId=<slave_id> \
-d volumes='[
{
"name": "disk",
"type": "SCALAR",
"scalar": { "value": 512 },
"role": "ads",
"reservation": {
"principal": <operator_principal>
},
"disk": {
"persistence": {
"id" : <persistence_id>,
"principal" : <operator_principal>
},
"volume": {
"mode": "RW",
"container_path": <path>
}
}
}
]' \
-X POST http://<ip>:<port>/master/create-volumes
The user receives one of the following HTTP responses:
202 Accepted: Request accepted (see below).400 BadRequest: Invalid arguments (e.g., missing parameters).401 Unauthorized: Unauthenticated request.403 Forbidden: Unauthorized request.409 Conflict: Insufficient resources to create the volumes.
A single /create-volumes request can create multiple persistent volumes, but
all of the volumes must be on the same agent.
This endpoint returns the 202 ACCEPTED HTTP status code, which indicates that the create operation has been validated successfully by the master. The request is then forwarded asynchronously to the Mesos agent where the reserved resources are located. That asynchronous message may not be delivered or creating the volumes at the agent might fail, in which case no volumes will be created. To determine if a create operation has succeeded, the user can examine the state of the appropriate Mesos agent (e.g., via the agent's /state HTTP endpoint).
/destroy-volumes
To destroy the volume created above, we can send an HTTP POST to the master's /destroy-volumes endpoint like so:
curl -i \
-u <operator_principal>:<password> \
-d slaveId=<slave_id> \
-d volumes='[
{
"name": "disk",
"type": "SCALAR",
"scalar": { "value": 512 },
"role": "ads",
"reservation": {
"principal": <operator_principal>
},
"disk": {
"persistence": {
"id" : <persistence_id>
},
"volume": {
"mode": "RW",
"container_path": <path>
}
}
}
]' \
-X POST http://<ip>:<port>/master/destroy-volumes
Note that the volume JSON in the /destroy-volumes request must
exactly match the definition of the volume. The JSON definition of a
volume can be found via the reserved_resources_full key in the
master's /slaves endpoint (see below).
The user receives one of the following HTTP responses:
202 Accepted: Request accepted (see below).400 BadRequest: Invalid arguments (e.g., missing parameters).401 Unauthorized: Unauthenticated request.403 Forbidden: Unauthorized request.409 Conflict: Insufficient resources to destroy the volumes.
A single /destroy-volumes request can destroy multiple persistent volumes, but
all of the volumes must be on the same agent.
This endpoint returns the 202 ACCEPTED HTTP status code, which indicates that the destroy operation has been validated successfully by the master. The request is then forwarded asynchronously to the Mesos agent where the volumes are located. That asynchronous message may not be delivered or destroying the volumes at the agent might fail, in which case no volumes will be destroyed. To determine if a destroy operation has succeeded, the user can examine the state of the appropriate Mesos agent (e.g., via the agent's /state HTTP endpoint).
Listing Persistent Volumes
Information about the persistent volumes at each agent in the cluster can be
found by querying the /slaves master endpoint,
under the reserved_resources_full key.
The same information can also be found in the /state
agent endpoint (under the reserved_resources_full key). The agent
endpoint is useful to confirm if changes to persistent volumes have been
propagated to the agent (which can fail in the event of network partition or
master/agent restarts).
Programming with Persistent Volumes
Some suggestions to keep in mind when building applications that use persistent volumes:
-
A single
acceptOfferscall make a dynamic reservation (viaOffer::Operation::Reserve) and create a new persistent volume on the newly reserved resources (viaOffer::Operation::Create). However, these operations are not executed atomically (i.e., either operation or both operations could fail). -
Volume IDs must be unique per role on each agent. However, it is strongly recommended that frameworks use globally unique volume IDs, to avoid potential confusion between volumes on different agents with the same volume ID. Note also that the agent ID where a volume resides might change over time. For example, suppose a volume is created on an agent and then the agent's host machine is rebooted. When the agent registers with Mesos after the reboot, it will be assigned a new AgentID---but it will retain the same volume it had previously. Hence, frameworks should not assume that using the pair <AgentID, VolumeID> is a stable way to identify a volume in a cluster.
-
Attempts to dynamically reserve resources or create persistent volumes might fail---for example, because the network message containing the operation did not reach the master or because the master rejected the operation. Applications should be prepared to detect failures and correct for them (e.g., by retrying the operation).
-
When using HTTP endpoints to reserve resources or create persistent volumes, some failures can be detected by examining the HTTP response code returned to the client. However, it is still possible for a
202response code to be returned to the client but for the associated operation to fail---see discussion above. -
When using the scheduler API, detecting that a dynamic reservation has failed is a little tricky: reservations do not have unique identifiers, and the Mesos master does not provide explicit feedback on whether a reservation request has succeeded or failed. Hence, framework schedulers typically use a combination of two techniques:
-
They use timeouts to detect that a reservation request may have failed (because they don't receive a resource offer containing the expected resources after a given period of time).
-
To check whether a resource offer includes the effect of a dynamic reservation, applications cannot check for the presence of a "reservation ID" or similar value (because reservations do not have IDs). Instead, applications should examine the resource offer and check that it contains sufficient reserved resources for the application's role. If it does not, the application should make additional reservation requests as necessary.
-
-
When a scheduler issues a dynamic reservation request, the reserved resources might not be present in the next resource offer the scheduler receives. There are two reasons for this: first, the reservation request might fail or be dropped by the network, as discussed above. Second, the reservation request might simply be delayed, so that the next resource offer from the master will be issued before the reservation request is received by the master. This is why the text above suggests that applications wait for a timeout before assuming that a reservation request should be retried.
-
A consequence of using timeouts to detect failures is that an application might submit more reservation requests than intended (e.g., a timeout fires and an application makes another reservation request; meanwhile, the original reservation request is also processed). Recall that two reservations for the same role at the same agent are "merged": for example, role
foomakes two requests to reserve 2 CPUs at a single agent and both reservation requests succeed, the result will be a single reservation of 4 CPUs. To handle this situation, applications should be prepared for resource offers that contain more resources than expected. Some applications may also want to detect this situation and unreserve any additional reserved resources that will not be required. -
It often makes sense to structure application logic as a "state machine", where the application moves from its initial state (no reserved resources and no persistent volumes) and eventually transitions toward a single terminal state (necessary resources reserved and persistent volume created). As new events (such as timeouts and resource offers) are received, the application compares the event with its current state and decides what action to take next.
-
Because persistent volumes are associated with roles, a volume might be offered to any of the frameworks that are subscribed to that role. For example, a persistent volume might be created by one framework and then offered to a different framework subscribed to the same role. This can be used to pass large volumes of data between frameworks in a convenient way. However, this behavior might also allow sensitive data created by one framework to be read or modified by another framework subscribed to the same role. It can also make it more difficult for frameworks to determine whether a dynamic reservation has succeeded: as discussed above, frameworks need to wait for an offer that contains the "expected" reserved resources to determine when a reservation request has succeeded. Determining what a framework should "expect" to find in an offer is more difficult when multiple frameworks can make reservations for the same role concurrently. In general, whenever multiple frameworks are allowed to subscribe to the same role, the operator should ensure that those frameworks are configured to collaborate with one another when using role-specific resources. For more information, see the discussion of multiple frameworks in the same role.
Version History
Persistent volumes were introduced in Mesos 0.23. Mesos 0.27 introduced HTTP
endpoints for creating and destroying volumes. Mesos 0.28 introduced support for
multiple disk resources, and also enhanced the /slaves
master endpoint to include detailed information about persistent volumes and
dynamic reservations. Mesos 1.0 changed the semantics of destroying a volume:
in previous releases, destroying a volume would remove the Mesos-level metadata
but would not remove the volume's data from the agent's filesystem. Mesos 1.1
introduced support for shared persistent volumes. Mesos
1.6 introduced experimental support for resizing persistent volumes.
Container Storage Interface (CSI) Support
This document describes the Container Storage Interface (CSI) support in Mesos.
Currently, only CSI spec version 0.2 is supported in Mesos 1.6+ due to incompatible changes between CSI version 0.1 and version 0.2. CSI version 0.1 is supported in Mesos 1.5.
Motivation
Current Limitations of Storage Support in Mesos
Prior to 1.5, Mesos supports both local persistent volumes as well as external persistent volumes. However, both of them have limitations.
Local persistent volumes do not support offering physical or logical block devices directly. Frameworks do not have the choice to select filesystems for their local persistent volumes. Although Mesos does support multiple local disks, it's a big burden for operators to configure each agent properly to be able to leverage this feature. Finally, there is no well-defined interface allowing third-party storage vendors to plug into Mesos.
External persistent volumes support in Mesos bypasses the resource management part. In other words, using an external persistent volume does not go through the usual offer cycle. Mesos does not track resources associated with the external volumes. This makes quota control, reservation, and fair sharing almost impossible to enforce. Also, the current interface Mesos uses to interact with storage vendors is the Docker Volume Driver Interface (DVDI), which has several limitations.
Container Storage Interface (CSI)
Container Storage Interface (CSI) is a specification that defines a common set of APIs for all interactions between the storage vendors and the container orchestration platforms. It is the result of a close collaboration among representatives from the Kubernetes, CloudFoundry, Docker and Mesos communities. The primary goal of CSI is to allow storage vendors to write one plugin that works with all container orchestration platforms.
It was an easy decision to build the storage support in Mesos using CSI. The benefits are clear: it will fit Mesos into the larger storage ecosystem in a consistent way. In other words, users will be able to use any storage system with Mesos using a consistent API. The out-of-tree plugin model of CSI decouples the release cycle of Mesos from that of the storage systems, making the integration itself more sustainable and maintainable.
Architecture
The following figure provides an overview about how Mesos supports CSI.
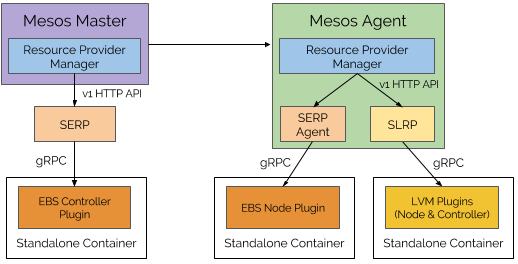
First Class Storage Resource Provider
The resource provider abstraction is a natural fit for supporting storage and CSI. Since CSI standardizes the interface between container orchestrators and storage vendors, the implementation for the storage resource provider should be the same for all storage systems that are CSI-compatible.
As a result, Mesos provides a default implementation of LRP, called Storage Local Resource Provider (SLRP), to provide general support for storage and CSI. Storage External Resource Provider (SERP) support is coming soon. The storage resource providers serve as the bridges between Mesos and CSI plugins.
More details about SLRP can be found in the following section.
Standalone Containers for CSI Plugins
CSI plugins are long-running gRPC services, like daemons. Those CSI plugins are packaged as containers, and are launched by SLRPs using the standalone containers API from the agent. Standalone containers can be launched without any tasks or executors. They use the same isolation mechanism provided by the agent for task and executor containers.
There is a component in each SLRP that is responsible for monitoring the health of the CSI plugin containers and restarting them if needed.
Framework API
New Disk Source Types
Two new types of disk sources have been added: RAW and BLOCK.
message Resource {
message DiskInfo {
message Source {
enum Type {
PATH = 1;
MOUNT = 2;
BLOCK = 3; // New in 1.5
RAW = 4; // New in 1.5
}
optional Type type = 1;
}
}
}
The disk source type (i.e., DiskInfo::Source::Type) specifies the property of
a disk resource and how it can be consumed.
PATH: The disk resource can be accessed using the Volume API (backed by a POSIX compliant filesystem). The disk resource can be carved up into smaller chunks.MOUNT: The disk resource can be accessed using the Volume API (backed by a POSIX compliant filesystem). The disk resource cannot be carved up into smaller chunks.BLOCK: (New in 1.5) The disk resource can be directly accessed on Linux without any filesystem (e.g.,/dev/sdb). The disk resource cannot be carved up into smaller chunks.RAW: (New in 1.5) The disk resource cannot be accessed by the framework yet. It has to be converted into any of the above types before it can be accessed. The disk resource cannot be carved up into smaller chunks if it has an ID (i.e., pre-existing disks), and can be carved up into smaller chunks if it does not have an ID (i.e., storage pool).
Disk ID and Metadata
Two more fields have been added to DiskInfo.Source to further describe the
disk source. It also allows CSI plugins to propagate plugin-specific information
to the framework.
message Resource {
message DiskInfo {
message Source {
// An identifier for this source. This field maps onto CSI
// volume IDs and is not expected to be set by frameworks.
optional string id = 4;
// Additional metadata for this source. This field maps onto CSI
// volume metadata and is not expected to be set by frameworks.
optional Labels metadata = 5;
}
}
}
id: This maps to CSI Volume ID if the disk resource is backed by a Volume from a CSI plugin. This field must not be set by frameworks.metadata: This maps to CSI Volume Attributes if the disk resource is backed by a Volume from a CSI plugin. This field must not be set by frameworks.
Storage Pool
A RAW disk resource may or may not have an ID (i.e., DiskInfo.Source.id),
depending on whether or not the RAW disk resource is backed by a CSI Volume. A
RAW disk resource not backed by a CSI Volume is usually referred to as a
storage pool (e.g., an LVM volume group, or EBS storage space, etc.).
The size of the storage pool is reported by the CSI plugin using the
GetCapacity interface.
Currently, a storage pool must have a profile defined. Any disk resource created from the storage pool inherits the same profile as the storage pool. See more details in the profiles section.
Pre-existing Disks
A RAW disk resource with an ID (i.e., DiskInfo.Source.id) is referred to as
a pre-existing disk. Pre-existing disks are those
CSI Volumes
that are detected by the corresponding CSI plugin using the
ListVolumes interface,
but have not gone through the dynamic provisioning process (i.e., via CREATE_DISK).
For example, operators might pre-create some LVM logical volumes before
launching Mesos. Those pre-created LVM logical volumes will be reported by the
LVM CSI plugin when Mesos invokes the ListVolumes interface, thus will be
reported as pre-existing disks in Mesos.
Currently, pre-existing disks do not have profiles. This may change in the near future. See more details in the profiles section.
New Offer Operations for Disk Resources
To allow dynamic provisioning of disk resources, two new offer operations have
been added to the scheduler API:
CREATE_DISK and DESTROY_DISK.
To learn how to use the offer operations, please refer to the
ACCEPT Call in the v1 scheduler API, or
acceptOffers method in the v0
scheduler API for more details.
message Offer {
message Operation {
enum Type {
UNKNOWN = 0;
LAUNCH = 1;
LAUNCH_GROUP = 6;
RESERVE = 2;
UNRESERVE = 3;
CREATE = 4;
DESTROY = 5;
GROW_VOLUME = 11;
SHRINK_VOLUME = 12;
CREATE_DISK = 13; // New in 1.7.
DESTROY_DISK = 14; // New in 1.7.
}
optional Type type = 1;
}
}
CREATE_DISK operation
The offer operation CREATE_DISK takes a RAW disk resource
(create_disk.source), and create a MOUNT or a BLOCK disk resource
(create_disk.target_type) from the source. The source RAW disk resource can
either be a storage pool (i.e., a RAW disk resource without an ID) or a
pre-existing disk (i.e., a RAW disk resource with an ID). The quantity of the
converted resource (either MOUNT or BLOCK disk resource) will be the same as
the source RAW resource.
message Offer {
message Operation {
message CreateDisk {
required Resource source = 1;
required Resource.DiskInfo.Source.Type target_type = 2;
}
optional CreateDisk create_disk = 15;
}
}
The created disk resource will have the disk id and metadata
set accordingly to uniquely identify the volume reported by the CSI plugin.
Note that CREATE_DISK is different than CREATE.
CREATE creates a persistent volume which indicates
that the data stored in the volume will be persisted until the framework
explicitly destroys it. It must operate on a non-RAW disk resource (i.e.,
PATH, MOUNT or BLOCK).
DESTROY_DISK operation
The offer operation DESTROY_DISK destroys a MOUNT or a BLOCK disk resource
(destroy_disk.source), which will result in a RAW disk resource. The
quantity of the RAW disk resource will be the same as the specified source,
unless it has an invalid profile (described later), in which case the
DESTROY_DISK operation will completely remove the disk resource.
message Offer {
message Operation {
message DestroyDisk {
required Resource source = 1;
}
optional DestroyDisk destroy_disk = 16;
}
}
This operation is intended to be a reverse operation of CREATE_DISK. In
other words, if the volume is created from a storage pool (i.e., a RAW disk
resource without an ID), the result of the corresponding DESTROY_DISK should
be a storage pool. And if the volume is created from a pre-existing disk
(i.e., a RAW disk resource with an ID), the result of the corresponding
DESTROY_DISK should be a pre-existing disk.
Currently, Mesos infers the result based on the presence of an assigned
profile in the disk resource. In other words, if the volume to be
destroyed has a profile, the converted RAW disk resource will be a storage
pool (i.e., RAW disk resource without an ID). Otherwise, the converted RAW
disk resource will be a pre-existing disk (i.e., RAW disk resource with an
ID). This leverages the fact that currently, each storage pool must have a
profile, and pre-existing disks do not have profiles.
Getting Operation Results
It is important for the frameworks to get the results of the above offer operations so that they know if the dynamic disk provisioning is successful or not.
Starting with Mesos 1.6.0 it is possible to opt-in to receive status updates
related to operations that affect resources managed by a resource provider. In
order to do so, the framework has to set the id field in the operation.
Support for operations affecting the agent default resources is coming
soon.
Profiles
The primary goal of introducing profiles is to provide an indirection to a set of storage vendor-specific parameters for the disk resources. It provides a way for the cluster operator to describe the classes of storage they offer and abstracts away the low-level details of a storage system.
Each profile is just a simple string (e.g., "fast", "slow", "gold"), as described below:
message Resource {
message DiskInfo {
message Source {
// This field serves as an indirection to a set of storage
// vendor specific disk parameters which describe the properties
// of the disk. The operator will setup mappings between a
// profile name to a set of vendor specific disk parameters. And
// the framework will do disk selection based on profile names,
// instead of vendor specific disk parameters.
//
// Also see the DiskProfile module.
optional string profile = 6;
}
}
}
A typical framework that needs storage is expected to perform disk
resource selection based on the profile of a disk resource, rather
than low-level storage vendor specific parameters.
Disk Profile Adaptor Module
In order to let cluster operators customize the mapping between profiles and
storage system-specific parameters, Mesos provides a module
interface called DiskProfileAdaptor.
class DiskProfileAdaptor
{
public:
struct ProfileInfo
{
csi::VolumeCapability capability;
google::protobuf::Map<std::string, std::string> parameters;
};
virtual Future<ProfileInfo> translate(
const std::string& profile,
const ResourceProviderInfo& resourceProviderInfo) = 0;
virtual Future<hashset<std::string>> watch(
const hashset<std::string>& knownProfiles,
const ResourceProviderInfo& resourceProviderInfo) = 0;
};
The module interface has a translate method that takes a profile and returns
the corresponding CSI volume capability
(i.e., the capability field) and CSI volume creation parameters
(i.e., the parameters field) for that profile. These two fields will be used to
call the CSI CreateVolume interface during dynamic provisioning (i.e.,
CREATE_DISK), or CSI ControllerPublishVolume and
NodePublishVolume when publishing (i.e., when a task using the disk resources
is being launched on a Mesos agent).
The watch method in the module interface allows Mesos to get notified about
the changes on the profiles. It takes a list of known profiles and returns a
future which will be set if the module detects changes to the known profiles
(e.g., a new profile is added). Currently, all profiles are immutable, thus are
safe to cache.
Since ProfileInfo uses protobuf from the CSI spec directly, there is an
implicit dependency between backward compatibility of the module interface and
the CSI spec version. Since CSI doesn't provide a backward compatibility
promise, modules have to be re-built against each release of Mesos.
URI Disk Profile Adaptor
To demonstrate how to use the disk profile adaptor module, Mesos ships with a
default disk profile adaptor, called UriDiskProfileAdaptor. This module
polls the profile information (in JSON) from a configurable URI. Here are the
module parameters that can be used to configure the module:
uri: URI to a JSON object containing the profile mapping. The module supports both HTTP(s) and file URIs. The JSON object should consist of some top-level string keys corresponding to the disk profile name. Each value should contain aResourceProviderSelectorunderresource_provider_selectoror aCSIPluginTypeSelectorundercsi_plugin_type_selectorto specify the set of resource providers this profile applies to, followed by aVolumeCapabilityundervolume_capabilitiesand arbitrary key-value pairs undercreate_parameters. For example:
{
"profile_matrix": {
"my-profile": {
"csi_plugin_type_selector": {
"plugin_type": "org.apache.mesos.csi.test"
},
"volume_capabilities": {
"mount": {
"fs_type": "xfs"
},
"access_mode": {
"mode": "SINGLE_NODE_WRITER"
}
},
"create_parameters": {
"type": "raid5",
"stripes": "3",
"stripesize": "64"
}
}
}
}
poll_interval: How long to wait between polling the specifieduri. If the poll interval has elapsed since the last fetch, then the URI is re-fetched; otherwise, a cachedProfileInfois returned. If not specified, the URI is only fetched once.max_random_wait: How long at most to wait between discovering a new set of profiles and notifying the callers ofwatch. The actual wait time is a uniform random value between 0 and this value. If the--uripoints to a centralized location, it may be good to scale this number according to the number of resource providers in the cluster. [default: 0secs]
To enable this module, please follow the modules documentation:
add the following JSON to the --modules agent flag, and set agent flag
--disk_profile_adaptor to org_apache_mesos_UriDiskProfileAdaptor.
{
"libraries": [
{
"file": "/PATH/TO/liburi_disk_profile.so",
"modules": [
{
"name": "org_apache_mesos_UriDiskProfileAdaptor",
"parameters": [
{
"key": "uri",
"value": "/PATH/TO/my_profile.json"
},
{
"key": "poll_interval",
"value": "1secs"
}
]
}
]
}
]
}
Storage Pool Capacity and Profiles
The capacity of a storage pool is usually tied to the profiles
of the volumes that the users want to provision from the pool. For instance,
consider an LVM volume group (a storage pool) backed by 1000G of physical
volumes. The capacity of the storage pool will be 1000G if the logical volumes
provisioned from the pool have "raid0" configuration, and will be 500G if the
logical volumes provisioned from the pool have "raid1" configuration.
In fact, it does not make sense to have a storage pool that does not have a profile because otherwise the allocator or the framework will not be able to predict how much space a volume will take, making resource management almost impossible to implement.
Therefore, each storage pool must have a profile associated with it. The profile of a storage pool is the profile of the volumes that can be provisioned from the pool. In other words, the volumes provisioned from a storage pool inherit the profile of the storage pool.
Mesos gets the capacity of a storage pool with a given profile by invoking the
CSI GetCapacity interface
with the corresponding volume capability and parameters associated with the
profile.
It is possible that a storage system is able to provide volumes with different
profiles. For example, the LVM volume group is able to produce both raid0 and
raid1 logical volumes, backed by the same physical volumes. In that case, Mesos
will report one storage pool per profile. In this example, assuming there are
two profiles: "raid0" and "raid1", Mesos will report 2 RAW disk resources:
- 1000G
RAWdisk resource with profile"raid0" - 500G
RAWdisk resource with profile"raid1".
TODO(jieyu): Discuss correlated resources.
Storage Local Resource Provider
Resource Provider is an abstraction in Mesos allowing cluster administrators to customize the providing of resources and the handling of operations related to the provided resources.
For storage and CSI support, Mesos provides a default implementation of the resource provider interface that serves as the bridge between Mesos and the CSI plugins. It is called the Storage Resource Provider. It is responsible for launching CSI plugins, talking to CSI plugins using the gRPC protocol, reporting available disk resources, handling offer operations from frameworks, and making disk resources available on the agent where the disk resources are used.
Currently, each Storage Resource Provider instance manages exactly one CSI plugin. This simplifies reasoning and implementation.
In Mesos 1.5, only the Storage Local Resource Provider (SLRP) is supported. This means the disk resources it reports are tied to a particular agent node, and thus cannot be used on other nodes. The Storage External Resource Provider (SERP) is coming soon.
Enable gRPC Support
gRPC must be enabled to support SLRP. To enable gRPC
support, configure Mesos with --enable-grpc.
Enable Agent Resource Provider Capability
In order to use SLRPs, the agent needs to be configured to enable resource
provider support. Since resource provider support is an experimental feature, it
is not turned on by default in 1.5. To enable that, please set the agent flag
--agent_features to the following JSON:
{
"capabilities": [
{"type": "MULTI_ROLE"},
{"type": "HIERARCHICAL_ROLE"},
{"type": "RESERVATION_REFINEMENT"},
{"type": "RESOURCE_PROVIDER"}
]
}
Note that although capabilities MULTI_ROLE, HIERARCHICAL_ROLE and
RESERVATION_REFINEMENT are not strictly necessary for supporting resources
providers, these must be specified because the agent code already assumes those
capabilities are set, and the old code that assumes those capabilities not being
set has already been removed.
SLRP Configuration
Each SLRP configures itself according to its ResourceProviderInfo which is
specified by the operator.
message ResourceProviderInfo {
required string type = 3;
required string name = 4;
repeated Resource.ReservationInfo default_reservations = 5;
// Storage resource provider related information.
message Storage {
required CSIPluginInfo plugin = 1;
}
optional Storage storage = 6;
}
type: The type of the resource provider. This uniquely identifies a resource provider implementation. For instance:"org.apache.mesos.rp.local.storage". The naming of thetypefield should follow the Java package naming convention to avoid conflicts on the type names.name: The name of the resource provider. There could be multiple instances of a type of resource provider. The name field is used to distinguish these instances. It should be a legal Java identifier to avoid conflicts on concatenation of type and name.default_reservations: If set, any new resources from this resource provider will be reserved by default. The firstReservationInfomay have typeSTATICorDYNAMIC, but the rest must haveDYNAMIC. One can create a new reservation on top of an existing one by pushing a newReservationInfoto the back. The lastReservationInfoin this stack is the "current" reservation. The new reservation's role must be a child of the current one.storage: Storage resource provider specific information (see more details below).
message CSIPluginInfo {
required string type = 1;
required string name = 2;
repeated CSIPluginContainerInfo containers = 3;
}
type: The type of the CSI plugin. This uniquely identifies a CSI plugin implementation. For instance:"org.apache.mesos.csi.test". The naming should follow the Java package naming convention to avoid conflicts on type names.name: The name of the CSI plugin. There could be multiple instances of the same type of CSI plugin. The name field is used to distinguish these instances. It should be a legal Java identifier to avoid conflicts on concatenation of type and name.containers: CSI plugin container configurations (see more details below). The CSI controller service will be served by the first that containsCONTROLLER_SERVICE, and the CSI node service will be served by the first that containsNODE_SERVICE.
message CSIPluginContainerInfo {
enum Service {
UNKNOWN = 0;
CONTROLLER_SERVICE = 1;
NODE_SERVICE = 2;
}
repeated Service services = 1;
optional CommandInfo command = 2;
repeated Resource resources = 3;
optional ContainerInfo container = 4;
}
services: Whether the CSI plugin container provides the CSI controller service, the CSI node service or both.command: The command to launch the CSI plugin container.resources: The resources to be used for the CSI plugin container.container: The additionalContainerInfoabout the CSI plugin container.
Note that each CSI plugin will have all isolation mechanisms configured on the agent applied to it.
Sample SLRP Configuration
The following is a sample SLRP configuration that uses the test CSI plugin
provided by Mesos that provides both CSI controller and node services, and sets
the default reservation to "test-role". The test CSI plugin will be built if
you configure Mesos with --enable-tests-install.
{
"type": "org.apache.mesos.rp.local.storage",
"name": "test_slrp",
"default_reservations": [
{
"type": "DYNAMIC",
"role": "test-role"
}
],
"storage": {
"plugin": {
"type": "org.apache.mesos.csi.test",
"name": "test_plugin",
"containers": [
{
"services": [ "CONTROLLER_SERVICE", "NODE_SERVICE" ],
"command": {
"shell": true,
"value": "./test-csi-plugin --available_capacity=2GB --work_dir=workdir",
"uris": [
{
"value": "/PATH/TO/test-csi-plugin",
"executable": true
}
]
},
"resources": [
{ "name": "cpus", "type": "SCALAR", "scalar": { "value": 0.1 } },
{ "name": "mem", "type": "SCALAR", "scalar": { "value": 200.0 } }
]
}
]
}
}
}
SLRP Management
Launching SLRP
To launch a SLRP, place the SLRP configuration JSON described in the
previous section in a directory (e.g.,
/etc/mesos/resource-providers) and set the agent flag
--resource_provider_config_dir to point to that directory. The corresponding
SLRP will be loaded by the agent. It is possible to put multiple SLRP
configuration JSON files under that directory to instruct the agent to load
multiple SLRPs.
Alternatively, it is also possible to dynamically launch a SLRP using the agent
v1 operator API. To use that, still set the
agent flag --resource_provider_config_dir to point to a configuration
directory (the directory maybe empty). Once the agent is launched, hit the agent
/api/v1 endpoint using the ADD_RESOURCE_PROVIDER_CONFIG
call:
For example, here is the curl command to launch a SLRP:
curl -X POST -H 'Content-Type: application/json' -d '{"type":"ADD_RESOURCE_PROVIDER_CONFIG","add_resource_provider_config":{"info":<SLRP_JSON_CONFIG>}}' http://<agent_ip>:<agent_port>/api/v1
Updating SLRP
A SLRP can be updated by modifying the JSON configuration file. Once the modification is done, restart the agent to pick up the new configuration.
Alternatively, the operator can dynamically update a SLRP using the agent v1
operator API. When the agent is running, hit
the agent /api/v1 endpoint using the
UPDATE_RESOURCE_PROVIDER_CONFIG
call:
For example, here is the curl command to update a SLRP:
curl -X POST -H 'Content-Type: application/json' -d '{"type":"UPDATE_RESOURCE_PROVIDER_CONFIG","update_resource_provider_config":{"info":<NEW_SLRP_JSON_CONFIG>}}' http://<agent_ip>:<agent_port>/api/v1
NOTE: Currently, only storage.containers in the ResourceProviderInfo can
be updated. This allows operators to update the CSI plugin (e.g., upgrading)
without affecting running tasks and executors.
Removing SLRP
Removing a SLRP means that the agent will terminate the existing SLRP if it is
still running, and will no longer launch the SLRP during startup. The master and
the agent will think the SLRP has disconnected, similar to agent disconnection.
If there exists a task that is using the disk resources provided by the SLRP,
its execution will not be affected. However, offer operations (e.g.,
CREATE_DISK) for the SLRP will not be successful. In fact, if a SLRP is
disconnected, the master will rescind the offers related to that SLRP,
effectively disallowing frameworks to perform operations on the disconnected
SLRP.
The SLRP can be re-added after its removal following the same instructions of launching a SLRP. Note that removing a SLRP is different than marking a SLRP as gone, in which case the SLRP will not be allowed to be re-added. Marking a SLRP as gone is not yet supported.
A SLRP can be removed by removing the JSON configuration file from the
configuration directory (--resource_provider_config_dir). Once the removal is
done, restart the agent to pick up the removal.
Alternatively, the operator can dynamically remove a SLRP using the
agent v1 operator API. When the agent is
running, hit the agent /api/v1 endpoint using the
REMOVE_RESOURCE_PROVIDER_CONFIG
call:
For example, here is the curl command to update a SLRP:
curl -X POST -H 'Content-Type: application/json' -d '{"type":"REMOVE_RESOURCE_PROVIDER_CONFIG","remove_resource_provider_config":{"type":"org.apache.mesos.rp.local.storage","name":<SLRP_NAME>}}' http://<agent_ip>:<agent_port>/api/v1
Authorization
A new authorization action MODIFY_RESOURCE_PROVIDER_CONFIG has been added.
This action applies to adding/updating/removing a SLRP.
For the default Mesos local authorizer, a new ACL
ACL.ModifyResourceProviderConfig has been added, allowing operators limit the
access to the above API endpoints.
message ACL {
// Which principals are authorized to add, update and remove resource
// provider config files.
message ModifyResourceProviderConfig {
// Subjects: HTTP Username.
required Entity principals = 1;
// Objects: Given implicitly.
// Use Entity type ANY or NONE to allow or deny access.
required Entity resource_providers = 2;
}
}
Currently, the Objects has to be either ANY or NONE. Fine-grained
authorization of specific resource provider objects is not yet supported. Please
refer to the authorization doc for more details about the
default Mesos local authorizer.
Standalone Containers for CSI Plugins
As already mentioned earlier, each SLRP instance manages exactly one CSI plugin. Each CSI plugin consists of one or more containers containing run processes that implement both the CSI controller service and the CSI node service.
The CSI plugin containers are managed by the SLRP automatically. The operator does not need to deploy them manually. The SLRP will make sure that the CSI plugin containers are running and restart them if needed (e.g., failed).
The CSI plugin containers are launched using the standalone container API provided by the Mesos agent. See more details about standalone container in the standalone container doc.
Limitations
- Only local disk resources are supported currently. That means the disk resources are tied to a particular agent node and cannot be used on a different agent node. The external disk resources support is coming soon.
- The CSI plugin container cannot be a Docker container yet. Storage vendors currently should package the CSI plugins in binary format and use the fetcher to fetch the binary executable.
BLOCKtype disk resources are not supported yet.
title: Apache Mesos - Running Workloads in Mesos layout: documentation
Workloads in Mesos
The goal of most Mesos schedulers is to launch workloads on Mesos agents. Once
a scheduler has subscribed with the Mesos master using the
SUBSCRIBE call, it will begin to receive
offers. To launch a workload, the scheduler can submit an
ACCEPT call to the master, including the offer
ID of an offer that it previously received which contains resources it can use
to run the workload.
The basic unit of work in a Mesos cluster is the "task". A single command or
container image and accompanying artifacts can be packaged into a task which is
sent to a Mesos agent for execution. To launch a task, a scheduler can place it
into a task group and pass it to the Mesos master inside a LAUNCH_GROUP
operation. LAUNCH_GROUP is one of the offer operations that can be specified
in the ACCEPT call.
An older call in the same API, the LAUNCH call, allows schedulers to launch
single tasks as well; this legacy method of launching tasks will be covered at
the end of this document.
Task Groups
Task groups, or "pods", allow a scheduler to group one or more tasks into a single workload. When one task is specified alongside an executor that has a unique executor ID, the task group is simply executed as a single isolated OS process; this is the simple case of a single task.
When multiple tasks are specified for a single task group, all of the tasks will be launched together on the same agent, and their lifecycles are coupled such that if a single task fails, they are all killed. On Linux, the tasks will also share network and mount namespaces by default so that they can communicate over the network and access the same volumes (note that custom container networks may be used as well). The resource constraints specified may be enforced for the tasks collectively or individually depending on other settings; for more information, see below, as well as the documentation on nested containers and task groups.
The Executor
The Mesos "executor" is responsible for managing the tasks. The executor must be
specified in the LAUNCH_GROUP operation, including an executor ID, the
framework ID, and some resources for the executor to perform its work. The
minimum resources required for an executor are shown in the example below.
The Workload
You can specify your workload using a shell command, one or more artifacts to be fetched before task launch, a container image, or some combination of these. The example below shows a simple shell command and a URI pointing to a tarball which presumably contains the script invoked in the command.
Resource Requests and Limits
In each task, the resources required by that task can be specified. Common
resource types are cpus, mem, and disk. The resources listed in the
resources field are known as resource "requests" and represent the minimum
resource guarantee required by the task; these resources will always be
available to the task if they are needed. The quantities specified in the
limits field are the resource "limits", which represent the maximum amount of
cpus and/or mem that the task may use. Setting a CPU or memory limit higher
than the corresponding request allows the task to consume more than its
allocated amount of CPU or memory when there are unused resources available on
the agent. For important Linux-specific settings related to resource limits, see
the section below on Linux resource isolation.
In addition to finite numeric values, the resource limits may be set to infinity, indicating that the task will be permitted to consume any available CPU and/or memory on the agent. This is represented in the JSON example below using the string "Infinity", though when submitting scheduler calls in protobuf format the standard IEEE-defined floating point infinity value may be used.
When a task consumes extra available memory on an agent but then other task processes on the machine which were guaranteed access to that memory suddenly need it, it's possible that processes will have to be killed in order to reclaim memory. When a task has a memory limit higher than its memory request, the task process's OOM score adjustment is set so that it is OOM-killed preferentially if it exceeds its memory request in such cases.
Linux Resource Isolation
When workloads are executed on Linux agents, resource isolation is likely provided by the Mesos agent's manipulation of cgroup subsystems. In the simple case of an executor running a single task group with a single task (like the example below), enforcement of resource requests and limits is straightforward, since there is only one task process to isolate.
When multiple tasks or task groups run under a single executor, the enforcement
of resource constraints is more complex. Some control over this is allowed by
the container.linux_info.share_cgroups field in each task. When this boolean
field is true (this is the default), each task is constrained by the cgroups
of its executor. This means that if multiple tasks run underneath one executor,
their resource constraints will be enforced as a sum of all the task resource
constraints, applied collectively to those task processes. In this case, task
resource consumption is collectively managed via one set of cgroup subsystem
control files associated with the executor.
When the share_cgroups field is set to false, the resource consumption of
each task is managed via a unique set of cgroups associated with that task,
which means that each task process is subject to its own resource requests and
limits. Note that if you want to specify limits on a task, the task MUST set
share_cgroups to false. Also note that all tasks under a single executor
must share the same value of share_cgroups.
Example: Launching a Task Group
The following could be submitted by a registered scheduler in the body of a POST
request to the Mesos master's /api/v1/scheduler endpoint:
{
"framework_id": { "value" : "12220-3440-12532-2345" },
"type": "ACCEPT",
"accept": {
"offer_ids": [ { "value" : "12220-3440-12532-O12" } ],
"operations": [
{
"type": "LAUNCH_GROUP",
"launch_group": {
"executor": {
"type": "DEFAULT",
"executor_id": { "value": "28649-27G5-291H9-3816-04" },
"framework_id": { "value" : "12220-3440-12532-2345" },
"resources": [
{
"name": "cpus",
"type": "SCALAR",
"scalar": { "value": 0.1 }
}, {
"name": "mem",
"type": "SCALAR",
"scalar": { "value": 32 }
}, {
"name": "disk",
"type": "SCALAR",
"scalar": { "value": 32 }
}
]
},
"task_group": {
"tasks": [
{
"name": "Name of the task",
"task_id": {"value" : "task-000001"},
"agent_id": {"value" : "83J792-S8FH-W397K-2861-S01"},
"resources": [
{
"name": "cpus",
"type": "SCALAR",
"scalar": { "value": 1.0 }
}, {
"name": "mem",
"type": "SCALAR",
"scalar": { "value": 512 }
}, {
"name": "disk",
"type": "SCALAR",
"scalar": { "value": 1024 }
}
],
"limits": {
"cpus": "Infinity",
"mem": 4096
}
"command": { "value": "./my-artifact/run.sh" },
"container": {
"type": "MESOS",
"linux_info": { "share_cgroups": false }
},
"uris": [
{ "value": "https://my-server.com/my-artifact.tar.gz" }
]
}
]
}
}
}
],
"filters": { "refuse_seconds" : 5.0 }
}
}
Command Tasks
One or more simple tasks which specify a single container image and/or command
to execute can be launched using the LAUNCH operation. The same TaskInfo
message type is used in both the LAUNCH_GROUP and LAUNCH calls to describe
tasks, so the operations look similar and identical fields in the task generally
behave in the same way. Depending on the container type specified within the
task's container field, the task will be launched using either the Mesos
containerizer (Mesos in-tree container runtime) or the Docker containerizer
(wrapper around Docker runtime). Note that the
container.linux_info.share_cgroups field, if set, must be set to true for
command tasks.
The below example could be used as the payload of a POST request to the scheduler API endpoint:
{
"framework_id": { "value" : "12220-3440-12532-2345" },
"type": "ACCEPT",
"accept": {
"offer_ids": [ { "value" : "12220-3440-12532-O12" } ],
"operations": [
{
"type": "LAUNCH",
"launch": {
"task_infos": [
{
"name": "Name of the task",
"task_id": {"value" : "task-000001"},
"agent_id": {"value" : "83J792-S8FH-W397K-2861-S01"},
"resources": [
{
"name": "cpus",
"type": "SCALAR",
"scalar": { "value": 1.0 }
}, {
"name": "mem",
"type": "SCALAR",
"scalar": { "value": 512 }
}, {
"name": "disk",
"type": "SCALAR",
"scalar": { "value": 1024 }
}
],
"limits": {
"cpus": "Infinity",
"mem": 4096
}
"command": { "value": "./my-artifact/run.sh" },
"container": {
"type": "MESOS",
"linux_info": { "share_cgroups": false }
},
"uris": [
{ "value": "https://my-server.com/my-artifact.tar.gz" }
]
}
]
}
}
],
"filters": { "refuse_seconds" : 5.0 }
}
}
title: Apache Mesos - Framework Development Guide layout: documentation
Framework Development Guide
In this document we refer to Mesos applications as "frameworks".
See one of the example framework schedulers in MESOS_HOME/src/examples/ to
get an idea of what a Mesos framework scheduler and executor in the language
of your choice looks like. RENDLER
provides example framework implementations in C++, Go, Haskell, Java, Python
and Scala.
Create your Framework Scheduler
API
If you are writing a scheduler against Mesos 1.0 or newer, it is recommended to use the new HTTP API to talk to Mesos.
If your framework needs to talk to Mesos 0.28.0 or older, or you have not updated to the
HTTP API, you can write the scheduler in C++, Java/Scala, or Python.
Your framework scheduler should inherit from the Scheduler class
(see: C++,
Java,
Python). Your scheduler should create a SchedulerDriver (which will mediate
communication between your scheduler and the Mesos master) and then call SchedulerDriver.run()
(see: C++,
Java,
Python).
High Availability
How to build Mesos frameworks that are highly available in the face of failures is discussed in a separate document.
Multi-Scheduler Scalability
When implementing a scheduler, it's important to adhere to the following guidelines in order to ensure that the scheduler can run in a scalable manner alongside other schedulers in the same Mesos cluster:
- Use
Suppress: The scheduler must stay in a suppressed state whenever it has no additional tasks to launch or offer operations to perform. This ensures that Mesos can more efficiently offer resources to those frameworks that do have work to perform. - Do not hold onto offers: If an offer cannot be used, decline it immediately. Otherwise the resources cannot be offered to other schedulers and the scheduler itself will receive fewer additional offers.
Declineresources using a large timeout: when declining an offer, use a largeFilters.refuse_secondstimeout (e.g. 1 hour). This ensures that Mesos will have time to try offering the resources to other scheduler before trying the same scheduler again. However, if the scheduler is unable to eventually enter aSUPPRESSed state, and it has new workloads to run after having declined, it should considerREVIVEing if it is not receiving sufficient resources for some time.- Do not
REVIVEfrequently:REVIVEing clears all filters, and therefore ifREVIVEoccurs frequently it is similar to always declining with a very short timeout (violation of guideline (3)). - Use
FrameworkInfo.offer_filters: This allows the scheduler to specify global offer filters (Declinefilters, on the other hand, are per-agent). Currently supported isOfferFilters.min_allocatable_resourceswhich acts as an override of the cluster level--min_allocatable_resourcesmaster flag for each of the scheduler's roles. Keeping theFrameworkInfo.offer_filtersup-to-date with the minimum desired offer shape for each role will ensure that the sccheduler gets a better chance to receive offers sized with sufficient resources. - Consider specifying offer constraints via
SUBSCRIBE/UPDATE_FRAMEWORKcalls so that the framework role's quota is not consumed by offers that the scheduler will have to decline anyway based on agent attributes. See MESOS-10161 and scheduler.proto for more details.
Operationally, the following can be done to ensure that schedulers get the resources they need when co-existing with other schedulers:
- Do not share a role between schedulers: Roles are the level at which controls are available (e.g. quota, weight, reservation) that affect resource allocation. Within a role, there are no controls to alter the behavior should one scheduler not receive enough resources.
- Set quota if roles need a guarantee: If a role (either an entire scheduler or a "job"/"service"/etc within a multi-tenant scheduler) needs a certain amount of resources guaranteed to it, setting a quota ensures that Mesos will try its best to allocate to satisfy the guarantee.
- Set the minimum allocatable resources: Once quota is used, the
--min_allocatable_resourcesflag should be set (e.g.--min_allocatable_resources=cpus:0.1,mem:32:disk:32) to prevent offers that are missing cpu, memory, or disk (see MESOS-8935). - Consider enabling the random sorter: Depending on the use case, DRF can prove
problematic in that it will try to allocate to frameworks with a low share of the
cluster and penalize frameworks with a high share of the cluster. This can lead
to offer starvation for higher share frameworks. To allocate using a weighted
random uniform distribution instead of fair sharing, set
--role_sorter=randomand--framework_sorter=random(see MESOS-8936).
See the Offer Starvation Design Document in MESOS-3202 for more information about the pitfalls and future plans for running multiple schedulers.
Working with Executors
Using the Mesos Command Executor
Mesos provides a simple executor that can execute shell commands and Docker containers on behalf of the framework scheduler; enough functionality for a wide variety of framework requirements.
Any scheduler can make use of the Mesos command executor by filling in the
optional CommandInfo member of the TaskInfo protobuf message.
message TaskInfo {
...
optional CommandInfo command = 7;
...
}
The Mesos slave will fill in the rest of the ExecutorInfo for you when tasks
are specified this way.
Note that the agent will derive an ExecutorInfo from the TaskInfo and
additionally copy fields (e.g., Labels) from TaskInfo into the new
ExecutorInfo. This ExecutorInfo is only visible on the agent.
Using the Mesos Default Executor
Since Mesos 1.1, a new built-in default executor (experimental) is available that can execute a group of tasks. Just like the command executor the tasks can be shell commands or Docker containers.
The current semantics of the default executor are as folows:
-- Task group is an atomic unit of deployment of a scheduler onto the default executor.
-- The default executor can run one or more task groups (since Mesos 1.2) and each task group can be launched by the scheduler at different points in time.
-- All task groups' tasks are launched as nested containers underneath the executor container.
-- Task containers and executor container share resources like cpu, memory, network and volumes.
-- Each task can have its own separate root file system (e.g., Docker image).
-- There is no resource isolation between different tasks or task groups within an executor. Tasks' resources are added to the executor container.
-- If any of the tasks exits with a non-zero exit code or killed by the scheduler, all the tasks in the task group are killed automatically. The default executor commits suicide if there are no active task groups.
Once the default executor is considered stable, the command executor will be deprecated in favor of it.
Any scheduler can make use of the Mesos default executor by setting ExecutorInfo.type
to DEFAULT when launching a group of tasks using the LAUNCH_GROUP offer operation.
If DEFAULT executor is explicitly specified when using LAUNCH offer operation, command
executor is used instead of the default executor. This might change in the future when the default
executor gets support for handling LAUNCH operation.
message ExecutorInfo {
...
optional Type type = 15;
...
}
Creating a custom Framework Executor
If your framework has special requirements, you might want to provide your own Executor implementation. For example, you may not want a 1:1 relationship between tasks and processes.
If you are writing an executor against Mesos 1.0 or newer, it is recommended to use the new HTTP API to talk to Mesos.
If writing against Mesos 0.28.0 or older, your framework executor must inherit
from the Executor class (see (see: C++,
Java,
Python). It must override the launchTask() method. You can use
the $MESOS_HOME environment variable inside of your executor to determine where
Mesos is running from. Your executor should create an ExecutorDriver (which will
mediate communication between your executor and the Mesos agent) and then call
ExecutorDriver.run()
(see: C++,
Java,
Python).
Install your custom Framework Executor
After creating your custom executor, you need to make it available to all slaves in the cluster.
One way to distribute your framework executor is to let the
Mesos fetcher download it on-demand when your scheduler launches
tasks on that slave. ExecutorInfo is a Protocol Buffer Message class (defined
in include/mesos/mesos.proto), and it contains a field of type CommandInfo.
CommandInfo allows schedulers to specify, among other things, a number of
resources as URIs. These resources are fetched to a sandbox directory on the
slave before attempting to execute the ExecutorInfo command. Several URI
schemes are supported, including HTTP, FTP, HDFS, and S3 (e.g. see
src/examples/java/TestFramework.java for an example of this).
Alternatively, you can pass the frameworks_home configuration option
(defaults to: MESOS_HOME/frameworks) to your mesos-slave daemons when you
launch them to specify where your framework executors are stored (e.g. on an
NFS mount that is available to all slaves), then use a relative path in
CommandInfo.uris, and the slave will prepend the value of frameworks_home
to the relative path provided.
Once you are sure that your executors are available to the mesos-slaves, you should be able to run your scheduler, which will register with the Mesos master, and start receiving resource offers!
Labels
Labels can be found in the FrameworkInfo, TaskInfo, DiscoveryInfo and
TaskStatus messages; framework and module writers can use Labels to tag and
pass unstructured information around Mesos. Labels are free-form key-value pairs
supplied by the framework scheduler or label decorator hooks. Below is the
protobuf definitions of labels:
optional Labels labels = 11;
/**
* Collection of labels.
*/
message Labels {
repeated Label labels = 1;
}
/**
* Key, value pair used to store free form user-data.
*/
message Label {
required string key = 1;
optional string value = 2;
}
Labels are not interpreted by Mesos itself, but will be made available over
master and slave state endpoints. Further more, the executor and scheduler can
introspect labels on the TaskInfo and TaskStatus programmatically.
Below is an example of how two label pairs ("environment": "prod" and
"bananas": "apples") can be fetched from the master state endpoint.
$ curl http://master/state.json
...
{
"executor_id": "default",
"framework_id": "20150312-120017-16777343-5050-39028-0000",
"id": "3",
"labels": [
{
"key": "environment",
"value": "prod"
},
{
"key": "bananas",
"value": "apples"
}
],
"name": "Task 3",
"slave_id": "20150312-115625-16777343-5050-38751-S0",
"state": "TASK_FINISHED",
...
},
Service discovery
When your framework registers an executor or launches a task, it can provide additional information for service discovery. This information is stored by the Mesos master along with other imporant information such as the slave currently running the task. A service discovery system can programmatically retrieve this information in order to set up DNS entries, configure proxies, or update any consistent store used for service discovery in a Mesos cluster that runs multiple frameworks and multiple tasks.
The optional DiscoveryInfo message for TaskInfo and ExecutorInfo is
declared in MESOS_HOME/include/mesos/mesos.proto
message DiscoveryInfo {
enum Visibility {
FRAMEWORK = 0;
CLUSTER = 1;
EXTERNAL = 2;
}
required Visibility visibility = 1;
optional string name = 2;
optional string environment = 3;
optional string location = 4;
optional string version = 5;
optional Ports ports = 6;
optional Labels labels = 7;
}
Visibility is the key parameter that instructs the service discovery system
whether a service should be discoverable. We currently differentiate between
three cases:
- a task should not be discoverable for anyone but its framework.
- a task should be discoverable for all frameworks running on the Mesos cluster but not externally.
- a task should be made discoverable broadly.
Many service discovery systems provide additional features that manage the
visibility of services (e.g., ACLs in proxy based systems, security extensions
to DNS, VLAN or subnet selection). It is not the intended use of the visibility
field to manage such features. When a service discovery system retrieves the
task or executor information from the master, it can decide how to handle tasks
without DiscoveryInfo. For instance, tasks may be made non discoverable to
other frameworks (equivalent to visibility=FRAMEWORK) or discoverable to all
frameworks (equivalent to visibility=CLUSTER).
The name field is a string that provides the service discovery system
with the name under which the task is discoverable. The typical use of the name
field will be to provide a valid hostname. If name is not provided, it is up to
the service discovery system to create a name for the task based on the name
field in taskInfo or other information.
The environment, location, and version fields provide first class support
for common attributes used to differentiate between similar services in large
deployments. The environment may receive values such as PROD/QA/DEV, the
location field may receive values like EAST-US/WEST-US/EUROPE/AMEA, and the
version field may receive values like v2.0/v0.9. The exact use of these fields
is up to the service discovery system.
The ports field allows the framework to identify the ports a task listens to
and explicitly name the functionality they represent and the layer-4 protocol
they use (TCP, UDP, or other). For example, a Cassandra task will define ports
like "7000,Cluster,TCP", "7001,SSL,TCP", "9160,Thrift,TCP",
"9042,Native,TCP", and "7199,JMX,TCP". It is up to the service discovery
system to use these names and protocol in appropriate ways, potentially
combining them with the name field in DiscoveryInfo.
The labels field allows a framework to pass arbitrary labels to the service
discovery system in the form of key/value pairs. Note that anything passed
through this field is not guaranteed to be supported moving forward.
Nevertheless, this field provides extensibility. Common uses of this field will
allow us to identify use cases that require first class support.
title: Apache Mesos - Designing Highly Available Mesos Frameworks layout: documentation
Designing Highly Available Mesos Frameworks
A Mesos framework manages tasks. For a Mesos framework to be highly available, it must continue to manage tasks correctly in the presence of a variety of failure scenarios. The most common failure conditions that framework authors should consider include:
-
The Mesos master that a framework scheduler is connected to might fail, for example by crashing or by losing network connectivity. If the master has been configured to use high-availability mode, this will result in promoting another Mesos master replica to become the current leader. In this situation, the scheduler should reregister with the new master and ensure that task state is consistent.
-
The host where a framework scheduler is running might fail. To ensure that the framework remains available and can continue to schedule new tasks, framework authors should ensure that multiple copies of the scheduler run on different nodes, and that a backup copy is promoted to become the new leader when the previous leader fails. Mesos itself does not dictate how framework authors should handle this situation, although we provide some suggestions below. It can be useful to deploy multiple copies of your framework scheduler using a long-running task scheduler such as Apache Aurora or Marathon.
-
The host where a task is running might fail. Alternatively, the node itself might not have failed but the Mesos agent on the node might be unable to communicate with the Mesos master, e.g., due to a network partition.
Note that more than one of these failures might occur simultaneously.
Mesos Architecture
Before discussing the specific failure scenarios outlined above, it is worth highlighting some aspects of how Mesos is designed that influence high availability:
-
Mesos provides unreliable messaging between components by default: messages are delivered "at-most-once" (they might be dropped). Framework authors should expect that messages they send might not be received and be prepared to take appropriate corrective action. To detect that a message might be lost, frameworks typically use timeouts. For example, if a framework attempts to launch a task, that message might not be received by the Mesos master (e.g., due to a transient network failure). To address this, the framework scheduler should set a timeout after attempting to launch a new task. If the scheduler hasn't seen a status update for the new task before the timeout fires, it should take corrective action---for example, by performing task state reconciliation, and then launching a new copy of the task if necessary.
-
In general, distributed systems cannot distinguish between "lost" messages and messages that are merely delayed. In the example above, the scheduler might see a status update for the first task launch attempt immediately after its timeout has fired and it has already begun taking corrective action. Scheduler authors should be aware of this possibility and program accordingly.
-
Mesos actually provides ordered (but unreliable) message delivery between any pair of processes: for example, if a framework sends messages M1 and M2 to the master, the master might receive no messages, just M1, just M2, or M1 followed by M2 -- it will not receive M2 followed by M1.
-
As a convenience for framework authors, Mesos provides reliable delivery of task status updates and operation status updates. The agent persists these updates to disk and then forwards them to the master. The master sends status updates to the appropriate framework scheduler. When a scheduler acknowledges a status update, the master forwards the acknowledgment back to the agent, which allows the stored status update to be garbage collected. If the agent does not receive an acknowledgment for a status update within a certain amount of time, it will repeatedly resend the update to the master, which will again forward the update to the scheduler. Hence, task and operation status updates will be delivered "at least once", assuming that the agent and the scheduler both remain available. To handle the fact that task and operation status updates might be delivered more than once, it can be helpful to make the framework logic that processes them idempotent.
-
-
The Mesos master stores information about the active tasks and registered frameworks in memory: it does not persist it to disk or attempt to ensure that this information is preserved after a master failover. This helps the Mesos master scale to large clusters with many tasks and frameworks. A downside of this design is that after a failure, more work is required to recover the lost in-memory master state.
-
If all the Mesos masters are unavailable (e.g., crashed or unreachable), the cluster should continue to operate: existing Mesos agents and user tasks should continue running. However, new tasks cannot be scheduled, and frameworks will not receive resource offers or status updates about previously launched tasks.
-
Mesos does not dictate how frameworks should be implemented and does not try to assume responsibility for how frameworks should deal with failures. Instead, Mesos tries to provide framework developers with the tools they need to implement this behavior themselves. Different frameworks might choose to handle failures differently, depending on their exact requirements.
Recommendations for Highly Available Frameworks
Highly available framework designs typically follow a few common patterns:
-
To tolerate scheduler failures, frameworks run multiple scheduler instances (three instances is typical). At any given time, only one of these scheduler instances is the leader: this instance is connected to the Mesos master, receives resource offers and task status updates, and launches new tasks. The other scheduler replicas are followers: they are used only when the leader fails, in which case one of the followers is chosen to become the new leader.
-
Schedulers need a mechanism to decide when the current scheduler leader has failed and to elect a new leader. This is typically accomplished using a coordination service like Apache ZooKeeper or etcd. Consult the documentation of the coordination system you are using for more information on how to correctly implement leader election.
-
After electing a new leading scheduler, the new leader should reconnect to the Mesos master. When registering with the master, the framework should set the
idfield in itsFrameworkInfoto the ID that was assigned to the failed scheduler instance. This ensures that the master will recognize that the connection does not start a new session, but rather continues (and replaces) the session used by the failed scheduler instance.NOTE: When the old scheduler leader disconnects from the master, by default the master will immediately kill all the tasks and executors associated with the failed framework. For a typical production framework, this default behavior is very undesirable! To avoid this, highly available frameworks should set the
failover_timeoutfield in theirFrameworkInfoto a generous value. To avoid accidental destruction of tasks in production environments, many frameworks use afailover_timeoutof 1 week or more.- In the current implementation, a framework's
failover_timeoutis not preserved during master failover. Hence, if a framework fails but the leading master fails before thefailover_timeoutis reached, the newly elected leading master won't know that the framework's tasks should be killed after a period of time. Hence, if the framework never reregisters, those tasks will continue to run indefinitely but will be orphaned. This behavior will likely be fixed in a future version of Mesos (MESOS-4659).
- In the current implementation, a framework's
-
After connecting to the Mesos master, the new leading scheduler should ensure that its local state is consistent with the current state of the cluster. For example, suppose that the previous leading scheduler attempted to launch a new task and then immediately failed. The task might have launched successfully, at which point the newly elected leader will begin to receive status updates about it. To handle this situation, frameworks typically use a strongly consistent distributed data store to record information about active and pending tasks. In fact, the same coordination service that is used for leader election (such as ZooKeeper or etcd) can often be used for this purpose. Some Mesos frameworks (such as Apache Aurora) use the Mesos replicated log for this purpose.
-
The data store should be used to record the actions that the scheduler intends to take, before it takes them. For example, if a scheduler decides to launch a new task, it first writes this intent to its data store. Then it sends a "launch task" message to the Mesos master. If this instance of the scheduler fails and a new scheduler is promoted to become the leader, the new leader can consult the data store to find all possible tasks that might be running on the cluster. This is an instance of the write-ahead logging pattern often employed by database systems and filesystems to improve reliability. Two aspects of this design are worth emphasizing.
-
The scheduler must persist its intent before launching the task: if the task is launched first and then the scheduler fails before it can write to the data store, the new leading scheduler won't know about the new task. If this occurs, the new scheduler instance will begin receiving task status updates for a task that it has no knowledge of; there is often not a good way to recover from this situation.
-
Second, the scheduler should ensure that its intent has been durably recorded in the data store before continuing to launch the task (for example, it should wait for a quorum of replicas in the data store to have acknowledged receipt of the write operation). For more details on how to do this, consult the documentation for the data store you are using.
-
-
The Life Cycle of a Task
A Mesos task transitions through a sequence of states. The authoritative "source of truth" for the current state of a task is the agent on which the task is running. A framework scheduler learns about the current state of a task by communicating with the Mesos master---specifically, by listening for task status updates and by performing task state reconciliation.
Frameworks can represent the state of a task using a state machine, with one initial state and several possible terminal states:
-
A task begins in the
TASK_STAGINGstate. A task is in this state when the master has received the framework's request to launch the task but the task has not yet started to run. In this state, the task's dependencies are fetched---for example, using the Mesos fetcher cache. -
The
TASK_STARTINGstate is optional. It can be used to describe the fact that an executor has learned about the task (and maybe started fetching its dependencies) but has not yet started to run it. Custom executors are encouraged to send it, to provide a more detailed description of the current task state to outside observers. -
A task transitions to the
TASK_RUNNINGstate after it has begun running successfully (if the task fails to start, it transitions to one of the terminal states listed below).-
If a framework attempts to launch a task but does not receive a status update for it within a timeout, the framework should perform reconciliation. That is, it should ask the master for the current state of the task. The master will reply with
TASK_LOSTstatus updates for unknown tasks. The framework can then use this to distinguish between tasks that are slow to launch and tasks that the master has never heard about (e.g., because the task launch message was dropped).- Note that the correctness of this technique depends on the fact that messaging between the scheduler and the master is ordered.
-
-
The
TASK_KILLINGstate is optional and is intended to indicate that the request to kill the task has been received by the executor, but the task has not yet been killed. This is useful for tasks that require some time to terminate gracefully. Executors must not generate this state unless the framework has theTASK_KILLING_STATEframework capability. -
There are several terminal states:
TASK_FINISHEDis used when a task completes successfully.TASK_FAILEDindicates that a task aborted with an error.TASK_KILLEDindicates that a task was killed by the executor.TASK_LOSTindicates that the task was running on an agent that has lost contact with the current master (typically due to a network partition or an agent host failure). This case is described further below.TASK_ERRORindicates that a task launch attempt failed because of an error in the task specification.
Note that the same task status can be used in several different (but usually
related) situations. For example, TASK_ERROR is used when the framework's
principal is not authorized to launch tasks as a certain user, and also when the
task description is syntactically malformed (e.g., the task ID contains an
invalid character). The reason field of the TaskStatus message can be used
to disambiguate between such situations.
Performing operations on offered resources
The scheduler API provides a number of operations which can be applied to
resources included in offers sent to a framework scheduler. Schedulers which use
the v1 scheduler API may set the id field in an offer
operation in order to request feedback for the operation. When this is done, the
scheduler will receive UPDATE_OPERATION_STATUS events on its HTTP event stream
when the operation transitions to a new state. Additionally, the scheduler may
use the RECONCILE_OPERATIONS call to perform explicit or implicit
reconciliation of its operations' states, similar to task
state reconciliation.
Unlike tasks, which occur as the result of LAUNCH or LAUNCH_GROUP
operations, other operations do not currently have intermediate states that they
transition through:
-
An operation begins in the
OPERATION_PENDINGstate. In the absence of any system failures, it remains in this state until it transitions to a terminal state. -
There exist several terminal states that an operation may transition to:
OPERATION_FINISHEDis used when an operation completes successfully.OPERATION_FAILEDis used when an operation was attempted but failed to complete.OPERATION_ERRORis used when an operation failed because it was not specified correctly and was thus never attempted.OPERATION_DROPPEDis used when an operation was not successfully delivered to the agent.
-
When performing operation reconciliation, the scheduler may encounter other non-terminal states due to various failures in the system:
OPERATION_UNREACHABLEis used when an operation was previously pending on an agent which is not currently reachable by the Mesos master.OPERATION_RECOVERINGis used when an operation was previously pending on an agent which has been recovered from the master's checkpointed state after a master failover, but which has not yet reregistered.OPERATION_UNKNOWNis used when Mesos does not recognize an operation ID included in an explicit reconciliation request. This may be because an operation with that ID was never received by the master, or because the operation state is gone due to garbage collection or a system/network failure.OPERATION_GONE_BY_OPERATORis used when an operation was previously pending on an agent which was marked as "gone" by an operator.
Dealing with Partitioned or Failed Agents
The Mesos master tracks the availability and health of the registered agents using two different mechanisms:
-
The state of a persistent TCP connection between the master and the agent.
-
Health checks using periodic ping messages to the agent. The master sends "ping" messages to the agent and expects a "pong" response message within a configurable timeout. The agent is considered to have failed if it does not respond promptly to a certain number of ping messages in a row. This behavior is controlled by the
--agent_ping_timeoutand--max_agent_ping_timeoutsmaster flags.
If the persistent TCP connection to the agent breaks or the agent fails health checks, the master decides that the agent has failed and takes steps to remove it from the cluster. Specifically:
-
If the TCP connection breaks, the agent is considered disconnected. The semantics when a registered agent gets disconnected are as follows for each framework running on that agent:
-
If the framework is checkpointing: no immediate action is taken. The agent is given a chance to reconnect until health checks time out.
-
If the framework is not checkpointing: all the framework's tasks and executors are considered lost. The master immediately sends
TASK_LOSTstatus updates for the tasks. These updates are not delivered reliably to the scheduler (see NOTE below). The agent is given a chance to reconnect until health checks timeout. If the agent does reconnect, any tasks for whichTASK_LOSTupdates were previously sent will be killed.- The rationale for this behavior is that, using typical TCP settings, an
error in the persistent TCP connection between the master and the agent is
more likely to correspond to an agent error (e.g., the
mesos-agentprocess terminating unexpectedly) than a network partition, because the Mesos health-check timeouts are much smaller than the typical values of the corresponding TCP-level timeouts. Since non-checkpointing frameworks will not survive a restart of themesos-agentprocess, the master sendsTASK_LOSTstatus updates so that these tasks can be rescheduled promptly. Of course, the heuristic that TCP errors do not correspond to network partitions may not be true in some environments.
- The rationale for this behavior is that, using typical TCP settings, an
error in the persistent TCP connection between the master and the agent is
more likely to correspond to an agent error (e.g., the
-
-
If the agent fails health checks, it is scheduled for removal. The removals can be rate limited by the master (see
--agent_removal_rate_limitmaster flag) to avoid removing a slew of agents at once (e.g., during a network partition). -
When it is time to remove an agent, the master removes the agent from the list of registered agents in the master's durable state (this will survive master failover). The master sends a
slaveLostcallback to every registered scheduler driver; it also sendsTASK_LOSTstatus updates for every task that was running on the removed agent.NOTE: Neither the callback nor the task status updates are delivered reliably by the master. For example, if the master or scheduler fails over or there is a network connectivity issue during the delivery of these messages, they will not be resent.
-
Meanwhile, any tasks at the removed agent will continue to run and the agent will repeatedly attempt to reconnect to the master. Once a removed agent is able to reconnect to the master (e.g., because the network partition has healed), the reregistration attempt will be refused and the agent will be asked to shutdown. The agent will then shutdown all running tasks and executors. Persistent volumes and dynamic reservations on the removed agent will be preserved.
- A removed agent can rejoin the cluster by restarting the
mesos-agentprocess. When a removed agent is shutdown by the master, Mesos ensures that the next timemesos-agentis started (using the same work directory at the same host), the agent will receive a new agent ID; in effect, the agent will be treated as a newly joined agent. The agent will retain any previously created persistent volumes and dynamic reservations, although the agent ID associated with these resources will have changed.
- A removed agent can rejoin the cluster by restarting the
Typically, frameworks respond to failed or partitioned agents by scheduling new copies of the tasks that were running on the lost agent. This should be done with caution, however: it is possible that the lost agent is still alive, but is partitioned from the master and is unable to communicate with it. Depending on the nature of the network partition, tasks on the agent might still be able to communicate with external clients or other hosts in the cluster. Frameworks can take steps to prevent this (e.g., by having tasks connect to ZooKeeper and cease operation if their ZooKeeper session expires), but Mesos leaves such details to framework authors.
Dealing with Partitioned or Failed Masters
The behavior described above does not apply during the period immediately after a new Mesos master is elected. As noted above, most Mesos master state is only kept in memory; hence, when the leading master fails and a new master is elected, the new master will have little knowledge of the current state of the cluster. Instead, it rebuilds this information as the frameworks and agents notice that a new master has been elected and then reregister with it.
Framework Reregistration
When master failover occurs, frameworks that were connected to the previous
leading master should reconnect to the new leading
master. MesosSchedulerDriver handles most of the details of detecting when the
previous leading master has failed and connecting to the new leader; when the
framework has successfully reregistered with the new leading master, the
reregistered scheduler driver callback will be invoked.
Agent Reregistration
During the period after a new master has been elected but before a given agent
has reregistered or the agent_reregister_timeout has fired, attempting to
reconcile the state of a task running on that agent will not return any
information (because the master cannot accurately determine the state of the
task).
If an agent does not reregister with the new master within a timeout (controlled
by the --agent_reregister_timeout configuration flag), the master marks the
agent as failed and follows the same steps described above. However, there is
one difference: by default, agents are allowed to reconnect following master
failover, even after the agent_reregister_timeout has fired. This means that
frameworks might see a TASK_LOST update for a task but then later discover
that the task is running (because the agent where it was running was allowed to
reconnect).
title: Apache Mesos - Reconciliation layout: documentation
Task Reconciliation
Messages between framework schedulers and the Mesos master may be dropped due to failures and network partitions. This may cause a framework scheduler and the master to have different views of the current state of the cluster. For example, consider a launch task request sent by a framework. There are many ways that failures can prevent the task launch operation from succeeding, such as:
- Framework fails after persisting its intent to launch the task, but before the launch task message was sent.
- Master fails before receiving the message.
- Master fails after receiving the message but before sending it to the agent.
In these cases, the framework believes the task to be staging but the task is unknown to the master. To cope with such situations, Mesos frameworks should use reconciliation to ask the master for the current state of their tasks.
How To Reconcile
Frameworks can use the scheduler driver's reconcileTasks method to send a
reconciliation request to the master:
// Allows the framework to query the status for non-terminal tasks.
// This causes the master to send back the latest task status for
// each task in 'statuses', if possible. Tasks that are no longer
// known will result in a TASK_LOST update. If statuses is empty,
// then the master will send the latest status for each task
// currently known.
virtual Status reconcileTasks(const std::vector<TaskStatus>& statuses);
Currently, the master will only examine two fields in TaskStatus:
TaskID: This is required.SlaveID: Optional but recommended. This leads to faster reconciliation in the presence of agents that are transitioning between states.
Mesos provides two forms of reconciliation:
- "Explicit" reconciliation: the scheduler sends a list of non-terminal task IDs and the master responds with the latest state for each task, if possible.
- "Implicit" reconciliation: the scheduler sends an empty list of tasks and the master responds with the latest state for all currently known non-terminal tasks.
Reconciliation results are returned as task status updates (e.g., via the
scheduler driver's statusUpdate callback). Status updates that result from
reconciliation requests will their reason field set to
REASON_RECONCILIATION. Note that most of the other fields in the returned
TaskStatus message will not be set: for example, reconciliation cannot be used
to retrieve the labels or data fields associated with a running task.
When To Reconcile
Framework schedulers should periodically reconcile all of their tasks (for example, every fifteen minutes). This serves two purposes:
- It is necessary to account for dropped messages between the framework and the master; for example, see the task launch scenario described above.
- It is a defensive programming technique to catch bugs in both the framework and the Mesos master.
As an optimization, framework schedulers should reconcile more frequently when
they have reason to suspect that their local state differs from that of the
master. For example, after a framework launches a task, it should expect to
receive a TASK_RUNNING status update for the new task fairly promptly. If no
such update is received, the framework should perform explicit reconciliation
more quickly than usual.
Similarly, frameworks should initiate reconciliation after both framework
failovers and master failovers. Note that the scheduler driver notifies
frameworks when master failover has occurred (via the reregistered()
callback). For more information, see the
guide to designing highly available frameworks.
Algorithm
This technique for explicit reconciliation reconciles all non-terminal tasks
until an update is received for each task, using exponential backoff to retry
tasks that remain unreconciled. Retries are needed because the master temporarily
may not be able to reply for a particular task. For example, during master
failover the master must reregister all of the agents to rebuild its
set of known tasks (this process can take minutes for large clusters, and
is bounded by the --agent_reregister_timeout flag on the master).
Steps:
- let
start = now() - let
remaining = { T in tasks | T is non-terminal } - Perform reconciliation:
reconcile(remaining) - Wait for status updates to arrive (use truncated exponential backoff). For each update, note the time of arrival.
- let
remaining = { T in remaining | T.last_update_arrival() < start } - If
remainingis non-empty, go to 3.
This reconciliation algorithm must be run after each (re-)registration.
Implicit reconciliation (passing an empty list) should also be used periodically, as a defense against data loss in the framework. Unless a strict registry is in use on the master, its possible for tasks to resurrect from a LOST state (without a strict registry the master does not enforce agent removal across failovers). When an unknown task is encountered, the scheduler should kill or recover the task.
Notes:
- When waiting for updates to arrive, use a truncated exponential backoff. This will avoid a snowball effect in the case of the driver or master being backed up.
- It is beneficial to ensure that only 1 reconciliation is in progress at a time, to avoid a snowball effect in the face of many re-registrations. If another reconciliation should be started while one is in-progress, then the previous reconciliation algorithm should stop running.
Offer Reconciliation
Offers are reconciled automatically after a failure:
- Offers do not persist beyond the lifetime of a Master.
- If a disconnection occurs, offers are no longer valid.
- Offers are rescinded and regenerated each time the framework (re-)registers.
Operation Reconciliation
When a scheduler specifies an id on an offer operation, the master will
provide updates on the status of that operation. If the scheduler needs to
reconcile its view of the current states of operations with the master's view,
it can do so via the RECONCILE_OPERATIONS call in the v1 scheduler API.
Operation reconciliation is similar to task reconciliation in that the scheduler
can perform either explicit or implicit reconciliation by specifying particular
operation IDs or by leaving the operations field unset, respectively.
In order to explicitly reconcile particular operations, the scheduler should
include in the RECONCILE_OPERATIONS call a list of operations, specifying an
operation ID, agent ID, and resource provider ID (if applicable) for each one.
While the agent and resource provider IDs are optional, the master will be able
to provide the highest quality reconciliation information when they are set. For
example, if the relevant agent is not currently registered, inclusion of the
agent ID will allow the master to respond with states like
OPERATION_RECOVERING, OPERATION_UNREACHABLE, or OPERATION_GONE_BY_OPERATOR
when the agent is recovering, unreachable, or gone, respectively. Inclusion of
the resource provider ID provides the same benefit for cases where the
resource provider is recovering or gone.
Similar to task reconciliation, we recommend that schedulers implement a periodic reconciliation loop for operations in order to defend against network failures and bugs in the scheduler and/or Mesos master.
title: Apache Mesos - Task State Reasons layout: documentation
Task State Reasons
Some TaskStatus messages will arrive with the reason field set to a value
that can allow frameworks to display better error messages and to implement
special behaviour for some of the reasons.
For most reasons, the message field of the TaskStatus message will give a
more detailed, human-readable error description.
Not all status updates will contain a reason.
Guidelines for Framework Authors
Frameworks that implement their own executors are free to set the reason field on any status messages they produce.
Note that executors can not generally rely on the fact that the scheduler will
see the status update with the reason set by the executor, since only the
latest update for each different task state is stored and re-transmitted. See
in particular the description of REASON_RECONCILIATION below.
Most reasons describe conditions that can only be detected in the master or agent code, and will accompany automatically generated status updates from either of these.
For consistency with the existing usages of the different task reasons, we recommend that executors restrict themselves to the following subset if they use a non-default reason in their status updates.
REASON_TASK_CHECK_STATUS_UPDATED
| For executors that support running task checks, it is
recommended to generate a status update with this reason
every time the task check status changes, together with a
human-readable description of the change in
the message field.
|
REASON_TASK_HEALTH_CHECK_STATUS_UPDATED
| For executors that support running task health checks, it
is recommended to generate a status update with this reason
every time the health check status changes, together with a
human-readable description of the change in
the message field.
Note:
The built-in executors additionally send an update with
this reason every time a health check is unhealthy.
|
REASON_TASK_INVALID
| For executors that implement their own task validation
logic, this reason can be used when the validation check
fails, together with a human-readable description of the
failed check in the message field.
|
REASON_TASK_UNAUTHORIZED
| For executors that implement their own authorization logic,
this reason can be used when authorization fails, together
with a human-readable description in
the message field.
|
Reference of Reasons Currently Used in Mesos
Deprecated Reasons
The reason REASON_COMMAND_EXECUTOR_FAILED is deprecated and will be removed
in the future. It should not be referenced by newly written code.
Unused Reasons
The reasons REASON_CONTAINER_LIMITATION, REASON_INVALID_FRAMEWORKID,
REASON_SLAVE_UNKNOWN, REASON_TASK_UNKNOWN and
REASON_EXECUTOR_UNREGISTERED are not used as of Mesos 1.4.
Reasons for Terminal Status Updates
For these status updates, the reason indicates why the task state changed. Typically, a given reason will always appear together with the same state.
Typically they are generated by mesos when an error occurs that prevents the executor from sending its own status update messages.
Below, a partition-aware framework means a framework which has the
Capability::PARTITION_AWARE capability bit set in its FrameworkInfo.
Messages generated on the master will have the source field set to
SOURCE_MASTER and messages generated on the agent will have it set
to SOURCE_AGENT in the v1 API or SOURCE_SLAVE in the v0 API.
As of Mesos 1.4, the following reasons are being used.
For state TASK_FAILED
In status updates generated on the agent:
REASON_CONTAINER_LAUNCH_FAILED
| The task could not be launched because its container failed to launch. |
REASON_CONTAINER_LIMITATION_MEMORY
| The container in which the task was running exceeded its memory allocation. |
REASON_CONTAINER_LIMITATION_DISK
| The container in which the task was running exceeded its disk quota. |
REASON_IO_SWITCHBOARD_EXITED
| The I/O switchboard server terminated unexpectedly. |
REASON_EXECUTOR_REGISTRATION_TIMEOUT
| The executor for this task didn't register with the agent within the allowed time limit. |
REASON_EXECUTOR_REREGISTRATION_TIMEOUT
| The executor for this task lost connection and didn't reregister within the allowed time limit. |
REASON_EXECUTOR_TERMINATED
| The tasks' executor terminated abnormally, and no more specific reason could be determined. |
For state TASK_KILLED
In status updates generated on the master:
REASON_FRAMEWORK_REMOVED
| The framework to which this task belonged was removed.
Note: The status update will be sent out before the task is actually killed. |
REASON_TASK_KILLED_DURING_LAUNCH
| This task, or a task within this task group, was killed before delivery to the agent. |
In status updates generated on the agent:
REASON_TASK_KILLED_DURING_LAUNCH
| This task, or a task within this task group, was killed
before delivery to the executor.
Note: Prior to version 1.5, the agent would in this situation sometimes send status updates with reason set to REASON_EXECUTOR_UNREGISTERED and
sometimes without any reason set, depending on details of
the timing of the executor launch and the kill command.
|
For state TASK_ERROR
In status updates generated on the master:
REASON_TASK_INVALID
| Task or resource validation checks failed. |
REASON_TASK_GROUP_INVALID
| Task group or resource validation checks failed. |
REASON_TASK_UNAUTHORIZED
| Task authorization failed on the master. |
REASON_TASK_GROUP_UNAUTHORIZED
| Task group authorization failed on the master. |
In status updates generated on the agent:
REASON_TASK_UNAUTHORIZED
| Task authorization failed on the agent. |
REASON_TASK_GROUP_UNAUTHORIZED
| Task group authorization failed on the agent. |
For state TASK_LOST
In status updates generated on the master:
REASON_SLAVE_DISCONNECTED
| The agent on which the task was running disconnected, and
didn't reconnect in time.
Note: For partition-aware frameworks, the state will be TASK_DROPPED instead
|
| The task was part of an accepted offer, but the agent
sending the offer disconnected in the meantime.
Note: For partition-aware frameworks, the state will be TASK_DROPPED instead.
| |
REASON_MASTER_DISCONNECTED
| The task was part of an accepted offer which couldn't be
sent to the master, because it was disconnected.
Note: For partition-aware frameworks, the state will be TASK_DROPPED instead.
Note: Despite the source being set to SOURCE_MASTER ,
the message is not sent from the master but locally from
the scheduler driver.
Note:
This reason is only used in the v0 API.
|
REASON_SLAVE_REMOVED
| The agent on which the task was running was removed. |
| The task was part of an accepted offer, but the agent
sending the offer was disconnected in the meantime.
Note: For partition-aware frameworks, the state will be to TASK_DROPPED instead.
| |
| The agent on which the task was running was marked
unreachable.
Note: For partition-aware frameworks, the state will be TASK_UNREACHABLE instead.
| |
REASON_RESOURCES_UNKNOWN
| The task was part of an accepted offer which used
checkpointed resources that are not known to the master.
Note: For partition-aware frameworks, the state will be TASK_DROPPED instead.
|
In status updates generated on the agent:
REASON_SLAVE_RESTARTED
| The task was launched during an agent restart, and never
got forwarded to the executor.
Note: For partition-aware frameworks, the state will be TASK_DROPPED instead.
|
REASON_CONTAINER_PREEMPTED
| The container in which the task was running was pre-empted
by a QoS correction.
Note: For partition-aware frameworks, the state will be changed to TASK_GONE instead.
|
REASON_CONTAINER_UPDATE_FAILED
| The container in which the task was running was discarded
because a resource update failed.
Note: For partition-aware frameworks, the state will be TASK_GONE instead.
|
REASON_EXECUTOR_TERMINATED
| The executor which was supposed to execute this task was
already terminated, or the agent receives an instruction to
kill the task before the executor was started.
Note: For partition-aware frameworks, the state will be TASK_DROPPED instead.
|
REASON_GC_ERROR
| A directory to be used by this task was scheduled for GC
and it could not be unscheduled.
Note: For partition-aware frameworks, the state will be TASK_DROPPED instead.
|
REASON_INVALID_OFFERS
| This task belonged to an accepted offer that didn't pass
validation checks.
Note: For partition-aware frameworks, the state will be TASK_DROPPED instead.
|
For state TASK_DROPPED:
In status updates generated on the master:
REASON_SLAVE_DISCONNECTED
| See TASK_LOST
|
REASON_SLAVE_REMOVED
| See TASK_LOST
|
REASON_RESOURCES_UNKNOWN
| See TASK_LOST
|
In status updates generated on the agent:
REASON_SLAVE_RESTARTED
| See TASK_LOST
|
REASON_GC_ERROR
| See TASK_LOST
|
REASON_INVALID_OFFERS
| See TASK_LOST
|
For state TASK_UNREACHABLE:
In status updates generated on the master:
REASON_SLAVE_REMOVED
| See TASK_LOST |
For state TASK_GONE
In status updates generated on the agent:
REASON_CONTAINER_UPDATE_FAILED
| See TASK_LOST
|
REASON_CONTAINER_PREEMPTED
| See TASK_LOST
|
REASON_EXECUTOR_PREEMPTED
| Renamed to REASON_CONTAINER_PREEMPTED in
Mesos 0.26.
|
Reasons for Non-Terminal Status Updates
These reasons do not cause a state change, and will be sent along with the last known state of the task. The reason field indicates why the status update was sent.
REASON_RECONCILIATION
| A framework requested implicit or explicit reconciliation
for this task.
Note: Status updates with this reason are not the original ones, but rather a modified copy that is re-sent from the master. In particular, the original data
and message fields are erased and the
original reason field is overwritten
by REASON_RECONCILIATION .
|
REASON_TASK_CHECK_STATUS_UPDATED
| A task check notified the agent that its state changed.
Note: This reason is set by the executor, so for tasks that are running with a custom executor, whether or not status updates with this reasons are sent depends on that executors implementation. Note: Currently, when using one of the built-in executors, this reason is only used within status updates with task state TASK_RUNNING .
|
REASON_TASK_HEALTH_CHECK_STATUS_UPDATED
| A task health check notified the agent that its
state changed.
Note: This reason is set by the executor, so for tasks that are running with a custom executor, whether or not status updates with this reasons are sent depends on that executors implementation. Note: Currently, when using one of the built-in executors, this reason is only used within status updates with task state TASK_RUNNING .
|
REASON_SLAVE_REREGISTERED
| The agent on which the task was running has reregistered
after being marked unreachable by the master.
Note: Due to garbage collection of the unreachable and gone agents in the registry and master state Mesos also sends such status updates for agents unknown to the master. Note: Status updates with this reason are modified copies re-sent by the master which reflect the states of the tasks reported by the agent upon its re-registration. See comments for REASON_RECONCILIATION .
|
title: Apache Mesos - Task Health Checking and Generalized Checks layout: documentation
Task Health Checking and Generalized Checks
Sometimes applications crash, misbehave, or become unresponsive. To detect and recover from such situations, some frameworks (e.g., Marathon, Apache Aurora) implement their own logic for checking the health of their tasks. This is typically done by having the framework scheduler send a "ping" request, e.g., via HTTP, to the host where the task is running and arranging for the task or executor to respond to the ping. Although this technique is extremely useful, there are several disadvantages in the way it is usually implemented:
- Each Apache Mesos framework uses its own API and protocol.
- Framework developers have to reimplement common functionality.
- Health checks originating from a scheduler generate extra network traffic if the task and the scheduler run on different nodes (which is usually the case); moreover, network failures between the task and the scheduler may make the latter think that the former is unhealthy, which might not be the case.
- Implementing health checks in the framework scheduler can be a performance bottleneck. If a framework is managing a large number of tasks, performing health checks for every task can cause scheduler performance problems.
To address the aforementioned problems, Mesos 1.2.0 introduced the Mesos-native health check design, defined common API for command, HTTP(S), and TCP health checks, and provided reference implementations for all built-in executors.
Mesos 1.4.0 introduced a generalized check, which delegates interpretation of a check result to the framework. This might be useful, for instance, to track tasks' internal state transitions reliably without Mesos taking action on them.
NOTE: Some functionality related to health checking was available prior to 1.2.0 release, however it was considered experimental.
NOTE: Mesos monitors each process-based task, including Docker containers,
using an equivalent of a waitpid() system call. This technique allows
detecting and reporting process crashes, but is insufficient for cases when the
process is still running but is not responsive.
This document describes supported check and health check types, touches on relevant implementation details, and mentions limitations and caveats.
Mesos-native Task Checking
In contrast to the state-of-the-art "scheduler health check" pattern mentioned above, Mesos-native checks run on the agent node: it is the executor which performs checks and not the scheduler. This improves scalability but means that detecting network faults or task availability from the outside world becomes a separate concern. For instance, if the task is running on a partitioned agent, it will still be (health) checked and---if the health checks fail---might be terminated. Needless to say that due to the network partition, all this will happen without the framework scheduler being notified.
Mesos checks and health checks are described in
CheckInfo
and HealthCheck
protobufs respectively. Currently, only tasks can be (health) checked, not
arbitrary processes or executors, i.e., only the TaskInfo protobuf has the
optional CheckInfo and HealthCheck fields. However, it is worth noting that
all built-in executors map a task to a process.
Task status updates are leveraged to transfer the check and health check status to the Mesos master and further to the framework's scheduler ensuring the "at-least-once" delivery guarantee. To minimize performance overhead, those task status updates are triggered if a certain condition is met, e.g., the value or presence of a specific field in the check status changes.
When a built-in executor sends a task status update because the check or health
check status has changed, it sets TaskStatus.reason to
REASON_TASK_CHECK_STATUS_UPDATED or REASON_TASK_HEALTH_CHECK_STATUS_UPDATED
respectively. While sending such an update, the executor avoids shadowing other
data that might have been injected previously, e.g., a check update includes the
last known update from a health check.
It is the responsibility of the executor to interpret CheckInfo and
HealthCheckInfo and perform checks appropriately. All built-in executors
support health checking their tasks and all except the docker executor support
generalized checks (see implementation details and
limitations).
NOTE: It is up to the executor how---and whether at all---to honor the
CheckInfo and HealthCheck fields in TaskInfo. Implementations may vary
significantly depending on what entity TaskInfo represents. On this page only
the reference implementation for built-in executors is considered.
Custom executors can use the checker library, the reference implementation for health checking that all built-in executors rely on.
On the Differences Between Checks and Health Checks
When humans read data from a sensor, they may interpret these data and act on them. For example, if they check air temperature, they usually interpret temperature readings and say whether it's cold or warm outside; they may also act on the interpretation and decide to apply sunscreen or put on an extra jacket.
Similar reasoning can be applied to checking task's state in Mesos:
- Perform a check.
- Optionally interpret the result and, for example, declare the task either healthy or unhealthy.
- Optionally act on the interpretation by killing an unhealthy task.
Mesos health checks do all of the above, 1+2+3: they run the check, declare the
task healthy or not, and kill it after consecutive_failures have occurred.
Though efficient and scalable, this strategy is inflexible for the needs of
frameworks which may want to run an arbitrary check without Mesos interpreting
the result in any way, for example, to transmit the task's internal state
transitions and make global decisions.
Conceptually, a health check is a check with an interpretation and a kill policy. A check and a health check differ in how they are specified and implemented:
- Built-in executors do not (and custom executors shall not) interpret the result of a check. If they do, it should be a health check.
- There is no concept of a check failure, hence grace period and consecutive failures options are only available for health checks. Note that a check can still time out (a health check interprets timeouts as failures), in this case an empty result is sent to the scheduler.
- Health checks do not propagate the result of the underlying check to the scheduler, only its interpretation: healthy or unhealthy. Note that this may change in the future.
- Health check updates are deduplicated based on the interpretation and not the
result of the underlying check, i.e., given that only HTTP
4**status codes are considered failures, if the first HTTP check returns200and the second202, only one status update after the first success is sent, while a check would generate two status updates in this case.
NOTE: Docker executor currently supports health checks but not checks.
NOTE: Slight changes in protobuf message naming and structure are due to
backward compatibility reasons; in the future the HealthCheck message will be
based on CheckInfo.
Anatomy of a Check
A CheckStatusInfo message is added to the task status update to convey the
check status. Currently, check status info is only added for TASK_RUNNING
status updates.
Built-in executors leverage task status updates to deliver check updates to the
scheduler. To minimize performance overhead, a check-related task status update
is triggered if and only if the value or presence of any field in
CheckStatusInfo changes. As the CheckStatusInfo message matures, in the
future we might deduplicate only on specific fields in CheckStatusInfo to make
sure that as few updates as possible are sent. Note that custom executors may
use a different strategy.
To support third party tooling that might not have access to the original
TaskInfo specification, TaskStatus.check_status generated by built-in
executors adheres to the following conventions:
- If the original
TaskInfohas not specified a check,TaskStatus.check_statusis not present. - If the check has been specified,
TaskStatus.check_status.typeindicates the check's type. - If the check result is not available for some reason (a check has not run yet
or a check has timed out), the corresponding result is empty, e.g.,
TaskStatus.check_status.commandis present and empty.
NOTE: Frameworks that use custom executors are highly advised to follow the same principles built-in executors use for consistency.
Command Checks
Command checks are described by the CommandInfo protobuf wrapped in the
CheckInfo.Command message; some fields are ignored though: CommandInfo.user
and CommandInfo.uris. A command check specifies an arbitrary command that is
used to check a particular condition of the task. The result of the check is the
exit code of the command.
NOTE: Docker executor does not currently support checks. For all other tasks, including Docker containers launched in the mesos containerizer, the command will be executed from the task's mount namespace.
To specify a command check, set type to CheckInfo::COMMAND and populate
CheckInfo.Command.CommandInfo, for example:
TaskInfo task = [...];
CheckInfo check;
check.set_type(CheckInfo::COMMAND);
check.mutable_command()->mutable_command()->set_value(
"ls /checkfile > /dev/null");
task.mutable_check()->CopyFrom(check);
HTTP Checks
HTTP checks are described by the CheckInfo.Http protobuf with port and
path fields. A GET request is sent to http://<host>:port/path using the
curl command. Note that <host> is currently not configurable and is set
automatically to 127.0.0.1 (see limitations), hence
the checked task must listen on the loopback interface along with any other
routeable interface it might be listening on. Field port must specify an
actual port the task is listening on, not a mapped one. The result of the check
is the HTTP status code of the response.
Built-in executors follow HTTP 3xx redirects; custom executors may employ a
different strategy.
If necessary, executors enter the task's network namespace prior to launching
the curl command.
NOTE: HTTPS checks are currently not supported.
To specify an HTTP check, set type to CheckInfo::HTTP and populate
CheckInfo.Http, for example:
TaskInfo task = [...];
CheckInfo check;
check.set_type(CheckInfo::HTTP);
check.mutable_http()->set_port(8080);
check.mutable_http()->set_path("/health");
task.mutable_check()->CopyFrom(check);
TCP Checks
TCP checks are described by the CheckInfo.Tcp protobuf, which has a single
port field, which must specify an actual port the task is listening on, not a
mapped one. The task is probed using Mesos' mesos-tcp-connect command, which
tries to establish a TCP connection to <host>:port. Note that <host> is
currently not configurable and is set automatically to 127.0.0.1
(see limitations), hence the checked task must listen on
the loopback interface along with any other routeable interface it might be
listening on. Field port must specify an actual port the task is listening on,
not a mapped one. The result of the check is the boolean value indicating
whether a TCP connection succeeded.
If necessary, executors enter the task's network namespace prior to launching
the mesos-tcp-connect command.
To specify a TCP check, set type to CheckInfo::TCP and populate
CheckInfo.Tcp, for example:
TaskInfo task = [...];
CheckInfo check;
check.set_type(CheckInfo::TCP);
check.mutable_tcp()->set_port(8080);
task.mutable_check()->CopyFrom(check);
Common options
The CheckInfo protobuf contains common options which regulate how a check must
be performed by an executor:
delay_secondsis the amount of time to wait until starting checking the task.interval_secondsis the interval between check attempts.timeout_secondsis the amount of time to wait for the check to complete. After this timeout, the check attempt is aborted and empty check update, i.e., the absence of the check result, is reported.
NOTE: Since each time a check is performed a helper command is launched
(see limitations), setting timeout_seconds to a small
value, e.g., <5s, may lead to intermittent failures.
NOTE: Launching a check is not a free operation. To avoid unpredictable
spikes in agent's load, e.g., when most of the tasks run their checks
simultaneously, avoid setting interval_seconds to zero.
As an example, the code below specifies a task which is a Docker container with
a simple HTTP server listening on port 8080 and an HTTP check that should be
performed every 5 seconds starting from the task launch and response time
under 1 second.
TaskInfo task = createTask(...);
// Use Netcat to emulate an HTTP server.
const string command =
"nc -lk -p 8080 -e echo -e \"HTTP/1.1 200 OK\r\nContent-Length: 0\r\n\"";
task.mutable_command()->set_value(command)
Image image;
image.set_type(Image::DOCKER);
image.mutable_docker()->set_name("alpine");
ContainerInfo* container = task.mutable_container();
container->set_type(ContainerInfo::MESOS);
container->mutable_mesos()->mutable_image()->CopyFrom(image);
// Set `delay_seconds` here because it takes
// some time to launch Netcat to serve requests.
CheckInfo check;
check.set_type(CheckInfo::HTTP);
check.mutable_http()->set_port(8080);
check.set_delay_seconds(15);
check.set_interval_seconds(5);
check.set_timeout_seconds(1);
task.mutable_check()->CopyFrom(check);
Anatomy of a Health Check
The boolean healthy field is used to convey health status, which
may be insufficient in certain cases. This means a task
that has failed health checks will be RUNNING with healthy set to false.
Currently, the healthy field is only set for TASK_RUNNING status updates.
When a task turns unhealthy, a task status update message with the healthy
field set to false is sent to the Mesos master and then forwarded to a
scheduler. The executor is expected to kill the task after a number of
consecutive failures defined in the consecutive_failures field of the
HealthCheck protobuf.
NOTE: While a scheduler currently cannot cancel a task kill due to failing
health checks, it may issue a killTask command itself. This may be helpful to
emulate a "global" policy for handling tasks with failing health checks (see
limitations). Alternatively, the scheduler might use
generalized checks instead.
Built-in executors forward all unhealthy status updates, as well as the first healthy update when a task turns healthy, i.e., when the task has started or after one or more unhealthy updates have occurred. Note that custom executors may use a different strategy.
Command Health Checks
Command health checks are described by the CommandInfo protobuf; some fields
are ignored though: CommandInfo.user and CommandInfo.uris. A command health
check specifies an arbitrary command that is used to validate the health of the
task. The executor launches the command and inspects its exit status: 0 is
treated as success, any other status as failure.
NOTE: If a task is a Docker container launched by the docker executor, it
will be wrapped in docker run. For all other tasks, including Docker
containers launched in the mesos containerizer, the
command will be executed from the task's mount namespace.
To specify a command health check, set type to HealthCheck::COMMAND and
populate CommandInfo, for example:
TaskInfo task = [...];
HealthCheck healthCheck;
healthCheck.set_type(HealthCheck::COMMAND);
healthCheck.mutable_command()->set_value("ls /checkfile > /dev/null");
task.mutable_health_check()->CopyFrom(healthCheck);
HTTP(S) Health Checks
HTTP(S) health checks are described by the HealthCheck.HTTPCheckInfo protobuf
with scheme, port, path, and statuses fields. A GET request is sent to
scheme://<host>:port/path using the curl command. Note that <host> is
currently not configurable and is set automatically to 127.0.0.1 (see
limitations), hence the health checked task must listen
on the loopback interface along with any other routeable interface it might be
listening on. The scheme field supports "http" and "https" values only.
Field port must specify an actual port the task is listening on, not a mapped
one.
Built-in executors follow HTTP 3xx redirects and treat status codes between
200 and 399 as success; custom executors may employ a different strategy,
e.g., leveraging the statuses field.
NOTE: Setting HealthCheck.HTTPCheckInfo.statuses has no effect on the
built-in executors.
If necessary, executors enter the task's network namespace prior to launching
the curl command.
To specify an HTTP health check, set type to HealthCheck::HTTP and populate
HTTPCheckInfo, for example:
TaskInfo task = [...];
HealthCheck healthCheck;
healthCheck.set_type(HealthCheck::HTTP);
healthCheck.mutable_http()->set_port(8080);
healthCheck.mutable_http()->set_scheme("http");
healthCheck.mutable_http()->set_path("/health");
task.mutable_health_check()->CopyFrom(healthCheck);
TCP Health Checks
TCP health checks are described by the HealthCheck.TCPCheckInfo protobuf,
which has a single port field, which must specify an actual port the task is
listening on, not a mapped one. The task is probed using Mesos'
mesos-tcp-connect command, which tries to establish a TCP connection to
<host>:port. Note that <host> is currently not configurable and is set
automatically to 127.0.0.1 (see limitations), hence
the health checked task must listen on the loopback interface along with any
other routeable interface it might be listening on. Field port must specify an
actual port the task is listening on, not a mapped one.
The health check is considered successful if the connection can be established.
If necessary, executors enter the task's network namespace prior to launching
the mesos-tcp-connect command.
To specify a TCP health check, set type to HealthCheck::TCP and populate
TCPCheckInfo, for example:
TaskInfo task = [...];
HealthCheck healthCheck;
healthCheck.set_type(HealthCheck::TCP);
healthCheck.mutable_tcp()->set_port(8080);
task.mutable_health_check()->CopyFrom(healthCheck);
Common options
The HealthCheck protobuf contains common options which regulate how a health
check must be performed and interpreted by an executor:
delay_secondsis the amount of time to wait until starting health checking the task.interval_secondsis the interval between health checks.timeout_secondsis the amount of time to wait for the health check to complete. After this timeout, the health check is aborted and treated as a failure.consecutive_failuresis the number of consecutive failures until the task is killed by the executor.grace_period_secondsis the amount of time after the task is launched during which health check failures are ignored. Once a health check succeeds for the first time, the grace period does not apply anymore. Note that it includesdelay_seconds, i.e., settinggrace_period_seconds<delay_secondshas no effect.
NOTE: Since each time a health check is performed a helper command is
launched (see limitations), setting timeout_seconds
to a small value, e.g., <5s, may lead to intermittent failures.
As an example, the code below specifies a task which is a Docker container with
a simple HTTP server listening on port 8080 and an HTTP health check that
should be performed every 5 seconds starting from the task launch and allows
consecutive failures during the first 15 seconds and response time under 1
second.
TaskInfo task = createTask(...);
// Use Netcat to emulate an HTTP server.
const string command =
"nc -lk -p 8080 -e echo -e \"HTTP/1.1 200 OK\r\nContent-Length: 0\r\n\"";
task.mutable_command()->set_value(command)
Image image;
image.set_type(Image::DOCKER);
image.mutable_docker()->set_name("alpine");
ContainerInfo* container = task.mutable_container();
container->set_type(ContainerInfo::MESOS);
container->mutable_mesos()->mutable_image()->CopyFrom(image);
// Set `grace_period_seconds` here because it takes
// some time to launch Netcat to serve requests.
HealthCheck healthCheck;
healthCheck.set_type(HealthCheck::HTTP);
healthCheck.mutable_http()->set_port(8080);
healthCheck.set_delay_seconds(0);
healthCheck.set_interval_seconds(5);
healthCheck.set_timeout_seconds(1);
healthCheck.set_grace_period_seconds(15);
task.mutable_health_check()->CopyFrom(healthCheck);
Under the Hood
All built-in executors rely on the checker library, which lives in
"src/checks".
An executor creates an instance of the Checker or HealthChecker class per
task and passes the check or health check definition together with extra
parameters. In return, the library notifies the executor of changes in the
task's check or health status. For health checks, the definition is converted
to the check definition before performing the check, and the check result is
interpreted according to the health check definition.
The library depends on curl for HTTP(S) checks and mesos-tcp-connect for
TCP checks (the latter is a simple command bundled with Mesos).
One of the most non-trivial things the library takes care of is entering the
appropriate task's namespaces (mnt, net) on Linux agents. To perform a
command check, the checker must be in the same mount namespace as the checked
process; this is achieved by either calling docker run for the check command
in case of docker containerizer or by explicitly
calling setns() for mnt namespace in case of mesos containerizer
(see containerization in Mesos). To perform an HTTP(S) or
TCP check, the most reliable solution is to share the same network namespace
with the checked process; in case of docker containerizer setns() for net
namespace is explicitly called, while mesos containerizer guarantees an executor
and its tasks are in the same network namespace.
NOTE: Custom executors may or may not use this library. Please consult the respective framework's documentation.
Regardless of executor, all checks and health checks consume resources from the task's resource allocation. Hence it is a good idea to add some extra resources, e.g., 0.05 cpu and 32MB mem, to the task definition if a Mesos-native check and/or health check is specified.
Windows Implementation
On Windows, the implementation differs between the mesos containerizer
and docker containerizer. The
mesos containerizer does not provide network or mount
namespace isolation, so curl, mesos-tcp-connect or the command health check
simply run as regular processes on the host. In constrast, the
docker containerizer provides network and mount
isolation. For the command health check, the command enters the container's
namespace through docker exec. For the network health checks, the docker
executor launches a container with the mesos/windows-health-check
image and enters the original container's network namespace through the
--network=container:<ID> parameter in docker run.
Current Limitations and Caveats
- Docker executor does not support generalized checks (see MESOS-7250).
- HTTPS checks are not supported, though HTTPS health checks are (see MESOS-7356).
- Due to the short-polling nature of a check, some task state transitions may be
missed. For example, if the task transitions are
Init [111]→Join [418]→Ready [200], the observed HTTP status codes in check statuses may be111→200. - Due to its short-polling nature, a check whose state oscillates repeatedly may lead to scalability issues due to a high volume of task status updates.
- When a task becomes unhealthy, it is deemed to be killed after
HealthCheck.consecutive_failuresfailures. This decision is taken locally by an executor, there is no way for a scheduler to intervene and react differently. A workaround is to setHealthCheck.consecutive_failuresto some large value so that the scheduler can react. One possible solution is to introduce a "global" policy for handling unhealthy tasks (see MESOS-6171). - HTTP(S) and TCP health checks use
127.0.0.1as target IP. As a result, if tasks want to support HTTP or TCP health checks, they should listen on the loopback interface in addition to whatever interface they require (see MESOS-6517). - HTTP(S) health checks rely on the
curlcommand. A health check is considered failed if the required command is not available. - Windows HTTP(S) and TCP Docker health checks should ideally have the
mesos/windows-health-checkimage pulled beforehand. Otherwise, Docker will attempt to pull the image during the health check, which will count towards the health check timeout. - Only a single health check per task is allowed (see MESOS-5962).
- Each time a health check runs, a helper command is launched. This introduces some run-time overhead (see MESOS-6766).
- A task without a health check may be indistinguishable from a task with a health check but still in a grace period. An extra state should be introduced (see MESOS-6417).
- Task's health status cannot be assigned from outside, e.g., by an operator via an endpoint.
title: Apache Mesos - Scheduler HTTP API layout: documentation
Scheduler HTTP API
A Mesos scheduler can be built in two different ways:
-
By using the
SchedulerDriverC++ interface. TheSchedulerDriverhandles the details of communicating with the Mesos master. Scheduler developers implement custom scheduling logic by registering callbacks with theSchedulerDriverfor significant events, such as receiving a new resource offer or a status update on a task. Because theSchedulerDriverinterface is written in C++, this typically requires that scheduler developers either use C++ or use a C++ binding to their language of choice (e.g., JNI when using JVM-based languages). -
By using the new HTTP API. This allows Mesos schedulers to be developed without using C++ or a native client library; instead, a custom scheduler interacts with the Mesos master via HTTP requests, as described below. Although it is theoretically possible to use the HTTP scheduler API "directly" (e.g., by using a generic HTTP library), most scheduler developers should use a library for their language of choice that manages the details of the HTTP API; see the document on HTTP API client libraries for a list.
The v1 Scheduler HTTP API was introduced in Mesos 0.24.0. As of Mesos 1.0, it is considered stable and is the recommended way to develop new Mesos schedulers.
Overview
The scheduler interacts with Mesos via the /api/v1/scheduler master endpoint. We refer to this endpoint with its suffix "/scheduler" in the rest of this document. This endpoint accepts HTTP POST requests with data encoded as JSON (Content-Type: application/json) or binary Protobuf (Content-Type: application/x-protobuf). The first request that a scheduler sends to "/scheduler" endpoint is called SUBSCRIBE and results in a streaming response ("200 OK" status code with Transfer-Encoding: chunked).
Schedulers are expected to keep the subscription connection open as long as possible (barring errors in network, software, hardware, etc.) and incrementally process the response. HTTP client libraries that can only parse the response after the connection is closed cannot be used. For the encoding used, please refer to Events section below.
All subsequent (non-SUBSCRIBE) requests to the "/scheduler" endpoint (see details below in Calls section) must be sent using a different connection than the one used for subscription. Schedulers can submit requests using more than one different HTTP connection.
The master responds to HTTP POST requests that require asynchronous processing with status 202 Accepted (or, for unsuccessful requests, with 4xx or 5xx status codes; details in later sections). The 202 Accepted response means that a request has been accepted for processing, not that the processing of the request has been completed. The request might or might not be acted upon by Mesos (e.g., master fails during the processing of the request). Any asynchronous responses from these requests will be streamed on the long-lived subscription connection.
The master responds to HTTP POST requests that can be answered synchronously and immediately with status 200 OK (or, for unsuccessful requests, with 4xx or 5xx status codes; details in later sections), possibly including a response body encoded in JSON or Protobuf. The encoding depends on the Accept header present in the request (the default encoding is JSON).
Calls
The following calls are currently accepted by the master. The canonical source of this information is scheduler.proto. When sending JSON-encoded Calls, schedulers should encode raw bytes in Base64 and strings in UTF-8. All non-SUBSCRIBE calls should include the Mesos-Stream-Id header, explained in the SUBSCRIBE section. SUBSCRIBE calls should never include the Mesos-Stream-Id header.
RecordIO response format
The response returned from the SUBSCRIBE call (see below) is encoded in RecordIO format, which essentially prepends to a single record (either JSON or serialized Protobuf) its length in bytes, followed by a newline and then the data. See RecordIO Format for details.
SUBSCRIBE
This is the first step in the communication process between the scheduler and the master. This is also to be considered as subscription to the "/scheduler" event stream.
To subscribe with the master, the scheduler sends an HTTP POST with a SUBSCRIBE message including the required FrameworkInfo, the list of initially suppressed roles and the initial offer constraints. The initially suppressed roles, as well as roles for which offer constraints are specified, must be contained in the set of roles in FrameworkInfo. Note that Mesos 1.11.0 simply ignores constraints for invalid roles, but this might change in the future.
Note that if "subscribe.framework_info.id" and "FrameworkID" are not set, the master considers the scheduler as a new one and subscribes it by assigning it a FrameworkID. The HTTP response is a stream in RecordIO format; the event stream begins with either a SUBSCRIBED event or an ERROR event (see details in Events section). The response also includes the Mesos-Stream-Id header, which is used by the master to uniquely identify the subscribed scheduler instance. This stream ID header should be included in all subsequent non-SUBSCRIBE calls sent over this subscription connection to the master. The value of Mesos-Stream-Id is guaranteed to be at most 128 bytes in length.
SUBSCRIBE Request (JSON):
POST /api/v1/scheduler HTTP/1.1
Host: masterhost:5050
Content-Type: application/json
Accept: application/json
Connection: close
{
"type" : "SUBSCRIBE",
"subscribe" : {
"framework_info" : {
"user" : "foo",
"name" : "Example HTTP Framework",
"roles": ["test1", "test2"],
"capabilities" : [{"type": "MULTI_ROLE"}]
},
"suppressed_roles" : ["test2"],
"offer_constraints" : {
"role_constraints": {
"test1": {
"groups": [{
"attribute_constraints": [{
"selector": {"attribute_name": "foo"},
"predicate": {"exists": {}}
}]
}]
}
}
}
}
}
SUBSCRIBE Response Event (JSON):
HTTP/1.1 200 OK
Content-Type: application/json
Transfer-Encoding: chunked
Mesos-Stream-Id: 130ae4e3-6b13-4ef4-baa9-9f2e85c3e9af
<event length>
{
"type" : "SUBSCRIBED",
"subscribed" : {
"framework_id" : {"value":"12220-3440-12532-2345"},
"heartbeat_interval_seconds" : 15
}
}
<more events>
Alternatively, if "subscribe.framework_info.id" and "FrameworkID" are set, the master considers this a request from an already subscribed scheduler reconnecting after a disconnection (e.g., due to master/scheduler failover or network disconnection) and responds
with a SUBSCRIBED event. For further details, see the Disconnections section below.
NOTE: In the old version of the API, (re-)registered callbacks also included MasterInfo, which contained information about the master the driver currently connected to. With the new API, since schedulers explicitly subscribe with the leading master (see details below in Master Detection section), it's not relevant anymore.
NOTE: By providing a different FrameworkInfo and/or set of suppressed roles
and/or offer constraints, a re-subscribing scheduler can change some of the
fields of FrameworkInfo, the set of suppressed roles and/or offer constraints.
Allowed changes and their effects are consistent with those that can be
performed via UPDATE_FRAMEWORK call (see below).
If subscription fails for whatever reason (e.g., invalid request), an HTTP 4xx response is returned with the error message as part of the body and the connection is closed.
A scheduler can make additional HTTP requests to the "/scheduler" endpoint only after it has opened a persistent connection to it by sending a SUBSCRIBE request and received a SUBSCRIBED response. Calls made without subscription will result in "403 Forbidden" instead of a "202 Accepted" response. A scheduler might also receive a "400 Bad Request" response if the HTTP request is malformed (e.g., malformed HTTP headers).
Note that the Mesos-Stream-Id header should never be included with a SUBSCRIBE call; the master will always provide a new unique stream ID for each subscription.
TEARDOWN
Sent by the scheduler when it wants to tear itself down. When Mesos receives this request it will shut down all executors (and consequently kill tasks). It then removes the framework and closes all open connections from this scheduler to the Master.
TEARDOWN Request (JSON):
POST /api/v1/scheduler HTTP/1.1
Host: masterhost:5050
Content-Type: application/json
Mesos-Stream-Id: 130ae4e3-6b13-4ef4-baa9-9f2e85c3e9af
{
"framework_id" : {"value" : "12220-3440-12532-2345"},
"type" : "TEARDOWN"
}
TEARDOWN Response:
HTTP/1.1 202 Accepted
ACCEPT
Sent by the scheduler when it accepts offer(s) sent by the master. The ACCEPT request includes the type of operations (e.g., launch task, launch task group, reserve resources, create volumes) that the scheduler wants to perform on the offers. Note that until the scheduler replies (accepts or declines) to an offer, the offer's resources are considered allocated to the offer's role and to the framework. Also, any of the offer's resources not used in the ACCEPT call (e.g., to launch a task or task group) are considered declined and might be reoffered to other frameworks, meaning that they will not be reoffered to the scheduler for the amount of time defined by the filter. The same OfferID cannot be used in more than one ACCEPT call. These semantics might change when we add new features to Mesos (e.g., persistence, reservations, optimistic offers, resizeTask, etc.).
The scheduler API uses Filters.refuse_seconds to specify the duration for which resources are considered declined. If filters is not set, then the default value defined in mesos.proto will be used.
NOTE: Mesos will cap Filters.refuse_seconds at 31536000 seconds (365 days).
The master will send task status updates in response to LAUNCH and LAUNCH_GROUP operations. For other types of operations, if an operation ID is specified, the master will send operation status updates in response.
For more information on running workloads using this call, see the introduction to the LAUNCH_GROUP and LAUNCH operations.
ACCEPT Request (JSON):
POST /api/v1/scheduler HTTP/1.1
Host: masterhost:5050
Content-Type: application/json
Mesos-Stream-Id: 130ae4e3-6b13-4ef4-baa9-9f2e85c3e9af
{
"framework_id": {"value": "12220-3440-12532-2345"},
"type": "ACCEPT",
"accept": {
"offer_ids": [
{"value": "12220-3440-12532-O12"}
],
"operations": [
{
"type": "LAUNCH",
"launch": {
"task_infos": [
{
"name": "My Task",
"task_id": {"value": "12220-3440-12532-my-task"},
"agent_id": {"value": "12220-3440-12532-S1233"},
"executor": {
"command": {
"shell": true,
"value": "sleep 1000"
},
"executor_id": {"value": "12214-23523-my-executor"}
},
"resources": [
{
"allocation_info": {"role": "engineering"},
"name": "cpus",
"role": "*",
"type": "SCALAR",
"scalar": {"value": 1.0}
}, {
"allocation_info": {"role": "engineering"},
"name": "mem",
"role": "*",
"type": "SCALAR",
"scalar": {"value": 128.0}
}
],
"limits": {
"cpus": "Infinity",
"mem": 512.0
}
}
]
}
}
],
"filters": {"refuse_seconds": 5.0}
}
}
ACCEPT Response:
HTTP/1.1 202 Accepted
DECLINE
Sent by the scheduler to explicitly decline offer(s) received. Note that this is same as sending an ACCEPT call with no operations.
DECLINE Request (JSON):
POST /api/v1/scheduler HTTP/1.1
Host: masterhost:5050
Content-Type: application/json
Mesos-Stream-Id: 130ae4e3-6b13-4ef4-baa9-9f2e85c3e9af
{
"framework_id" : {"value" : "12220-3440-12532-2345"},
"type" : "DECLINE",
"decline" : {
"offer_ids" : [
{"value" : "12220-3440-12532-O12"},
{"value" : "12220-3440-12532-O13"}
],
"filters" : {"refuse_seconds" : 5.0}
}
}
DECLINE Response:
HTTP/1.1 202 Accepted
REVIVE
Sent by the scheduler to perform two actions:
- Place the scheduler's role(s) in a non-
SUPPRESSed state in order to once again receive offers. No-op if the role is not suppressed. - Clears all filters for its role(s) that were previously set via
ACCEPTandDECLINE.
If no role is specified, the operation will apply to all of the scheduler's subscribed roles.
REVIVE Request (JSON):
POST /api/v1/scheduler HTTP/1.1
Host: masterhost:5050
Content-Type: application/json
Mesos-Stream-Id: 130ae4e3-6b13-4ef4-baa9-9f2e85c3e9af
{
"framework_id" : {"value" : "12220-3440-12532-2345"},
"type" : "REVIVE",
"revive" : {"role": <one-of-the-subscribed-roles>}
}
REVIVE Response:
HTTP/1.1 202 Accepted
KILL
Sent by the scheduler to kill a specific task. If the scheduler has a custom executor, the kill is forwarded to the executor; it is up to the executor to kill the task and send a TASK_KILLED (or TASK_FAILED) update. If the task hasn't yet been delivered to the executor when Mesos master or agent receives the kill request, a TASK_KILLED is generated and the task launch is not forwarded to the executor. Note that if the task belongs to a task group, killing of one task results in all tasks in the task group being killed. Mesos releases the resources for a task once it receives a terminal update for the task. If the task is unknown to the master, a TASK_LOST will be generated.
KILL Request (JSON):
POST /api/v1/scheduler HTTP/1.1
Host: masterhost:5050
Content-Type: application/json
Mesos-Stream-Id: 130ae4e3-6b13-4ef4-baa9-9f2e85c3e9af
{
"framework_id" : {"value" : "12220-3440-12532-2345"},
"type" : "KILL",
"kill" : {
"task_id" : {"value" : "12220-3440-12532-my-task"},
"agent_id" : {"value" : "12220-3440-12532-S1233"}
}
}
KILL Response:
HTTP/1.1 202 Accepted
SHUTDOWN
Sent by the scheduler to shutdown a specific custom executor (NOTE: This is a new call that was not present in the old API). When an executor gets a shutdown event, it is expected to kill all its tasks (and send TASK_KILLED updates) and terminate. If an executor doesn't terminate within a certain timeout (configurable via the --executor_shutdown_grace_period agent flag), the agent will forcefully destroy the container (executor and its tasks) and transition its active tasks to TASK_LOST.
SHUTDOWN Request (JSON):
POST /api/v1/scheduler HTTP/1.1
Host: masterhost:5050
Content-Type: application/json
Mesos-Stream-Id: 130ae4e3-6b13-4ef4-baa9-9f2e85c3e9af
{
"framework_id" : {"value" : "12220-3440-12532-2345"},
"type" : "SHUTDOWN",
"shutdown" : {
"executor_id" : {"value" : "123450-2340-1232-my-executor"},
"agent_id" : {"value" : "12220-3440-12532-S1233"}
}
}
SHUTDOWN Response:
HTTP/1.1 202 Accepted
ACKNOWLEDGE
Sent by the scheduler to acknowledge a status update. Note that with the new API, schedulers are responsible for explicitly acknowledging the receipt of status updates that have status.uuid set. These status updates are retried until they are acknowledged by the scheduler. The scheduler must not acknowledge status updates that do not have status.uuid set, as they are not retried. The uuid field contains raw bytes encoded in Base64.
ACKNOWLEDGE Request (JSON):
POST /api/v1/scheduler HTTP/1.1
Host: masterhost:5050
Content-Type: application/json
Mesos-Stream-Id: 130ae4e3-6b13-4ef4-baa9-9f2e85c3e9af
{
"framework_id" : {"value" : "12220-3440-12532-2345"},
"type" : "ACKNOWLEDGE",
"acknowledge" : {
"agent_id" : {"value" : "12220-3440-12532-S1233"},
"task_id" : {"value" : "12220-3440-12532-my-task"},
"uuid" : "jhadf73jhakdlfha723adf"
}
}
ACKNOWLEDGE Response:
HTTP/1.1 202 Accepted
ACKNOWLEDGE_OPERATION_STATUS
Sent by the scheduler to acknowledge an operation status update. Schedulers are responsible for explicitly acknowledging the receipt of status updates that have status.uuid set. These status updates are retried until they are acknowledged by the scheduler. The scheduler must not acknowledge status updates that do not have status.uuid set, as they are not retried. The uuid field contains raw bytes encoded in Base64.
ACKNOWLEDGE_OPERATION_STATUS Request (JSON):
POST /api/v1/scheduler HTTP/1.1
Host: masterhost:5050
Content-Type: application/json
Mesos-Stream-Id: 130ae4e3-6b13-4ef4-baa9-9f2e85c3e9af
{
"framework_id": { "value": "12220-3440-12532-2345" },
"type": "ACKNOWLEDGE_OPERATION_STATUS",
"acknowledge_operation_status": {
"agent_id": { "value": "12220-3440-12532-S1233" },
"resource_provider_id": { "value": "12220-3440-12532-rp" },
"uuid": "jhadf73jhakdlfha723adf",
"operation_id": "73jhakdlfha723adf"
}
}
ACKNOWLEDGE_OPERATION_STATUS Response:
HTTP/1.1 202 Accepted
RECONCILE
Sent by the scheduler to query the status of non-terminal tasks. This causes the master to send back UPDATE events for each task in the list. Tasks that are no longer known to Mesos will result in TASK_LOST updates. If the list of tasks is empty, master will send UPDATE events for all currently known tasks of the framework.
RECONCILE Request (JSON):
POST /api/v1/scheduler HTTP/1.1
Host: masterhost:5050
Content-Type: application/json
Mesos-Stream-Id: 130ae4e3-6b13-4ef4-baa9-9f2e85c3e9af
{
"framework_id" : {"value" : "12220-3440-12532-2345"},
"type" : "RECONCILE",
"reconcile" : {
"tasks" : [
{ "task_id" : {"value" : "312325"},
"agent_id" : {"value" : "123535"}
}
]
}
}
RECONCILE Response:
HTTP/1.1 202 Accepted
RECONCILE_OPERATIONS
Sent by the scheduler to query the status of non-terminal and terminal-but-unacknowledged operations. This causes the master to send back UPDATE_OPERATION_STATUS events for each operation in the list. If the list of operations is empty, the master will send events for all currently known operations of the framework.
RECONCILE_OPERATIONS Request (JSON):
POST /api/v1/scheduler HTTP/1.1
Host: masterhost:5050
Content-Type: application/json
Accept: application/json
Mesos-Stream-Id: 130ae4e3-6b13-4ef4-baa9-9f2e85c3e9af
{
"framework_id": { "value": "12220-3440-12532-2345" },
"type": "RECONCILE_OPERATIONS",
"reconcile_operations": {
"operations": [
{
"operation_id": { "value": "312325" },
"agent_id": { "value": "123535" },
"resource_provider_id": { "value": "927695" }
}
]
}
}
RECONCILE_OPERATIONS Response:
HTTP/1.1 202 Accepted
MESSAGE
Sent by the scheduler to send arbitrary binary data to the executor. Mesos neither interprets this data nor makes any guarantees about the delivery of this message to the executor. data is raw bytes encoded in Base64.
MESSAGE Request (JSON):
POST /api/v1/scheduler HTTP/1.1
Host: masterhost:5050
Content-Type: application/json
Mesos-Stream-Id: 130ae4e3-6b13-4ef4-baa9-9f2e85c3e9af
{
"framework_id" : {"value" : "12220-3440-12532-2345"},
"type" : "MESSAGE",
"message" : {
"agent_id" : {"value" : "12220-3440-12532-S1233"},
"executor_id" : {"value" : "my-framework-executor"},
"data" : "adaf838jahd748jnaldf"
}
}
MESSAGE Response:
HTTP/1.1 202 Accepted
REQUEST
Sent by the scheduler to request resources from the master/allocator. The built-in hierarchical allocator simply ignores this request but other allocators (modules) can interpret this in a customizable fashion.
Request (JSON):
POST /api/v1/scheduler HTTP/1.1
Host: masterhost:5050
Content-Type: application/json
Mesos-Stream-Id: 130ae4e3-6b13-4ef4-baa9-9f2e85c3e9af
{
"framework_id" : {"value" : "12220-3440-12532-2345"},
"type" : "REQUEST",
"requests" : [
{
"agent_id" : {"value" : "12220-3440-12532-S1233"},
"resources" : {}
}
]
}
REQUEST Response:
HTTP/1.1 202 Accepted
SUPPRESS
Sent by the scheduler when it doesn't need offers for a given set of its roles. When Mesos master receives this request, it will stop sending offers for the given set of roles to the framework. As a special case, if roles are not specified, all subscribed roles of this framework are suppressed.
Note that master continues to send offers to other subscribed roles of this framework that are not suppressed. Also, status updates about tasks, executors and agents are not affected by this call.
If the scheduler wishes to receive offers for the suppressed roles again (e.g., it needs to schedule new workloads), it can send REVIVE call.
SUPPRESS Request (JSON):
POST /api/v1/scheduler HTTP/1.1
Host: masterhost:5050
Content-Type: application/json
Mesos-Stream-Id: 130ae4e3-6b13-4ef4-baa9-9f2e85c3e9af
{
"framework_id" : {"value" : "12220-3440-12532-2345"},
"type" : "SUPPRESS",
"suppress" : {"roles": <an-array-of-strings>}
}
SUPPRESS Response:
HTTP/1.1 202 Accepted
UPDATE_FRAMEWORK
Sent by the scheduler to change fields of its FrameworkInfo and/or the set of
suppressed roles and/or offer constraints. Allowed changes and their effects
are consistent with changing the same fields via re-subscribing.
Disallowed updates
Updating the following FrameworkInfo fields is not allowed:
principal(mainly because "changing a principal" effectively means a transfer of a framework by an original principal to the new one; secure mechanism for such transfer is yet to be developed)usercheckpoint
UPDATE_FRAMEWORK call trying to update any of these fields is not valid,
unlike an attempt to change user/checkpoint when resubscribing, in which
case the new value is ignored.
Updating framework roles
Updating framework_info.roles and suppressed_roles is supported.
In a valid UPDATE_FRAMEWORK call, new suppressed roles must be a (potentially
empty) subset of new framework roles.
Updating roles has the following effects:
- After the call is processed, master will be sending offers to all non-suppressed roles of the framework.
- Offers to old framework roles removed by this call will be rescinded.
- Offers to roles from suppressed set will NOT be rescinded.
- For roles that were transitioned out of suppressed, offer filters (set by ACCEPT/DECLINE) will be cleared. will be cleared.
- Other framework objects that use roles removed by this call (for example, tasks) are not affected.
Updating offer constraints
For the UPDATE_FRAMEWORK call to be successfull, the offer_constraints
field, if present, must be internally valid (for the constraints validity
criteria, please refer to comments in
scheduler.proto)
As of 1.11.0, Mesos ignores offer constraints for roles other than valid roles
in framework_info.roles; future versions of Mesos are going to treat such
offer constraints as invalid.
Updated offer constraints have an immediate effect on offer generation after
update, but have no effect on already outstanding offers. Frameworks should not
expect that offers they receive right after the UPDATE_FRAMEWORK call
will satisfy the new constraints.
Updating other fields
- Updating
name,hostname,webui_urlandlabelsis fully supported by Mesos; these updates are simply propagated to Mesos API endpoints. - Updating
failover_timeoutandoffer_filtersis supported. Note that there is no way to guarantee that offers issued when the oldoffer_filterswere in place will not be received by the framework after the master applies the update. - Schedulers can add capabilities via updating
capabilitiesfield. The call attempting to remove a capability is not considered invalid; however, there is no guarantee that it is safe for the framework to remove the capability. If you really need your framewok to be able to remove a capability, please reach out to the Mesos dev/user list (dev@mesos.apache.org or user@mesos.apache.org). In future, to prevent accidental unsafe downgrade of frameworks, Mesos will need to implement minimum capabilities for schedulers (similarly to minimum master/agent capabilities, see MESOS-8878).
UPDATE_FRAMEWORK Request (JSON):
POST /api/v1/scheduler HTTP/1.1
Host: masterhost:5050
Content-Type: application/json
Accept: application/json
Connection: close
{
"type" : "UPDATE_FRAMEWORK",
"update_framework" : {
"framework_info" : {
"user" : "foo",
"name" : "Example HTTP Framework",
"roles": ["test1", "test2"],
"capabilities" : [{"type": "MULTI_ROLE"}]
},
"suppressed_roles" : ["test2"]
"offer_constraints" : {
"role_constraints": {
"test1": {
"groups": [{
"attribute_constraints": [{
"selector": {"attribute_name": "foo"},
"predicate": {"exists": {}}
}]
}]
}
}
}
}
}
UPDATE_FRAMEWORK Response:
HTTP/1.1 200 OK
Response codes:
- "200 OK" after the update has been successfully applied by the master and sent to the agents.
- "400 Bad request" if the call was not valid or authorizing the call failed.
- "403 Forbidden" if the principal was declined authorization to use the provided FrameworkInfo. (Typical authorizer implementations will check authorization to use specified roles.)
No partial updates occur in error cases: either all fields are updated or none of them.
NOTE: In Mesos 1.9, effects of changing roles or suppressed roles set via
UPDATE_FRAMEWORK could be potentially reordered with related effects of
ACCEPT/DECLINE/SUPPRESS/REVIVE or another UPDATE_FRAMEWORK;
to avoid such reordering, it was necessary to wait for UPDATE_FRAMEWORK response
before issuing the next call. This issue has been fixed in Mesos 1.10.0 (see
MESOS-10056).
Events
Schedulers are expected to keep a persistent connection to the "/scheduler" endpoint (even after getting a SUBSCRIBED HTTP Response event). This is indicated by the "Connection: keep-alive" and "Transfer-Encoding: chunked" headers with no "Content-Length" header set. All subsequent events that are relevant to this framework generated by Mesos are streamed on this connection. The master encodes each Event in RecordIO format, i.e., string representation of the length of the event in bytes followed by JSON or binary Protobuf (possibly compressed) encoded event. The length of an event is a 64-bit unsigned integer (encoded as a textual value) and will never be "0". Also, note that the RecordIO encoding should be decoded by the scheduler whereas the underlying HTTP chunked encoding is typically invisible at the application (scheduler) layer. The type of content encoding used for the events will be determined by the accept header of the POST request (e.g., Accept: application/json).
The following events are currently sent by the master. The canonical source of this information is at scheduler.proto. Note that when sending JSON encoded events, master encodes raw bytes in Base64 and strings in UTF-8.
SUBSCRIBED
The first event sent by the master when the scheduler sends a SUBSCRIBE request, if authorization / validation succeeds. See SUBSCRIBE in Calls section for the format.
OFFERS
Sent by the master whenever there are new resources that can be offered to the framework. Each offer corresponds to a set of resources on an agent and is allocated to one of roles the framework is subscribed to. Until the scheduler 'Accept's or 'Decline's an offer the resources are considered allocated to the scheduler, unless the offer is otherwise rescinded, e.g., due to a lost agent or --offer_timeout.
OFFERS Event (JSON)
<event-length>
{
"type" : "OFFERS",
"offers" : [
{
"allocation_info": { "role": "engineering" },
"id" : {"value": "12214-23523-O235235"},
"framework_id" : {"value": "12124-235325-32425"},
"agent_id" : {"value": "12325-23523-S23523"},
"hostname" : "agent.host",
"resources" : [
{
"allocation_info": { "role": "engineering" },
"name" : "cpus",
"type" : "SCALAR",
"scalar" : {"value" : 2},
"role" : "*"
}
],
"attributes" : [
{
"name" : "os",
"type" : "TEXT",
"text" : {"value" : "ubuntu16.04"}
}
],
"executor_ids" : [
{"value" : "12214-23523-my-executor"}
]
}
]
}
RESCIND
Sent by the master when a particular offer is no longer valid (e.g., the agent corresponding to the offer has been removed) and hence needs to be rescinded. Any future calls (ACCEPT / DECLINE) made by the scheduler regarding this offer will be invalid.
RESCIND Event (JSON)
<event-length>
{
"type" : "RESCIND",
"rescind" : {
"offer_id" : { "value" : "12214-23523-O235235"}
}
}
UPDATE
Sent by the master whenever there is a status update that is generated by the executor, agent or master. Status updates should be used by executors to reliably communicate the status of the tasks that they manage. It is crucial that a terminal update (e.g., TASK_FINISHED, TASK_KILLED, TASK_FAILED) is sent by the executor as soon as the task terminates, in order for Mesos to release the resources allocated to the task. It is also the responsibility of the scheduler to explicitly acknowledge the receipt of status updates that are reliably retried. See ACKNOWLEDGE in the Calls section above for the semantics. Note that uuid and data are raw bytes encoded in Base64.
UPDATE Event (JSON)
<event-length>
{
"type" : "UPDATE",
"update" : {
"status" : {
"task_id" : { "value" : "12344-my-task"},
"state" : "TASK_RUNNING",
"source" : "SOURCE_EXECUTOR",
"uuid" : "adfadfadbhgvjayd23r2uahj",
"bytes" : "uhdjfhuagdj63d7hadkf"
}
}
}
UPDATE_OPERATION_STATUS
Sent by the master whenever there is an update to the state of an operation for which the scheduler requested feedback by setting the operation's id field. It is the responsibility of the scheduler to explicitly acknowledge the receipt of any status updates which have their uuid field set, as this indicates that the update will be retried until acknowledgement is received. This ensures that such updates are delivered reliably. See ACKNOWLEDGE_OPERATION_STATUS in the Calls section above for the relevant acknowledgement semantics. Note that the uuid field contains raw bytes encoded in Base64.
UPDATE_OPERATION_STATUS Event (JSON)
<event-length>
{
"type" : "UPDATE_OPERATION_STATUS",
"update_operation_status" : {
"status" : {
"operation_id" : { "value" : "operation-1234"},
"state" : "OPERATION_FAILED",
"uuid" : "adfadfadbhgvjayd23r2uahj",
"agent_id" : { "value" : "12214-23523-S235235"},
"resource_provider_id" : { "value" : "83978-17885-1089645"}
}
}
}
MESSAGE
A custom message generated by the executor that is forwarded to the scheduler by the master. This message is not interpreted by Mesos and is only forwarded (without reliability guarantees) to the scheduler. It is up to the executor to retry if the message is dropped for any reason. The data field contains raw bytes encoded as Base64.
MESSAGE Event (JSON)
<event-length>
{
"type" : "MESSAGE",
"message" : {
"agent_id" : { "value" : "12214-23523-S235235"},
"executor_id" : { "value" : "12214-23523-my-executor"},
"data" : "adfadf3t2wa3353dfadf"
}
}
FAILURE
Sent by the master when an agent is removed from the cluster (e.g., failed health checks) or when an executor is terminated. This event coincides with receipt of terminal UPDATE events for any active tasks belonging to the agent or executor and receipt of RESCIND events for any outstanding offers belonging to the agent. Note that there is no guaranteed order between the FAILURE, UPDATE, and RESCIND events.
FAILURE Event (JSON)
<event-length>
{
"type" : "FAILURE",
"failure" : {
"agent_id" : { "value" : "12214-23523-S235235"},
"executor_id" : { "value" : "12214-23523-my-executor"},
"status" : 1
}
}
ERROR
Can be sent either:
- As the first event (in lieu of
SUBSCRIBED) when the scheduler'sSUBSCRIBErequest is invalid (e.g. invalidFrameworkInfo) or unauthorized (e.g., a framework is not authorized to subscribe with some of the givenFrameworkInfo.roles). - When an asynchronous error event is generated (e.g. the master detects a newer subscription from a failed over instance of the scheduler).
It is recommended that the framework abort when it receives an error and retry subscription as necessary.
ERROR Event (JSON)
<event-length>
{
"type" : "ERROR",
"message" : "Framework is not authorized"
}
HEARTBEAT
This event is periodically sent by the master to inform the scheduler that a connection is alive. This also helps ensure that network intermediates do not close the persistent subscription connection due to lack of data flow. See the next section on how a scheduler can use this event to deal with network partitions.
HEARTBEAT Event (JSON)
<event-length>
{
"type" : "HEARTBEAT"
}
Disconnections
Master considers a scheduler disconnected if the persistent subscription connection (opened via SUBSCRIBE request) to "/scheduler" breaks. The connection could break for several reasons, e.g., scheduler restart, scheduler failover, network error. Note that the master doesn't keep track of non-subscription connection(s) to
"/scheduler" because it is not expected to be a persistent connection.
If master realizes that the subscription connection is broken, it marks the scheduler as "disconnected" and starts a failover timeout (failover timeout is part of FrameworkInfo). It also drops any pending events in its queue. Additionally, it rejects subsequent non-subscribe HTTP requests to "/scheduler" with "403 Forbidden", until the scheduler subscribes again with "/scheduler". If the scheduler does not re-subscribe within the failover timeout, the master considers the scheduler gone forever and shuts down all its executors, thus killing all its tasks. Therefore, all production schedulers are recommended to use a high value (e.g., 4 weeks) for the failover timeout.
NOTE: To force shutdown of a framework before the failover timeout elapses (e.g., during framework development and testing), either the framework can send the TEARDOWN call (part of the Scheduler API) or an operator can use the /teardown master endpoint (part of the Operator API).
If the scheduler realizes that its subscription connection to "/scheduler" is broken or the master has changed (e.g., via ZooKeeper), it should resubscribe (using a backoff strategy). This is done by sending a SUBSCRIBE request (with framework ID set) on a new persistent connection to the "/scheduler" endpoint on the (possibly new) master. It should not send new non-subscribe HTTP requests to "/scheduler" unless it receives a SUBSCRIBED event; such requests will result in "403 Forbidden".
If the master does not realize that the subscription connection is broken but the scheduler realizes it, the scheduler might open a new persistent connection to
"/scheduler" via SUBSCRIBE. In this case, the master closes the existing subscription connection and allows subscription on the new connection. The invariant here is that only one persistent subscription connection for a given framework ID is allowed on the master.
The master uses the Mesos-Stream-Id header to distinguish scheduler instances from one another. In the case of highly available schedulers with multiple instances, this can prevent unwanted behavior in certain failure scenarios. Each unique Mesos-Stream-Id is valid only for the life of a single subscription connection. Each response to a SUBSCRIBE request contains a Mesos-Stream-Id, and this ID must be included with all subsequent non-subscribe calls sent over that subscription connection. Whenever a new subscription connection is established, a new stream ID is generated and should be used for the life of that connection.
Network partitions
In the case of a network partition, the subscription connection between the scheduler and master might not necessarily break. To be able to detect this scenario, master periodically (e.g., 15s) sends HEARTBEAT events (similar to Twitter's Streaming API). If a scheduler doesn't receive a bunch (e.g., 5) of these heartbeats within a time window, it should immediately disconnect and try to resubscribe. It is highly recommended for schedulers to use an exponential backoff strategy (e.g., up to a maximum of 15s) to avoid overwhelming the master while reconnecting. Schedulers can use a similar timeout (e.g., 75s) for receiving responses to any HTTP requests.
Master detection
Mesos has a high-availability mode that uses multiple Mesos masters; one active master (called the leader or leading master) and several standbys in case it fails. The masters elect the leader, with ZooKeeper coordinating the election. For more details please refer to the documentation.
Schedulers are expected to make HTTP requests to the leading master. If requests are made to a non-leading master a "HTTP 307 Temporary Redirect" will be received with the "Location" header pointing to the leading master.
Example subscription workflow with redirection when the scheduler hits a non-leading master.
Scheduler -> Master
POST /api/v1/scheduler HTTP/1.1
Host: masterhost1:5050
Content-Type: application/json
Accept: application/json
Connection: keep-alive
{
"framework_info" : {
"user" : "foo",
"name" : "Example HTTP Framework"
},
"type" : "SUBSCRIBE"
}
Master -> Scheduler
HTTP/1.1 307 Temporary Redirect
Location: masterhost2:5050
Scheduler -> Master
POST /api/v1/scheduler HTTP/1.1
Host: masterhost2:5050
Content-Type: application/json
Accept: application/json
Connection: keep-alive
{
"framework_info" : {
"user" : "foo",
"name" : "Example HTTP Framework"
},
"type" : "SUBSCRIBE"
}
If the scheduler knows the list of master's hostnames for a cluster, it could use this mechanism to find the leading master to subscribe with. Alternatively, the scheduler could use a library that detects the leading master given a ZooKeeper (or etcd) URL. For a C++ library that does ZooKeeper based master detection please look at src/scheduler/scheduler.cpp.
title: Apache Mesos - Executor HTTP API layout: documentation
Executor HTTP API
A Mesos executor can be built in two different ways:
-
By using the HTTP API. This allows Mesos executors to be developed without using C++ or a native client library; instead, a custom executor interacts with the Mesos agent via HTTP requests, as described below. Although it is theoretically possible to use the HTTP executor API "directly" (e.g., by using a generic HTTP library), most executor developers should use a library for their language of choice that manages the details of the HTTP API; see the document on HTTP API client libraries for a list. This is the recommended way to develop new Mesos executors.
-
By using the deprecated
ExecutorDriverC++ interface. While this interface is still supported, note that new features are usually not added to it. TheExecutorDriverhandles the details of communicating with the Mesos agent. Executor developers implement custom executor logic by registering callbacks with theExecutorDriverfor significant events, such as when a new task launch request is received. Because theExecutorDriverinterface is written in C++, this typically requires that executor developers either use C++ or use a C++ binding to their language of choice (e.g., JNI when using JVM-based languages).
Overview
The executor interacts with Mesos via the [/api/v1/executor]
(endpoints/slave/api/v1/executor.md) agent endpoint. We refer to this endpoint
with its suffix "/executor" in the rest of this document. The endpoint accepts
HTTP POST requests with data encoded as JSON (Content-Type: application/json) or
binary Protobuf (Content-Type: application/x-protobuf). The first request that
the executor sends to the "/executor" endpoint is called SUBSCRIBE and results
in a streaming response ("200 OK" status code with Transfer-Encoding: chunked).
Executors are expected to keep the subscription connection open as long as possible (barring network errors, agent process restarts, software bugs, etc.) and incrementally process the response. HTTP client libraries that can only parse the response after the connection is closed cannot be used. For the encoding used, please refer to Events section below.
All subsequent (non-SUBSCRIBE) requests to the "/executor" endpoint (see
details below in Calls section) must be sent using a different connection
than the one used for subscription. The agent responds to these HTTP POST
requests with "202 Accepted" status codes (or, for unsuccessful requests, with
4xx or 5xx status codes; details in later sections). The "202 Accepted" response
means that a request has been accepted for processing, not that the processing
of the request has been completed. The request might or might not be acted upon
by Mesos (e.g., agent fails during the processing of the request). Any
asynchronous responses from these requests will be streamed on the long-lived
subscription connection. Executors can submit requests using more than one
different HTTP connection.
The "/executor" endpoint is served at the Mesos agent's IP:port and in addition,
when the agent has the http_executor_domain_sockets flag set to true, the
executor endpoint is also served on a Unix domain socket, the location of which
can be found by the executor in the MESOS_DOMAIN_SOCKET environment variable.
Connecting to the domain socket is similar to connecting using a TCP socket, and
once the connection is established, data is sent and received in the same way.
Calls
The following calls are currently accepted by the agent. The canonical source of this information is executor.proto. When sending JSON-encoded Calls, executors should encode raw bytes in Base64 and strings in UTF-8.
SUBSCRIBE
This is the first step in the communication process between the executor and agent. This is also to be considered as subscription to the "/executor" events stream.
To subscribe with the agent, the executor sends an HTTP POST with a SUBSCRIBE
message. The HTTP response is a stream in [RecordIO]
(scheduler-http-api.md#recordio-response-format) format; the event stream will
begin with a SUBSCRIBED event (see details in Events section).
Additionally, if the executor is connecting to the agent after a disconnection, it can also send a list of:
- Unacknowledged Status Updates: The executor is expected to maintain a list
of status updates not acknowledged by the agent via the
ACKNOWLEDGEevents. - Unacknowledged Tasks: The executor is expected to maintain a list of tasks that have not been acknowledged by the agent. A task is considered acknowledged if at least one of the status updates for this task is acknowledged by the agent.
SUBSCRIBE Request (JSON):
POST /api/v1/executor HTTP/1.1
Host: agenthost:5051
Content-Type: application/json
Accept: application/json
{
"type": "SUBSCRIBE",
"executor_id": {
"value": "387aa966-8fc5-4428-a794-5a868a60d3eb"
},
"framework_id": {
"value": "49154f1b-8cf6-4421-bf13-8bd11dccd1f1"
},
"subscribe": {
"unacknowledged_tasks": [
{
"name": "dummy-task",
"task_id": {
"value": "d40f3f3e-bbe3-44af-a230-4cb1eae72f67"
},
"agent_id": {
"value": "f1c9cdc5-195e-41a7-a0d7-adaa9af07f81"
},
"command": {
"value": "ls",
"arguments": [
"-l",
"\/tmp"
]
}
}
],
"unacknowledged_updates": [
{
"framework_id": {
"value": "49154f1b-8cf6-4421-bf13-8bd11dccd1f1"
},
"status": {
"source": "SOURCE_EXECUTOR",
"task_id": {
"value": "d40f3f3e-bbe3-44af-a230-4cb1eae72f67"
},
"state": "TASK_RUNNING",
"uuid": "ZDQwZjNmM2UtYmJlMy00NGFmLWEyMzAtNGNiMWVhZTcyZjY3Cg=="
}
}
]
}
}
SUBSCRIBE Response Event (JSON):
HTTP/1.1 200 OK
Content-Type: application/json
Transfer-Encoding: chunked
<event-length>
{
"type": "SUBSCRIBED",
"subscribed": {
"executor_info": {
"executor_id": {
"value": "387aa966-8fc5-4428-a794-5a868a60d3eb"
},
"command": {
"value": "\/path\/to\/executor"
},
"framework_id": {
"value": "49154f1b-8cf6-4421-bf13-8bd11dccd1f1"
}
},
"framework_info": {
"user": "foo",
"name": "my_framework"
},
"agent_id": {
"value": "f1c9cdc5-195e-41a7-a0d7-adaa9af07f81"
},
"agent_info": {
"host": "agenthost",
"port": 5051
}
}
}
<more events>
NOTE: Once an executor is launched, the agent waits for a duration of --executor_registration_timeout (configurable at agent startup) for the executor to subscribe. If the executor fails to subscribe within this duration, the agent forcefully destroys the container executor is running in.
UPDATE
Sent by the executor to reliably communicate the state of managed tasks. It is crucial that a terminal update (e.g., TASK_FINISHED, TASK_KILLED or TASK_FAILED) is sent to the agent as soon as the task terminates, in order to allow Mesos to release the resources allocated to the task.
The scheduler must explicitly respond to this call through an ACKNOWLEDGE message (see ACKNOWLEDGED in the Events section below for the semantics). The executor must maintain a list of unacknowledged updates. If for some reason, the executor is disconnected from the agent, these updates must be sent as part of SUBSCRIBE request in the unacknowledged_updates field.
UPDATE Request (JSON):
POST /api/v1/executor HTTP/1.1
Host: agenthost:5051
Content-Type: application/json
Accept: application/json
{
"executor_id": {
"value": "387aa966-8fc5-4428-a794-5a868a60d3eb"
},
"framework_id": {
"value": "9aaa9d0d-e00d-444f-bfbd-23dd197939a0-0000"
},
"type": "UPDATE",
"update": {
"status": {
"executor_id": {
"value": "387aa966-8fc5-4428-a794-5a868a60d3eb"
},
"source": "SOURCE_EXECUTOR",
"state": "TASK_RUNNING",
"task_id": {
"value": "66724cec-2609-4fa0-8d93-c5fb2099d0f8"
},
"uuid": "ZDQwZjNmM2UtYmJlMy00NGFmLWEyMzAtNGNiMWVhZTcyZjY3Cg=="
}
}
}
UPDATE Response:
HTTP/1.1 202 Accepted
MESSAGE
Sent by the executor to send arbitrary binary data to the scheduler. Note that Mesos neither interprets this data nor makes any guarantees about the delivery of this message to the scheduler. The data field is raw bytes encoded in Base64.
MESSAGE Request (JSON):
POST /api/v1/executor HTTP/1.1
Host: agenthost:5051
Content-Type: application/json
Accept: application/json
{
"executor_id": {
"value": "387aa966-8fc5-4428-a794-5a868a60d3eb"
},
"framework_id": {
"value": "9aaa9d0d-e00d-444f-bfbd-23dd197939a0-0000"
},
"type": "MESSAGE",
"message": {
"data": "t+Wonz5fRFKMzCnEptlv5A=="
}
}
MESSAGE Response:
HTTP/1.1 202 Accepted
Events
Executors are expected to keep a persistent connection to the "/executor" endpoint (even after getting a SUBSCRIBED HTTP Response event). This is indicated by the "Connection: keep-alive" and "Transfer-Encoding: chunked" headers with no "Content-Length" header set. All subsequent events that are relevant to this executor generated by Mesos are streamed on this connection. The agent encodes each Event in RecordIO format, i.e., string representation of length of the event in bytes followed by JSON or binary Protobuf (possibly compressed) encoded event. The length of an event is a 64-bit unsigned integer (encoded as a textual value) and will never be "0". Also, note that the RecordIO encoding should be decoded by the executor whereas the underlying HTTP chunked encoding is typically invisible at the application (executor) layer. The type of content encoding used for the events will be determined by the accept header of the POST request (e.g., "Accept: application/json").
The following events are currently sent by the agent. The canonical source of this information is at executor.proto. Note that when sending JSON-encoded events, agent encodes raw bytes in Base64 and strings in UTF-8.
SUBSCRIBED
The first event sent by the agent when the executor sends a SUBSCRIBE request on the persistent connection. See SUBSCRIBE in Calls section for the format.
LAUNCH
Sent by the agent whenever it needs to assign a new task to the executor. The executor is required to send an UPDATE message back to the agent indicating the success or failure of the task initialization.
The executor must maintain a list of unacknowledged tasks (see SUBSCRIBE in Calls section). If for some reason, the executor is disconnected from the agent, these tasks must be sent as part of SUBSCRIBE request in the tasks field.
LAUNCH Event (JSON)
<event-length>
{
"type": "LAUNCH",
"launch": {
"framework_info": {
"id": {
"value": "49154f1b-8cf6-4421-bf13-8bd11dccd1f1"
},
"user": "foo",
"name": "my_framework"
},
"task": {
"name": "dummy-task",
"task_id": {
"value": "d40f3f3e-bbe3-44af-a230-4cb1eae72f67"
},
"agent_id": {
"value": "f1c9cdc5-195e-41a7-a0d7-adaa9af07f81"
},
"command": {
"value": "sleep",
"arguments": [
"100"
]
}
}
}
}
LAUNCH_GROUP
This experimental event was added in 1.1.0.
Sent by the agent whenever it needs to assign a new task group to the executor. The executor is required to send UPDATE messages back to the agent indicating the success or failure of each of the tasks in the group.
The executor must maintain a list of unacknowledged tasks (see LAUNCH section above).
LAUNCH_GROUP Event (JSON)
<event-length>
{
"type": "LAUNCH_GROUP",
"launch_group": {
"task_group" : {
"tasks" : [
{
"name": "dummy-task",
"task_id": {
"value": "d40f3f3e-bbe3-44af-a230-4cb1eae72f67"
},
"agent_id": {
"value": "f1c9cdc5-195e-41a7-a0d7-adaa9af07f81"
},
"command": {
"value": "sleep",
"arguments": [
"100"
]
}
}
]
}
}
}
KILL
The KILL event is sent whenever the scheduler needs to stop execution of a specific task. The executor is required to send a terminal update (e.g., TASK_FINISHED, TASK_KILLED or TASK_FAILED) back to the agent once it has stopped/killed the task. Mesos will mark the task resources as freed once the terminal update is received.
LAUNCH Event (JSON)
<event-length>
{
"type" : "KILL",
"kill" : {
"task_id" : {"value" : "d40f3f3e-bbe3-44af-a230-4cb1eae72f67"}
}
}
ACKNOWLEDGED
Sent by the agent in order to signal the executor that a status update was received as part of the reliable message passing mechanism. Acknowledged updates must not be retried.
ACKNOWLEDGED Event (JSON)
<event-length>
{
"type" : "ACKNOWLEDGED",
"acknowledged" : {
"task_id" : {"value" : "d40f3f3e-bbe3-44af-a230-4cb1eae72f67"},
"uuid" : "ZDQwZjNmM2UtYmJlMy00NGFmLWEyMzAtNGNiMWVhZTcyZjY3Cg=="
}
}
MESSAGE
Custom message generated by the scheduler and forwarded all the way to the executor. These messages are delivered "as-is" by Mesos and have no delivery guarantees. It is up to the scheduler to retry if a message is dropped for any reason. The data field contains raw bytes encoded as Base64.
MESSAGE Event (JSON)
<event-length>
{
"type" : "MESSAGE",
"message" : {
"data" : "c2FtcGxlIGRhdGE="
}
}
SHUTDOWN
Sent by the agent in order to shutdown the executor. Once an executor gets a SHUTDOWN event it is required to kill all its tasks, send TASK_KILLED updates and gracefully exit. If an executor doesn't terminate within a certain period MESOS_EXECUTOR_SHUTDOWN_GRACE_PERIOD (an environment variable set by the agent upon executor startup), the agent will forcefully destroy the container where the executor is running. The agent would then send TASK_LOST updates for any remaining active tasks of this executor.
SHUTDOWN Event (JSON)
<event-length>
{
"type" : "SHUTDOWN"
}
ERROR
Sent by the agent when an asynchronous error event is generated. It is recommended that the executor abort when it receives an error event and retry subscription.
ERROR Event (JSON)
<event-length>
{
"type" : "ERROR",
"error" : {
"message" : "Unrecoverable error"
}
}
Executor Environment Variables
The following environment variables are set by the agent that can be used by the executor upon startup:
MESOS_FRAMEWORK_ID:FrameworkIDof the scheduler needed as part of theSUBSCRIBEcall.MESOS_EXECUTOR_ID:ExecutorIDof the executor needed as part of theSUBSCRIBEcall.MESOS_DIRECTORY: Path to the working directory for the executor on the host filesystem (deprecated).MESOS_SANDBOX: Path to the mapped sandbox inside of the container (determined by the agent flagsandbox_directory) for either mesos container with image or docker container. For the case of command task without image specified, it is the path to the sandbox on the host filesystem, which is identical toMESOS_DIRECTORY.MESOS_DIRECTORYis always the sandbox on the host filesystem.MESOS_AGENT_ENDPOINT: Agent endpoint (i.e., ip:port to be used by the executor to connect to the agent).MESOS_CHECKPOINT: If set to true, denotes that framework has checkpointing enabled.MESOS_EXECUTOR_SHUTDOWN_GRACE_PERIOD: Amount of time the agent would wait for an executor to shut down (e.g., 60secs, 3mins etc.) after sending aSHUTDOWNevent.MESOS_EXECUTOR_AUTHENTICATION_TOKEN: The token the executor should use to authenticate with the agent. When executor authentication is enabled, the agent generates a JSON web token (JWT) that the executor can use to authenticate with the agent's default JWT authenticator.
If MESOS_CHECKPOINT is set (i.e., if framework checkpointing is enabled), the following additional variables are also set that can be used by the executor for retrying upon a disconnection with the agent:
MESOS_RECOVERY_TIMEOUT: The total duration that the executor should spend retrying before shutting itself down when it is disconnected from the agent (e.g.,15mins,5secsetc.). This is configurable at agent startup via the flag--recovery_timeout.MESOS_SUBSCRIPTION_BACKOFF_MAX: The maximum backoff duration to be used by the executor between two retries when disconnected (e.g.,250ms,1minsetc.). This is configurable at agent startup via the flag--executor_reregistration_timeout.
NOTE: Additionally, the executor also inherits all the agent's environment variables.
Disconnections
An executor considers itself disconnected if the persistent subscription connection (opened via SUBSCRIBE request) to "/executor" breaks. The disconnection can happen due to an agent process failure etc.
Upon detecting a disconnection from the agent, the retry behavior depends on whether framework checkpointing is enabled:
- If framework checkpointing is disabled, the executor is not supposed to retry subscription and gracefully exit.
- If framework checkpointing is enabled, the executor is supposed to retry subscription using a suitable backoff strategy for a duration of
MESOS_RECOVERY_TIMEOUT. If it is not able to establish a subscription with the agent within this duration, it should gracefully exit.
Agent Recovery
Upon agent startup, an agent performs recovery. This allows the agent to recover status updates and reconnect with old executors. Currently, the agent supports the following recovery mechanisms specified via the --recover flag:
- reconnect (default): This mode allows the agent to reconnect with any of it's old live executors provided the framework has enabled checkpointing. The recovery of the agent is only marked complete once all the disconnected executors have connected and hung executors have been destroyed. Hence, it is mandatory that every executor retries at least once within the interval (
MESOS_SUBSCRIPTION_BACKOFF_MAX) to ensure it is not shutdown by the agent due to being hung/unresponsive. - cleanup: This mode kills any old live executors and then exits the agent. This is usually done by operators when making a non-compatible agent/executor upgrade. Upon receiving a
SUBSCRIBErequest from the executor of a framework with checkpointing enabled, the agent would send it aSHUTDOWNevent as soon as it reconnects. For hung executors, the agent would wait for a duration of--executor_shutdown_grace_period(configurable at agent startup) and then forcefully kill the container where the executor is running in.
Backoff Strategies
Executors are encouraged to retry subscription using a suitable backoff strategy like linear backoff, when they notice a disconnection with the agent. A disconnection typically happens when the agent process terminates (e.g., restarted for an upgrade). Each retry interval should be bounded by the value of MESOS_SUBSCRIPTION_BACKOFF_MAX which is set as an environment variable.